Advertisement
®
DR
SELF-FEEDING WOOD CHIPPER
SAFETY & OPERATING INSTRUCTIONS
Model:
Premier 375
Serial No.
Order No.
Read and understand this manual and all instructions before operating or servicing this DR SELF-FEEDING WOOD CHIPPER.
DR Power Equipment
Toll-free phone: 1-800-DR-OWNER (376-9637)
Website: www.DRpower.com
Advertisement

Related Manuals for DR Premier 375


Summary of Contents for DR Premier 375
- Page 1 SELF-FEEDING WOOD CHIPPER SAFETY & OPERATING INSTRUCTIONS Model: Premier 375 DR Power Equipment Serial No. Toll-free phone: 1-800-DR-OWNER (376-9637) Order No. Website: www.DRpower.com Read and understand this manual and all instructions before operating or servicing this DR SELF-FEEDING WOOD CHIPPER.
-
Page 2: Table Of Contents
Additional Information and Potential Changes DR Power Equipment reserves the right to discontinue, change, and improve its products at any time without notice or obligation to the purchaser. The descriptions and specifications contained in this manual were in effect at printing. Equipment described within this manual may be optional. -
Page 3: Chapter 1: General Safety Rules
Labels Your DR SELF-FEEDING WOOD CHIPPER carries prominent labels as reminders for its proper and safe use. Shown below are copies of all the safety and operation labels that appear on the equipment. Take a moment to study them and make a note of their location on your DR SELF-FEEDING WOOD CHIPPER as you assemble and before you operate the unit. - Page 4 Pictogram Descriptions This label indicates proximity to machine openings with rotating blades Keep bystanders 50 feet away from inside. your work area at all times. Wood chips exit the chipper at great speeds. SERIOUS INJURY OR DEATH will occur To be safe, do not operate the machine if hands, feet, or any part of your body near small children or pets, and never are placed in the chipper hopper,...
- Page 5 Never, under any conditions, remove, bend, cut, fit, weld, or otherwise alter standard parts on the DR SELF-FEEDING WOOD CHIPPER. This includes all shields and guards. Modifications to your machine could cause personal injuries and property damage and will void your warranty.
- Page 6 Be alert and turn the machine off if children or pets enter the work area. Never allow children to operate the DR SELF-FEEDING WOOD CHIPPER. Safety with Gasoline - Powered Machines Gasoline is a highly flammable liquid. Gasoline also gives off flammable vapor that can be easily ignited and cause a fire or explosion.
- Page 7 Keep in mind that the operator or user is responsible for accidents or hazards occurring to other people, their property, and themselves. Your DR SELF-FEEDING WOOD CHIPPER is a powerful tool, not a plaything. Exercise extreme caution at all times. The design of this machine is to chip wood. Do not use it for any other purpose. ...
- Page 8 Under California law, and the laws of some other states, you are not permitted to operate an internal combustion engine using hydrocarbon fuels without an engine spark arrester. This also applies to operation on US Forest Lands. All DR SELF-FEEDING WOOD CHIPPERS shipped to California, New Mexico and Washington State are provided with spark arresters.
-
Page 9: Chapter 2: Setting Up The Dr Self-Feeding Wood Chipper
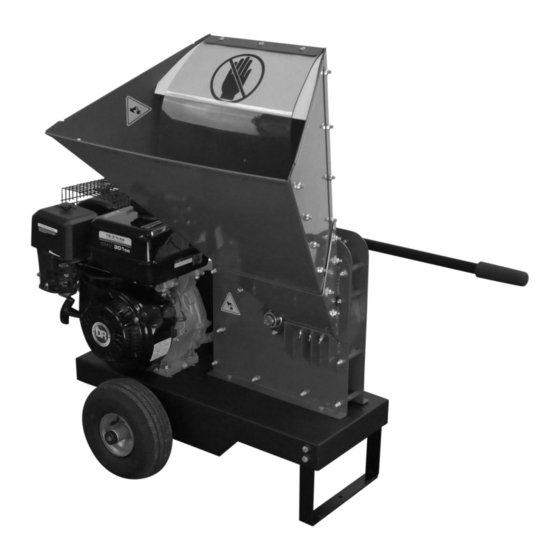
This chapter outlines assembly and a few simple steps you will need to follow to set up your new machine before you use it. It may be helpful to familiarize yourself with the controls and features of your DR SELF-FEEDING WOOD CHIPPER as shown in Figure 1 If you have any questions at all, please feel free to contact us at www.DRpower.com... - Page 10 Hopper Opening at Top 23-1/2" x 15-3/4" Machine Weight 190 Lbs Assembly Parts Identification Parts Supplied in Crate: DR SELF-FEEDING WOOD CHIPPER Hopper Assembly Pin-Hitch Package (if ordered, see Chapter 6 “Chipper Accessories”) Parts Supplied in Box: ...
- Page 11 - IMPORTANT FIRST STEP ! - Chipper Knife Setting the Gap between Knife and Wear Plate Flywheel BEFORE you begin assembling the Chipper, you must set the clearance between the Knife and Wear Plate to 1/16" (Figure 3) by using the Knife Gap Gauge. First remove the Knife Gap Gauge that has been installed temporarily under the Wear Plate as described below.
- Page 12 ® SELF-FEEDING WOOD CHIPPER...
- Page 13 Attaching the Hopper Assembly Housing Note: We recommend that you have someone help you lift the Hopper in place and Studs support it until it is secured to the Chipper. Tools Needed: Two 1/2" Wrenches Shipping Nuts on Housing Bolts Remove the two shipping nuts, but leave the Housing Bolts loosely in place (Figure 6).
- Page 14 Note: This procedure applies to an Engine that it is shipped from the factory with no oil. Checking and adding oil after the machine has been filled for the first time is described in Chapter 4 "Maintaining the DR SELF-FEEDING WOOD CHIPPER" Place the machine on a level surface and remove the Dipstick (clean the end of the Dipstick with a rag) (Figure 9).
-
Page 15: Chapter 3: Operating Your Dr Self-Feeding Wood Chipper
Chipper Knife (by removing only the Front Knife Access Cover). At engine start-up, the engine of your DR CHIPPER operates under no load until approximately 1000 RPM, at which speed the Centrifugal Clutch engages and begins driving the Rotor Assembly. Always operate the Engine at full speed when chipping. - Page 16 Use ear protectors or ear plugs rated for at least 20 dba to protect your hearing. The chipper hopper must be securely bolted to your DR SELF-FEEDING WOOD CHIPPER and the blowback shield in place before using the machine! ...
- Page 17 Starting the Engine Ensure that the Fuel Shut-Off Valve is in the “ON” position (Figure 13). Choke Control Move the Choke Control Lever to the “CHOKE” position if the engine is Lever cold (Figure 15). Leave it in the RUN position if the engine is already warm. Move the Throttle Control Lever to about half way between Slow and Fast position (Figure 16).
- Page 18 Moving the DR SELF-FEEDING WOOD CHIPPER The DR SELF-FEEDING WOOD CHIPPER can be easily moved using the Transport Handle. The Chipper can also be moved by a tractor with the optional Pin-Hitch Package installed. Never try to pick up, move, or transport the machine while the engine is Transport running, or the flywheel is turning.
-
Page 19: Chapter 4: Maintaining The Dr Self-Feeding Wood Chipper
Chapter 4: Maintaining the DR SELF-FEEDING WOOD CHIPPER This chapter covers regular maintenance procedures that will ensure the best performance and long life of your DR SELF- FEEDING WOOD CHIPPER. For engine maintenance, please refer to the Engine Owner’s Manual that came with your machine. - Page 20 Grease Fittings Your DR SELF-FEEDING WOOD CHIPPER was greased at the Factory. The operator needs to periodically lubricate the two Bearings of the Chipper Assembly. Tools and Supplies needed: Flexible hose grease gun Lithium grease Clean cloth ...
- Page 21 Removing, Replacing and Adjusting the Drive Belt Locknut and Washer Use only DR belts on your machine. The belts have been thoroughly tested and proven for many hours of use. Belt Guard Tools Needed: Tape Measure Two 1/2" Wrenches ...
- Page 22 Inspecting the Chipper Knife and Wear Plate Routine inspection of the Chipper Knife and Wear Plate will ensure that your DR SELF-FEEDING WOOD CHIPPER is operating at full efficiency (see “Regular Maintenance Checklist” at the beginning of this Chapter). Operating with a worn or damaged Chipper Knife or Wear Plate will cause extreme stress and vibration to the machine and make chipping difficult for the operator.
- Page 23 If the Knife has visible nicks or damage it must be sharpened or replaced Hopper Spacer (see “Removing and Replacing the Chipper Knife” in this chapter). Assembly If the Knife does not appear to have any damage, replace the Access Cover and tighten the Locknuts.
- Page 24 Rotate the Flywheel using a long stick until the three countersunk Allen Screws and Lock Nuts attaching the Knife to the Flywheel are visible through the Access Cover and Hopper openings (Figure 33 and 34). Flywheel Clean out the heads of the Allen Screws with an Awl or Sharp Tool. Insert a 3/16”...
- Page 25 If you detect any of these, inspect the machine for damage, or any loose parts. Repair or replace any damaged parts and tighten any loose parts before starting the DR SELF-FEEDING WOOD CHIPPER.
- Page 26 Chipper Knife Sharpening You should never attempt to sharpen the Chipper Knife freehand. It is extremely important to consistently maintain the 45-degree angle for proper performance (Figure 39). Chipper Knife Excessive heat generated during the sharpening process will damage Knives and weaken the metal.
- Page 27 Wear Plate. Removing and Replacing the Wheels The Wheels on the DR SELF-FEEDING WOOD CHIPPER are pneumatic and have pressed in Bearings for easy transport. With use, tires or Bearings may need replacing. The following procedures will explain the replacement procedures.
- Page 28 The Clutch obtains its power from the Engine RPM. The lower the engagement speed, and the higher the maintained Engine speed, the more torque the Clutch can transfer to the driven unit. NEVER operate the DR SELF-FEEDING WOOD CHIPPER Engine at less than full RPM when chipping.
- Page 29 Replacing the Clutch Assembly Note: If a Clutch part malfunctions, it could jeopardize the integrity of other Clutch components. If you have problems with the Clutch, a Clutch Kit is available, but we recommend replacing your Clutch as a complete assembly. Tools and Supplies Needed: ...
-
Page 30: Chapter 5: Troubleshooting
Does your engine have the right amount of clean oil? If it’s dirty, change it following the procedure in Chapter 4. If your engine still lacks power, contact us at www.DRpower.com or call 1(800) DR-OWNER (376-9637) for assistance. - Page 31 Knife and tighten the screws. Also, check the Knife to Wear Plate Gap. See Chapter 4. If the machine still exhibits excessive vibration, contact us at www.DRpower.com or call 1(800) DR-OWNER (376-9637) for assistance. When chipping, the log The Knife is dull; sharpen or replace it. See Chapter 4.
-
Page 32: Chapter 6: Parts List And Schematic Diagrams
Chapter 6: Parts List and Schematic Diagrams Parts List - Chipper Basic Assembly Note: Part numbers listed are available through DR Power Equipment. Ref# Part# Description Ref# Part# Description 10000023310 Flywheel, Balanced, W/Knife 112381 Washer, Flat, 1/4" , SAE 10000043433... - Page 33 Schematic - Chipper Basic Assembly CONTACT US AT www.DRpower.com...
- Page 34 Parts List – Base and Wheels Assembly Note: Part numbers listed are available through DR Power Equipment. Ref# Part# Description Ref# Part# Description 123211 Bolt, HCS, 5/16-18 x 3/4" 10000043469 Stand, Front 110761 Nut, Nylon Lock, 5/16-18 A0001222667 Guard, Belt...
- Page 35 Schematic – Base and Wheels Assembly CONTACT US AT www.DRpower.com...
- Page 36 Parts List – Hopper Assembly Note: Part numbers listed are available through DR Power Equipment. Ref# Part# Description Ref# Part# Description 10000043444 Hopper Bottom 10000043561 Shield, Blow Back 10000043481 Hopper, Side, LH 10000043449 Support, Blow Back 10000043485 Hopper Neck 112381 Washer, Flat, 1/4", SAE...
- Page 37 Schematic – Hopper Assembly CONTACT US AT www.DRpower.com...
- Page 38 Parts List – Drive Assembly Note: Part numbers listed are available through DR Power Equipment. Ref# Part# Description Ref# Part# Description 10000038394 Engine, DR 9.2 HP, 303cc, M/S 134431 Bolt, HCS, 5/16-18 x 1-1/2", GR5 R300 10000043530 Handle 150451 Bolt, HCS, 5/16-18 X 1 3/4", GR 5 10000043805 Grip, Handle 1"...
- Page 39 Schematic – Drive Assembly CONTACT US AT www.DRpower.com...
- Page 40 Notes: ® SELF-FEEDING WOOD CHIPPER...
- Page 41 Notes: CONTACT US AT www.DRpower.com...
- Page 42 ® SELF-FEEDING WOOD CHIPPER...
- Page 43 SELF-FEEDING WOOD CHIPPER is fit for ordinary purposes for which a product of this type is used. DR Power Equipment however, limits the implied warranties of merchantability and fitness in duration to a period of two (2) years in consumer use, ninety (90) days for any other use.
- Page 44 Daily Checklist for the DR SELF-FEEDING WOOD CHIPPER DR SELF-FEEDING WOOD CHIPPER To help maintain your for optimum performance, we recommend you follow this checklist each time you use your Chipper. The flywheel will still rotate for A WHILE after the engine is shut off. Shut down the engine, wait for all moving parts to come to a complete stop, remove spark plug wire, then wait 5 minutes before moving or working on the chipper.