Table of Contents
Advertisement
Quick Links
v
Before use please read & understand this manual; paying particular attention to the safety instructions before use.
Whilst every eff ort has been made to ensure the accuracy of information contained in this manual, our policy of continuous improvement
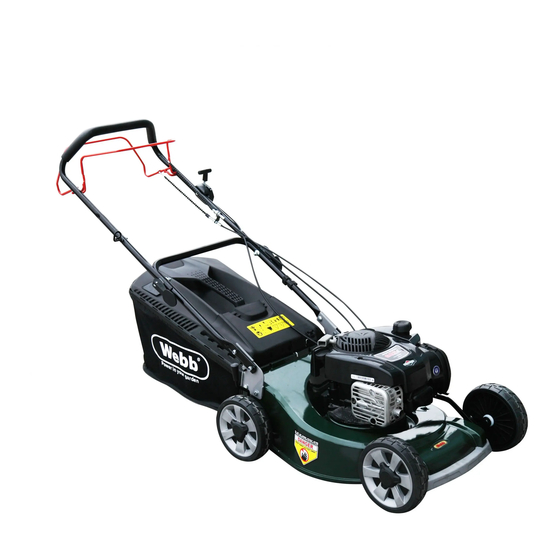
48cm (19") Self-Propelled Petrol
53cm (21") Self-Propelled Petrol
en - Original Instructions
ASSEMBLY REQUIRED
Minimum Two Persons
Save these instructions
Sales & Support: 01793 333212
Incorrect use of the product could put the operator or machine in danger.
determines the right to make modifi cations without prior warning.
Images are used for illustration purposes only.
Lawnmower
WER19ALSP
1938290001
Lawnmower
WER21ALSP
1938291001
Advertisement
Table of Contents

Related Manuals for Webb WER19ALSP


Summary of Contents for Webb WER19ALSP
- Page 1 48cm (19”) Self-Propelled Petrol Lawnmower WER19ALSP 1938290001 53cm (21”) Self-Propelled Petrol Lawnmower WER21ALSP 1938291001 en - Original Instructions ASSEMBLY REQUIRED Minimum Two Persons Save these instructions Sales & Support: 01793 333212 Before use please read & understand this manual; paying particular attention to the safety instructions before use.
- Page 2 INSTRUCTION MANUAL 5 January 21 Copyright Notice Copyright © Handy Distribution Permission is granted to reproduce this publication for personal & educational use only. Commercial copying, redistribution, hiring or lending is prohibited. No part of this publication may be stored in a retrieval system or transmitted in any other form or means without written permission from Handy Distribution.
-
Page 3: Table Of Contents
CONTENTS INTENDED USE SAFETY INSTRUCTIONS SPECIFICATIONS KNOW YOUR MACHINE ASSEMBLY OPERATION MAINTENANCE, CLEANING & STORAGE TROUBLE SHOOTING PARTS DIAGRAM & LIST DECLARATION OF CONFORMITY WARRANTY INTENDED USE This machine is to be used exclusively for cutting natural grass in private homes and hobby gardens. Never use the mower for other purposes. -
Page 4: Safety Instructions
INSTRUCTION MANUAL SAFETY INSTRUCTIONS Read and understand the owner’s manual and labels affixed to the machine. Learn its application and limitations as well as the specific potential hazards. Retain these instructions for future reference. The operator is responsible for following the warnings & instructions in this manual and on the product. Read &... - Page 5 − Before releasing blockages, inspecting, cleaning or working on the machine. − After hitting an obstruction. Search for damage on the machine & make repairs as necessary. If the machine starts vibrating unusually, it should be inspected by an Approved Webb Service Dealer.
- Page 6 INSTRUCTION MANUAL 15. Switch the engine off: − If you remove blockages from the machine. − Before refueling. WORK AREA 1. Keep work area clean and well lit. Cluttered and dark areas invite accidents. 2. Check the landscape where the machine will be used and remove all objects such as stones, toys, sticks and wires, which could be caught and thrown away from the work area.
- Page 7 11. Maintain your machine. Check for misalignment or binding of moving parts, breakage of parts & any other condition that may affect the operation. If damaged, have the machine repaired by an Approved Webb Service Dealer immediately. Many accidents are caused by poorly maintained machines.
-
Page 8: Specifications
INSTRUCTION MANUAL SPECIFICATIONS Model WER19ALSP WER21ALSP Product Number 1938290001 1938291001 Working Width 480mm (19”) 530mm (21”) Drive Type Self-Propelled Self-Propelled Cutting Heights 25-90mm - 8 levels 25-90mm - 8 levels Collector Capacity Deck Aluminium Aluminium B&S 625EXi B&S 675EXi Engine... -
Page 9: Know Your Machine
KNOW YOUR MACHINE - WER19ALSP 1. Self-Propelled Lever 2. Handle Soft Grip 3. Upper Handle 4. OPC/Brake Lever 5. Quick Release Handle 6. Lower Handle 7. 60L Grass Collector 8. Air Filter Housing 9. Single Height Adjuster Lever 10. Rear Wheel 11. - Page 10 INSTRUCTION MANUAL KNOW YOUR MACHINE - WER21ALSP 1. Self-Propelled Lever 2. Handle Soft Grip 3. Upper Handle 4. OPC/Brake Lever 5. Quick Release Handle 6. Lower Handle 7. 60L Grass Collector 8. Air Filter Housing 9. Single Height Adjuster Lever 10.
-
Page 11: Assembly
ASSEMBLY ASSEMBLY/PRE-OPERATION This manual gives instructions on the correct assembly and safe use of your machine. It is important that you read these instructions carefully. If necessary, obtain assistance to remove from packaging, take care when carrying the mower to the lawn, as the blades are sharp. REMOVE LAWN MOWER FROM CARTON Roll the lawn mower out of the carton and check thoroughly for additional loose parts. - Page 12 INSTRUCTION MANUAL CABLE TIDY 1. Place the cable tidy over the handle assembly and house the cables into the tidy. RECOIL STARTER HANDLE 1. To ease starting of the machine, the recoil starter handle can be housed on the handle assembly. 2.
- Page 13 GRASS COLLECTOR ASSEMBLY 1. Assemble the grass collector and tongue to one another using fixings supplied. FITTING 1. Lift the grass collector flap up, so that it opens past the handle assembly. Hold in position and place the grass collector hooks over the springs and place into position. 2.
- Page 14 INSTRUCTION MANUAL MULCH PLUG (WER21ALSP ONLY) NOTE: Mulching stops collection of grass into the rear collector. You will find the mulch plug loose in the carton or fitted to the machine. If the mulch plug is not located in the carton, lift the grass collector flap at the rear of the machine and remove the mulch plug.
- Page 15 REAR DISCHARGE 1. Lift the grass collector flap up, so that it opens past the handle assembly. Hold in position and remove to grass collector. 2. Lower the grass collector flap to sit against the rear of the cutting deck. Rear discharging means that your cuttings will disperse from the back of the machine.
-
Page 16: Operation
INSTRUCTION MANUAL OPERATION FUEL & OIL WARNING YOUR MACHINE IS SUPPLIED WITHOUT ENGINE OIL OR PETROL Operating the engine with insufficient oil, can have catastrophic consequences. Any failure caused by insufficient oil, will not be covered by the manufacturer’s warranty. READ THE SUPPLIED BRIGGS &... - Page 17 ENGINE OIL 1. Remove the oil filler cap with built in dipstick. Oil Filler 2. Fill the engine with 4-stroke SAE30 or 10W/30 air cooled lawnmower engine oil. DO NOT USE automotive or marine oil. The use of a funnel will aid the filling. The engine capacity is 0.47L. 3.
- Page 18 INSTRUCTION MANUAL ENGINE STARTING & STOPPING PROCEDURE (NOTE: STARTING AN ENGINE WITHOUT ENGINE OIL OR FUEL CAN SERIOUSLY DAMAGE THE MACHINE) STARTING THE ENGINE (COLD) 1. Push the throttle lever to its furthest point, away from the operator. 2. Pull the OPC/Brake lever towards the main handle. Do not let go. 3.
- Page 19 6. Move the throttle lever back to your required blade rotation speed between the Tortoise/Slow and Hare/Fast symbols. 7. If the engine does not start, run through from step 2 again. NOTE: If the engine won’t start after you have operated the starter several times, the engine may be flooded with excess fuel.
- Page 20 INSTRUCTION MANUAL 3. Grab the recoil starter handle and pull lightly until resistance is felt, then pull rapidly. 4. The engine should start. 5. Rehouse the recoil starter handle. Do not let it go until housed to prevent damage. 6. Move the throttle lever back to your required blade rotation speed between Tortoise/Slow and Hare/Fast symbols.
- Page 21 SELF-PROPELLED To self-propel your lawnmower, 1. Start the engine as stated above. 2. Push the drive lever up to the main handle. The lawnmower will start to move with the engine running and blade rotating. It is easier to manually push the machine a couple of steps and then engage the self- propelled motion to ensure the grass is not damaged and the machine does not take off, away from the user suddenly.
- Page 22 INSTRUCTION MANUAL MOWING WITH THE SIDE DISCHARGE CHUTE NOTE : When using the side discharge function. Remove the grass collector and plug the mulch plug into the rear of the machine. Unlock the side discharge cover and lift. Hook in the side discharge chute. Allow the side discharge cover to secure onto the side discharge chute into position.
-
Page 23: Maintenance, Cleaning & Storage
is damaged. Take the machine to a local Approved Service Dealer for inspection if necessary. Repairs of this nature are not covered under the Manufacturer’s warranty. If the mower vibrates in an abnormal way, find the reasons why, and take your mower to a local Approved Service Dealer. - Page 24 INSTRUCTION MANUAL WARNING Periodically inspect the blade adaptor for cracks, especially if you strike a foreign object. Replace where necessary When sharpening the blade, follow the original angle of grind as a guide. It is extremely important that each cutting edge receives an equal amount of grinding to prevent an unbalanced blade. An unbalanced blade will cause excessive vibration when rotating at high speeds.
- Page 25 ALWAYS REFER TO THE BRIGGS & STRATTON OPERATORS MANUAL FOR FULL AND COMPLETE INSTRUCTIONS FOR ENGINE MAINTENANCE. REMOVE ENGINE OIL CAUTION Used oil is a hazardous waste product and must be disposed of properly. Do not discard with household waste. Check with your local authorities, service center, or dealer for safe disposal/recycling facilities. WARNING Before draining any oil, ensure the fuel tank is empty.
- Page 26 INSTRUCTION MANUAL SPARK PLUG To ensure proper engine operation, the spark plug must be properly gapped and free of deposits. 1. Do not attempt to remove the plug from a hot engine in order to avoid possible damage to the threads. 2.
- Page 27 STORAGE & TRANSPORT The following steps should be taken to prepare your machine for storage. STORING THE LAWNMOWER FOR SHORT PERIODS The lawnmower can be stored for short periods of time (less than 15 days) without performing any storage maintenance.Before placing the lawnmower into storage always carry out the following: Allow the engine to fully cool.
-
Page 28: Trouble Shooting
INSTRUCTION MANUAL TRANSPORT • Empty the petrol tank Always let the engine run until it has used up the remainder of petrol in the tank. • • Empty the engine oil from the warm engine. • Remove the spark plug boot from the spark plug. •... - Page 29 Please find on the following pages, parts lists and drawings for your machine. Should you require a replacement part, please call the Handy Distribution Spares Team on 01793 333212, option 1 for assistance. Webb recommends the use of Handy Parts oils, fuel additives, nylon lines pre-packed parts for all our machines.
-
Page 30: Parts Diagram & List
INSTRUCTION MANUAL PARTS DIAGRAM & LIST - WER19ALSP (1938290001) - Page 32 INSTRUCTION MANUAL...
- Page 34 INSTRUCTION MANUAL PARTS DIAGRAM - WER21ALSP (1938291001)
- Page 35 PARTS LIST - WER21ALSP (1938291001)
- Page 36 EC DECLARATION OF CONFORMITY Designation: Petrol Self-Propelled 480mm Alloy Deck Lawnmower Model(s): WER19ALSP Product No.: 1938290001 Type/Serial No. As per rating label on machine Engine Displacement: 150 cm Rated Engine Power: 2.31kW Rated Engine Speed: 2900rpm/min Complies with the following directives:...
- Page 37 EC DECLARATION OF CONFORMITY Designation: Petrol Self-Propelled 530mm Alloy Deck Lawnmower Model(s): WER21ALSP Product No.: 1938291001 Type/Serial No. As per rating label on machine Engine Displacement: 163 cm Rated Engine Power: 2.67kW Rated Engine Speed: 2900rpm/min Complies with the following directives: Machinery Directive 2006/42/EC The conformity assessment procedure followed was in accordance with EN ISO 5395-1:2013/A1:2018;...
- Page 38 INSTRUCTION MANUAL This Service Book is provided with your Webb, to help you look after your purchase to our recommendations and enable you to take advantage of the conditional manufacturer domestic warranty*. Present this service book to your authorised Webb repair dealer, whenever a service or a warranty appraisal is required.
- Page 39 2. Period of Warranty - valid from 1 January 2020 Webb (excludes Dynamic, Legacy & Heritage), 2 year conditional warranty from the original date of sale to the fi rst domestic user.
-
Page 40: Warranty
It is the owner’s responsibility to ensure that their Webb machine is maintained at specifi c intervals. Any approved Webb service dealer can undertake a service, which are specialised in our products and will be aware of your particular machine and any technical updates which will save valuable time &... - Page 41 Your servicing Webb approved dealer will stamp & date the below relevant sections, when the correct service actions have been completed. PLEASE ENSURE THE SERVICE BOOK IS AVAILABLE FOR THE DEALER, DURING SERVICE WORK. 1st Service This must be stamped by an approved service dealer to qualify for a free second year warranty.
- Page 42 Service Record INSTRUCTION MANUAL 48 Months 60 Months Date Date 72 Months 84 Months Date Date 96 Months 108 Months Date Date 120 Months 132 Months Date Date...
- Page 43 Email From time to time Webb, its associated companies, authorised dealers or third parties working on our behalf may wish to contact you regarding our products, services, off ers or just opinions, which may be used for marketing, research or analysis purposes.
- Page 44 Webb Lawnmowers Murdock Road Dorcan Swindon Wiltshire SN3 5HY...
Need help?
Do you have a question about the WER19ALSP and is the answer not in the manual?
Questions and answers
Which way can you turn mower to inspect blade when it’s got oil and petrol in it
To safely turn a Webb WER19ALSP mower to inspect the blade:
1. Empty the fuel tank: Run the engine until it stops from lack of fuel to prevent leaks and fire risk.
2. Turn off the engine.
3. Remove the spark plug to prevent accidental starting.
4. Drain the oil from the oil filler neck before tilting the mower.
This prevents fuel or oil leakage and reduces the risk of fire, explosion, or engine damage.
This answer is automatically generated