Table of Contents

Related Manuals for claber TEMPO HYBRID 8487


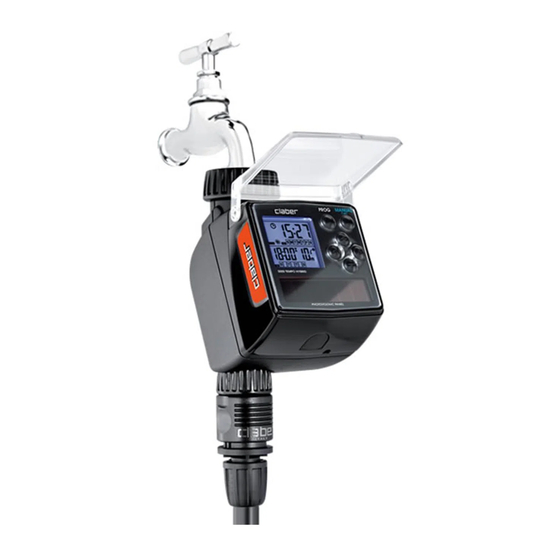
Summary of Contents for claber TEMPO HYBRID 8487
- Page 1 TEMPO HYBRID 8487 INSTALLATION: Install the water timer outside, in a bright area, avoiding any areas which are in shade or dark. Install the water timer outside, in a bright area, avoiding any areas which are in shade or dark.
- Page 2 Fit the timer to a cold water tap. The spout of the tap should have a 3/4" male thread (if not, use an adaptor). Screw the clamp collar of the 3/4" female fitting onto the tap. Caution: tighten the collar using hand pressure only.
-
Page 3: Fitting The Battery
Connect the hose on the watering line. FITTING THE BATTERY: The timer uses mainly light as energy to operate. For the backlit display to switch on or when there is insufficient light (e.g. after a few days of rain), the backup AA 1.5V alkaline battery (not included) is used automatically to ensure the timer works correctly. - Page 4 The water timer is protected against reverse polarity of the battery and automatically checks the battery level. When the battery is flat: ● if any key is pressed (for example, display back lighting), programming is suspended. To restore programming, replace the battery ●...
-
Page 5: Programming Page
Refit the water timer by joining the two parts until you hear the "click" of the coupling of the side key. TIME/DATE PAGE: 1) Rain Sensor rain indicator full 2) Power source indicator 3) Rain Sensor/ timer battery indicators 4A) PLUS mode on: watering cycles start up on odd days (1) or on even days (2). If PLUS is off no numbers appear 4B) Days of the week when watering starts 5) Information about time, run time, start time of next watering cycle (if watering is in progress,... -
Page 6: Initial Configuration
9) Total run time of all watering cycles for the week 10) Program start time 11) Program run time 12) Program number 13) Days on which program starts up (1 or 2 is shown if the PLUS function is on) The days are shown as: S Sunday, M Monday, T Tuesday, W Wednesday, T Thursday, F Friday, S Saturday. - Page 7 Press and hold the arrow keys at the same time until the message set appears on the display followed by the flashing message 24h. 12-hour or 24-hour clock option. Press the - button to choose whether to set the clock to 12-hour or 24-hour format.
- Page 8 HOUR setting. Press the right arrow key to access the HOUR setting (the number flashes to indicate that a value needs to be entered). Press the + and - keys to set the value (in the example, 18:00). MINUTE setting. Press the right arrow key to access the MINUTE setting (the number flashes to indicate that a value needs to be entered).
- Page 9 DATE setting. Press the right arrow key to access the DATE, if you have chosen the 24-hour clock, the values will be displayed in the format day-month-year; if you have chosen the 12-hour clock, the values will be displayed in the format month-day-year. These values are set in same way as described for the HOUR and MINUTES.
- Page 10 Press the right arrow key to go back to the TIME page. PROGRAMMING WATERING: Press any key to access the backlit display. Press the button shown to scroll through the programming pages for the 4 available programs until the number of the program you want to set shows in the bottom right corner (e.g.
- Page 11 After having set the start time, press the right arrow key to access the RUN TIME setting for the watering program. The timer automatically sets a run time of 10 minutes which can be changed from a minimum of 5 seconds to a maximum of 90 minutes. Press the + and - keys to set the required run time (e.g.
- Page 12 Press the right arrow button to access the irrigation day settings. If the PLUS function is ON, the timer automatically sets the watering cycle for even days (ON 2) or odd days (ON 1). If the PLUS function is OFF, set the days of the week you want each program to run. The days are shown as: S Sunday, M Monday, T Tuesday, W Wednesday, T Thursday, F Friday, S Saturday.
- Page 13 Set all subsequent programs in the same way. The top display shows the total of all the watering RUN TIMES for the programs set for the week (e.g. 4 hour and 40 minutes). From the page with backlit display active and once all the required programs have been set, it is possible to display the settings of each program (the program number appears in the bottom right) and change them if necessary (as indicated in the previous pages).
-
Page 14: Manual Watering
Time page. After programming, the display goes back to the time page. On the time page, at the bottom of the display, you can see the start time, run time of the next programmed irrigation cycle (in the example: 10 pm for 30 minutes) and the irrigation days. Watering in progress page. - Page 15 Press any key to access the backlit display. Press and hold the button shown until the screen in the figure is displayed. Press the keys + or - to set the required run time. Manual operation automatically suggests 15 minutes, which can be changed to between 5 seconds and 90 minutes (in the example, 20 minutes ).
-
Page 16: Delete A Program
To interrupt manual watering early, turn the timer to OFF (left arrow) and press the button shown for 3 seconds. This additional watering does not affect the programming which has already been set. DELETE A PROGRAM: To delete a program, simply set the start time to OFF (watering NOT active). RESETTING THE TIMER:... -
Page 17: Rain Sensor
To reset the settings, press the arrow keys for at least 10 seconds. The message SET will appear, then 24h and finally all the symbols will activate. At this point the two keys can be released and the reset has been carried out and you will need to set the timer again. - Page 18 Remove the protective jumper from the rain sensor contacts (no tools are needed). If the Rain Sensor is not going to be used, the jumper must remain in place across the contacts. Fit the connector of the sensor lead. Check that the two-core cable enters the timer by way of the slot provided in the rear of the housing.
-
Page 19: Cleaning And Maintenance
RF RAIN SENSOR ( 90831): Remove the protective jumper from the rain sensor contacts (no tools are needed). If the Rain Sensor is not going to be used, the jumper must remain in place across the contacts. Install the RF Rain Sensor Interface (8480), routing the wire antenna through the relative clips. CLEANING AND MAINTENANCE:... - Page 20 Clean the filter at the end of each season and check it regularly. Turn off the water tap. Loosen the 3/4" screw collar of the tap connector, turning clockwise. Remove the filter. Rinse the filter clean under running water. After washing, reassemble all parts as before.
- Page 21 At the end of the season, before the winter frosts, disconnect the timer from the tap. Remove the batteries. Store it in a closed environment, away from damp, where the temperature does not fall below 37 °F.
Need help?
Do you have a question about the TEMPO HYBRID 8487 and is the answer not in the manual?
Questions and answers