
Related Manuals for Acrosser Technology AAD-C622A Series


Summary of Contents for Acrosser Technology AAD-C622A Series
- Page 1 AAD-C622AX AAD-C622AX Series ® Intel XEON Cascade Lake In-Vehicle Server • Cascade Lake, 5x PCIe[x16] Exp. Slots • Air Cooling System User Manual Acrosser Technology Co., Ltd. www.acrosser.com...
- Page 2 Acrosser Technology Co., Ltd. In no event will Acrosser Technology Co., Ltd. be liable for direct, indirect, special, incidental, or consequential damages arising out of the use or inability to use the product or documentation, even if advised of the possibility of such damages.
-
Page 3: Table Of Contents
AAD-C622AX Table of Contents 1. System Introduction ..............5 1.1. Specifications ......................5 1.2. Package Contents ...................... 8 1.3. System Dissection ...................... 9 1.3.1. Dimensions ..................... 9 1.3.2. Front I/O Panel ....................11 1.3.3. Rear I/O Panel ....................15 2. Components Assembly ............... 17 2.1. - Page 4 Q 4. How to active the second SIM card SIMCOM SIM8202G 5G ? ......72 Q 5. How to switch over Sierra Module Dual SIM Setting ? ..........73 Q 6. How to run the GPS funtion in both 4G and 5G networks ? ........76 Acrosser Technology Co., Ltd.
-
Page 5: System Introduction
AAD-C622AX System Introduction AAD-C622AX is an in vehicle server which designed for autonomous vehicle developer for collecting data sets, improving self driving algorithm and build up high definition map. This in vehicle server feature with Intel 2nd Gen. Xeon SP processor, a server graded CPU, that can support multi-core with hyper threading. - Page 6 • 12V DC-in power input: 1x 2pin (12v DC to ATX power 1000W) • 24/48V DC-in power input: USA terminal block (2x 24v / 48V DC to ATX power) Ignition Pin • Ignition Connector: 1x 3-pin terminal block Acrosser Technology Co., Ltd.
- Page 7 AAD-C622AX Other Features Audio • 3x Audio Jack: (on-board is the master) Green: Audio Out Blue: Remote Switch Pink: Mic In CMOS Clear Button • RTC (+/- 2 seconds for 24 hours) • Lithium Battery (3V) for CMOS data backup Hardware Monitoring •...
-
Page 8: Package Contents
Check if the following items are included in the package. Item Q’ty AAD-C622AX (A1 or A2) � System Driver CD � Screw Pack � Bracket � Rubber � Ignition Terminal Block � M12 GbE Cable � GPU Card Retaining Set � Acrosser Technology Co., Ltd. -
Page 9: System Dissection
AAD-C622AX 1.3. System Dissection 1.3.1. Dimensions (Unit: mm) AAD-C622A1: www.acrosser.com... - Page 10 AAD-C622AX AAD-C622A2: Acrosser Technology Co., Ltd.
-
Page 11: Front I/O Panel
AAD-C622AX 1.3.2. Front I/O Panel AAD-C622A1: AAD-C622A2: www.acrosser.com... - Page 12 Battery Low Voltage. System on/off fail. When motherboard 1 Long, 2 Short cannot turn on or turn off after retry. LAN1 ~ LAN6 M12 X-code 8pin GbE Connector Pin # Signal Pin # Signal Acrosser Technology Co., Ltd.
- Page 13 AAD-C622AX 10G LAN 1 M12 X-code 8pin 10GbE Connector 10G LAN 2 Pin # Signal Pin # Signal LAN 2, LAN 1 10G LAN LED Blinking Always On Blinking Standard DB15/female VGA Connector COM1 RS-232/422/485 Port Multi-protocol Connector (DB9 male) COM2 RS-232 RS-422...
- Page 14 GPIO GPIO Port Connector (DB15 male) Pin # Signal Pin # Signal GPO0 GPO1 GPO2 GPI4 GPO3 GPI5 GPI6 GPI7 EXTPWR Note: JP_GP1 for more GPO setting USB1 ~ USB8 Standard USB3.0 Type-A Connector (13/16’’-28 UN) Acrosser Technology Co., Ltd.
-
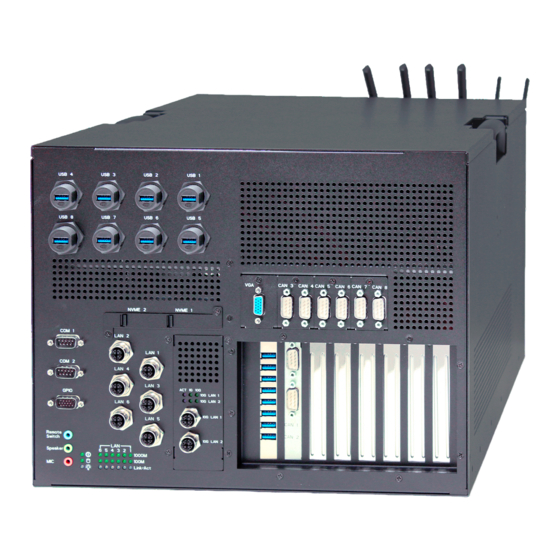
Page 15: Rear I/O Panel
AAD-C622AX 1.3.3. Rear I/O Panel AAD-C622A1: AAD-C622A2: www.acrosser.com... - Page 16 Standard 6+2Pin 12V Aux Power connector for High Power Output for PCIE Card PCIE Graphic Pin # Signal Pin # Signal Card +12V +12V Sense0 +12V Sense1 4 for AAD-C622A1 6 for AAD-C622A2 Antenna Type Reserved for installation of 6x optional SMA-type antennas. Acrosser Technology Co., Ltd.
-
Page 17: Components Assembly
AAD-C622AX Components Assembly The products shown in this procedule are used for illustration only, may not reflect the exact outlooks. 2.1. CPU & Memory Replacement AAD-C622A1: Step 1: Remove two handscrews, pull back the top cover and then open up. Step 2: Take off these scrcews and parts. - Page 18 AAD-C622AX m o d u l e . Lift the power module up to find CPU & memory location. Step 3: Replace CPU. Acrosser Technology Co., Ltd.
- Page 19 AAD-C622AX Please pay attention to the Pin 1 position and follow the screw tightening sequence. Step 4: Remove the memory bracket screws and retaining bracket to replace the memory modules. www.acrosser.com...
- Page 20 The memory placement sequence starts from the outside to the inside. Step 5: Lock the parts back in the order that had been taken off. AAD-C622A2: Step 1: Remove two handscrews, pull back the top cover and then open up. Acrosser Technology Co., Ltd.
- Page 21 AAD-C622AX Step 2: Take off these scrcews and parts. Lift the power module up to find CPU & memory location. www.acrosser.com...
- Page 22 AAD-C622AX Step 3: Replace CPU. Please pay attention to the Pin 1 position and follow the screw tightening sequence. Acrosser Technology Co., Ltd.
- Page 23 AAD-C622AX Step 4: Remove the memory bracket screws and retaining bracket to replace the memory modules. The memory placement sequence starts from the outside to the inside. Step 5: Lock the parts back in the order that had been taken off. www.acrosser.com...
-
Page 24: M Key Swappable Storage Bay
AAD-C622AX 2.2. M.2 M key Swappable Storage Bay Step 1: Remove these screws and cover. Step 2: Pull the handle to take out the M.2 tray. Acrosser Technology Co., Ltd. - Page 25 AAD-C622AX Step 3: Prepare the accessories. Step 4: Use screw (A) to lock the M2 SSD onto the tray. Step 5: Peel off the adhesive film on the thermal conductive sheet (D). Stick it onto the thermal pad (C). www.acrosser.com...
- Page 26 Use two screws (B) to lock the thermal pad on the tray. (Note that the front end of the thermal pad has to be clamped into the tray. Step 7: Insert the M.2 tray into the system, and push back the handle firmly. Acrosser Technology Co., Ltd.
-
Page 27: Hard Disk Replacement
AAD-C622AX 2.3. 2.5” Hard Disk Replacement Step 1: Remove two handscrews, pull back the top cover and then open up. Step 2: Remove four screws to take out the hard disk holder. www.acrosser.com... - Page 28 AAD-C622AX Step 3: Put the yellow washers in the locking holes at both sides of the hard disk holder. Step 4: Fix the hard disk into position with screws. Acrosser Technology Co., Ltd.
- Page 29 AAD-C622AX Step 5: Lock the hard disk holder onto the system, and then plug in the SATA cable and SATA power cable. Step 6: Lock the top cover. www.acrosser.com...
-
Page 30: Installing Graphics Cards
AAD-C622AX 2.4. Installing Graphics Cards Step 1: Remove two handscrews, pull back the top cover and then open up. Step 2: Remove two screws and take out the I/O shields. Acrosser Technology Co., Ltd. - Page 31 AAD-C622AX Step 3: Install the GPU card. Lock it up with screws. Step 4: Put the retaining clips on each GPU card ridge. www.acrosser.com...
- Page 32 AAD-C622AX Step 5: Secure the GPU card by attaching the retainging clips and bracket with screws. Step 6: Lock the top cover. Acrosser Technology Co., Ltd.
-
Page 33: External Usb Plug Holder Connection
AAD-C622AX 2.5. External USB Plug Holder Connection This USB plug holder is provided with the UE-1008 option. Step 1: Reach the USB plug into the holder. Lock the USB plug with screws on the first and last holes of the holder. www.acrosser.com... - Page 34 Remove two screws from the chassis. Connect the USB cable that had been locked with its holder. Step 3: Attach the fixing plate on chassis with two screws. Secure the USB cable holder with one screw to the center hole of the holder. Acrosser Technology Co., Ltd.
-
Page 35: Antenna Installation
AAD-C622AX 2.6. Antenna Installation Connect your antennas according to your system configuration. Wi-Fi: Connect female type antenna to the male type socket Wi-Fi 2 or Wi-Fi 1. GPS: Connect male type antenna tail cable to the female type socket GPS. 4G/5G: Connect male type antenna to the female type socket marked with www.acrosser.com... -
Page 36: Power Inlet & Cover Assembly
Power Inlet & Cover Assembly AAD-C622A1: Step 1: Pass the power cord through the protective cover. Step 2: Fix the end of power cord to the power input terminal. Pay attention to the positive and negative polarity. Acrosser Technology Co., Ltd. - Page 37 AAD-C622AX Step 3: Use screws to affix the protective cover onto the chassis. Step 4: Close the upper cover and tighten with handscrew. www.acrosser.com...
- Page 38 AAD-C622AX AAD-C622A2: Step 1: Fix the end of power cord to the power input terminal. Pay attention to the positive and negative polarity. Acrosser Technology Co., Ltd.
-
Page 39: Lan & 10G Testing Cable Connection
AAD-C622AX 2.8. LAN & 10G Testing Cable Connection (10G LAN is an option) Step 1: Prepare to connect the testing cable. Pay attention to its foolproof direction. www.acrosser.com... - Page 40 AAD-C622AX Step 2: Plug in the cable to 10G LAN 1 or 10G LAN 2 socket and tighten. Acrosser Technology Co., Ltd.
- Page 41 AAD-C622AX Step 3: Connect the other end with regular RJ-45 LAN. www.acrosser.com...
-
Page 42: Foot-Stand Installation
AAD-C622AX 2.9. Foot-stand Installation Step 1: Fix the foot-stand on the working platform according to the recommended size. Acrosser Technology Co., Ltd. - Page 43 AAD-C622AX Step 2: Lock the screw-in studs to the designated position on both side chassis. Step 3: Do the same action to the oposite side. www.acrosser.com...
- Page 44 AAD-C622AX Step 4: Slide the system into the slots of the foot-stand. Step 5: Lock the front fixing screws. Acrosser Technology Co., Ltd.
-
Page 45: Bios Settings
AAD-C622AX BIOS Settings This chapter describes the BIOS menu displays and explains how to perform common tasks needed to get the system up and running. It also gives detailed explanation of the elements found in each of the BIOS menus. The following topics are covered: •... - Page 46 System Time using the arrow keys. Enter new values using the keyboard. Press the key or the arrow keys to move between fields. The date must be entered in MM/DD/ YYYY format. The time is entered in HH:MM:SS format. Acrosser Technology Co., Ltd.
-
Page 47: Advanced Setup
AAD-C622AX 3.2. Advanced Setup Aptio Setup Utility - Copyright (C) 2021 American Megatrends, Inc. Main Advanced IntelRCSetup Processor Security Boot Save & Exit Trusted Computing Trusted Computing Power Sub System Settings W83627DHG Super IO Configuration W83627DHG HW Monitor USB Configuration CSM Configuration NVMe Configuration →←: Select Screen... -
Page 48: Power Sub System
Switch Off -> System off Signal period, set 1 second to 3600 seconds with 1 second increment. • Shutdown Delay Syatem off Signal -> VCC Off period, set 120 second to 3600 seconds with 1 second increment. • Battery Low Monitor Enabled / Disabled battery input voltage monitor function. Acrosser Technology Co., Ltd. -
Page 49: W83627Dhg Super Io Configuration
AAD-C622AX • Battery Low Delta Battery low delta is a number in unit of volt to determine the battery low voltage. 3.2.3. W83627DHG Super IO Configuration Aptio Setup Utility - Copyright (C) 2021 American Megatrends, Inc. Advanced W83627DHG Super IO Configuration Set Parameters of Serial Port Super IO Chip... -
Page 50: W83627Dhg Hw Monitor
+/-: Change Opt. F1: General Help : +5.068 V F2: Previous Values +12V : +12.328 V F3: Optimized Defaults VCORE : +1.832 V F4: Save & Exit ESC: Exit Version 2.20.1276. Copyright (C) 2021 American Megatrends, Inc. Acrosser Technology Co., Ltd. - Page 51 AAD-C622AX • Smart Fan Mode Configuration Smart Fan Mode Select Aptio Setup Utility - Copyright (C) 2021 American Megatrends, Inc. Advanced Smart Fan Mode Configuration Smart Fan Mode Select (CPU Fan & Fan1 ~ Fan4) Smart Fan Mode [Auto Mode] FAN Target Temperatur FAN Tolerance Smart Fan Mode...
-
Page 52: Usb Configuration
Select Enabled for USB Mass Storage Driver Support. • Port 60/64 Emulation Select Enabled for I/O port 60h/64h emulation support, which in turn, will provide complete legacy USB keyboard support for the operating systems that do not support legacy USB devices. Acrosser Technology Co., Ltd. -
Page 53: Csm Configuration
AAD-C622AX 3.2.6. CSM Configuration Aptio Setup Utility - Copyright (C) 2021 American Megatrends, Inc. Advanced Compatibility Support Module Configuration Enable/Disable CSM Support. CSM Support [Enabled] Boot option filter [UEFI only] Option ROM execution Network [Do not launch] Storage [UEFI] Video [UEFI] Other PCI devices [Do not launch]... -
Page 54: Nvme Configuration
No NVMe Device Found →←: Select Screen ↑↓: Select Item Enter: Select +/-: Change Opt. F1: General Help F2: Previous Values F3: Optimized Defaults F4: Save & Exit ESC: Exit Version 2.20.1276. Copyright (C) 2021 American Megatrends, Inc. Acrosser Technology Co., Ltd. -
Page 55: Intelrcsetup
AAD-C622AX 3.3. IntelRCSetup Aptio Setup Utility - Copyright (C) 2021 American Megatrends, Inc. Main Advanced IntelRCSetup Processor Security Boot Save & Exit PCH SATA Configuration SATA devices and settings Audio Configuration →←: Select Screen ↑↓: Select Item Enter: Select +/-: Change Opt. F1: General Help F2: Previous Values F3: Optimized Defaults... -
Page 56: Audio Configuration
↑↓: Select Item Enter: Select +/-: Change Opt. F1: General Help F2: Previous Values F3: Optimized Defaults F4: Save & Exit ESC: Exit Version 2.20.1276. Copyright (C) 2021 American Megatrends, Inc. • Audio Controller Enabled/Disable Audio controller. Acrosser Technology Co., Ltd. -
Page 57: Processor
AAD-C622AX 3.4. Processor Aptio Setup Utility - Copyright (C) 2021 American Megatrends, Inc. Main Advanced IntelRCSetup Processor Security Boot Save & Exit Processor Configuration Displays and provides Intel VT for Directed I/O (VT-d) Option to change the Processor Settings. →←: Select Screen ↑↓: Select Item Enter: Select +/-: Change Opt. -
Page 58: Intel Vt For Directed I/O (Vt-D)
Version 2.20.1276. Copyright (C) 2021 American Megatrends, Inc. • Intel VT for Directed I/O Enable/Disable the Intel Virtualization Technology for Directed I/O (VT-d) support function by reporting the I/O device assignment to VMM through DMAR ACPI Tables. Acrosser Technology Co., Ltd. -
Page 59: Security Setup
AAD-C622AX 3.5. Security Setup Aptio Setup Utility - Copyright (C) 2021 American Megatrends, Inc. Main Advanced IntelRCSetup Processor Security Boot Save & Exit Password Description Set Administrator Password If ONLY the Administrator’s password is set, then this only limits access to Setup and is only asked for when entering Setup. -
Page 60: Boot Setup
OEM logo instead of the normal POST messages. • Boot Option Priorities This feature allows the user to specify which devices are boot devices and the order of priority from which the systems boots from during startup. Acrosser Technology Co., Ltd. -
Page 61: Save & Exit Setup
AAD-C622AX 3.7. Save & Exit Setup Aptio Setup Utility - Copyright (C) 2021 American Megatrends, Inc. Main Advanced IntelRCSetup Processor Security Boot Save & Exit Save Options Reset the system after Save Changes and Reset saving the changes. Discard Changes and Reset Restore Defaults Boot Override →←: Select Screen... -
Page 62: Software Installation And Programming Guide
When the voltage is lower than the tolerable voltage, the power subsystem turns off the system. 7. Get/set the Soft Off deley. 8. Get/set the Hard Off delay. 9. Get/set the Power On delay. Acrosser Technology Co., Ltd. -
Page 63: Api List And Descriptions
AAD-C622AX 10. Get/set the Shutdown delay. The power subsystem connects to the main system via the COM port. On the Linux platform, the actual port number to which the Power Subsystem connects is determined by the Linux. The default supported COM interfaces on Linux are COM1~COM4. -
Page 64: Watchdog
Return Value: This function returns the value of the time counter and return it to the caller as an integer. Syntax: void wdt_stop(void) Description: This function read the watchdog timer stop. Parameters: None. Return Value: None. Acrosser Technology Co., Ltd. -
Page 65: Power Subsystem
AAD-C622AX 4.2.3. Power Subsystem Syntax: i32 getPicFwVer(struct PicInfo *ver) Description: This function gets the version information of the firmware of the Power Subsystem. Parameters: The definition of struct ‘PicInfo’ is: struct PicInfo { u8 info[18]; This API returns the version information and store the information in the memory which is pointed at by the pointer ‘ver’. - Page 66 This function takes an unsigned char as the parameter. The value of this parameter can be ‘ENABLED’ (0x5A) or ‘DISABLED’(0xA5). Return Value: If this function works successfully, it returns 0, any other value stands for error. Acrosser Technology Co., Ltd.
- Page 67 AAD-C622AX Syntax: i32 getBattVolt(float *vol) Description: This function gets the battery voltage ant put it in the memory which is pointed at by the pointer ‘vol’. Parameters: This function takes a pointer to a ‘float’ variable as the parameter. The reading of the battery voltage is put at the memory which is pointed at by the parameter ‘vol’.
- Page 68 The returned value is stored at this variable. The unit of the returned value is in seconds. Return Value: If this function works successfully, the function returns 0, any other value stands for error. Acrosser Technology Co., Ltd.
- Page 69 AAD-C622AX Syntax: i32 getHardOffDelay(u32 *Time) Description: The Hard Off Delay is the interval between that the system is off and that the power 5VSB is off. This function gets the interval. Parameters: The parameter is a pointer which points to an unsigned long variable.
- Page 70 This function takes a pointer to an unsigned char variable as the parameter. The Status will be put at the memory which is pointed by the parameter ‘val’. Return Value: If this function works successfully, the function returns 0, any other value stands for error. Acrosser Technology Co., Ltd.
- Page 71 AAD-C622AX 4.3. Appendix A Users have to modify the boot loader configuration to support COM6. Take the grub configuration file as an example. Add ‘8250.nr_uarts=XX noirqdebug’ at the setting of kernel. Here, XX represents the number of COM ports the system will support. Because the power subsystem connects to main system via COM6, the XX must be greater or equal to 6.
-
Page 72: Faq
Q 4. How to active the second SIM card SIMCOM SIM8202G 5G ? • AT+SMSIMCFG=1,1 //The current card slot is 1 • AT+SMSIMCFG=1,2 //Switch to card slot 2 • The configuration will be automatically saved to NVRAM. • This function takes effect after restart. Acrosser Technology Co., Ltd. -
Page 73: Q 5. How To Switch Over Sierra Module Dual Sim Setting
AAD-C622AX Q 5. How to switch over Sierra Module Dual SIM Setting ? AT Command: 1. Make sure UIM2 is enabled by check AT!CUSTOM? 2. Make sure SIM hot swap for both SIMs (UIM1 & UIM2). 3. Use AT!UIMS to select active SIM between the two SIM cards. Example: Manufacturer: Sierra Wireless, Incorporated Model: EM7455... - Page 74 GPSENABLE0x01 GPSSEL0x01 SIMLPM0x01 USBSERIALENABLE0x01 SINGLEAPNSWITCH0x01 AT!CUSTOM=? !CUSTOM: "GPSENABLE" "GPSLPM" "GPIOSARENABLE" "GPSSEL" "GPSREFLOC" "IMSWITCHHIDE" "IMCONFIG" "IPV6ENABLE" "WAKEHOSTEN" "SIMHOTSWAPDIS" "CFUNPERSISTEN" "QMIDETACHEN" "UIM2ENABLE" "NETWORKNAMEFMT" "SIMLPM" "USBSERIALENABLE" "PCSCDISABLE" "DHCPRELAYENABLE" "FLOWNOTIDISABLE" "FASTENUMEN" "CSVOICEREJECT" "IPCHANNELRATEEN" "SINGLEAPNSWITCH" AT!CUSTOM="UIM2ENABLE",1 Enable USIM2 identity AT!CUSTOM? Acrosser Technology Co., Ltd.
- Page 75 AAD-C622AX !CUSTOM: GPSENABLE0x01 GPSSEL0x01 UIM2ENABLE0x01 SIMLPM0x01 USBSERIALENABLE0x01 SINGLEAPNSWITCH0x01 AT+CPIN? +CPIN: READY AT!UIMS? Request USIM setting (USIM1 or USIM2) !UIMS: 0 USIM1 is active AT+CIMI Request international mobile subscriber 466924000182599 AT!UIMS=1 Active USIM2 AT!UIMS? Request USIM setting (USIM1 or USIM2) ...
-
Page 76: Q 6. How To Run The Gps Funtion In Both 4G And 5G Networks
Q 6. How to run the GPS funtion in both 4G and 5G networks ? • EM12-G: Set AT+QCFG="gpsdrx",0 in AT command AT+QGPS=1 • EM06: Set in AT command. (Must set up again on each restart.) AT+CGPS=1 • SIM8202GL: Set in AT command. • EM7455/7430: Install its driver. Acrosser Technology Co., Ltd. - Page 77 AAD-C622AX Technical Support Form We deeply appreciate your purchase of Acrosser products. Please find the “tech_form. doc” file in our utility CD. If you have any questions or problems about Acrosser products, please fill in the following information. We will answer your questions in the shortest time possible.
- Page 78 Acrosser Headquarters Acrosser Nanjing Office 欣扬通电子有限公司 南京办事处 241新北市三重區光復路一段61巷26號10樓 江苏省南京市江宁区天元东路228号504室 10F., No.26, Ln. 61, Sec. 1, Guangfu Rd., (邮编: 211100) Sanchong Dist., New Taipei City 241, Taiwan Room 504, No. 228, Tian Yuan East Rd., (R.O.C.) Jiang Ning Dist., Nanjing City, Jiangsu Province, TEL: +886-2-29999000 China (Postal: 211100) FAX: +886-2-29992887 / +886-2-29993960...
Need help?
Do you have a question about the AAD-C622A Series and is the answer not in the manual?
Questions and answers