Extron electronics USB HUB4 Series User Manual
Usb hubs
Hide thumbs
Also See for USB HUB4 Series:
- Setup manual (2 pages) ,
- Setup manual (2 pages) ,
- Setup manual (2 pages)
Table of Contents
Advertisement
Quick Links
Advertisement
Table of Contents

Related Manuals for Extron electronics USB HUB4 Series


Summary of Contents for Extron electronics USB HUB4 Series
- Page 1 User Guide USB Hubs USB HUB4 Series AAP and MAAP USB Hubs 68-1735-01 Rev. D 06 22...
- Page 2 Safety Instructions Safety Instructions • English WARNING: This symbol, , when used on the product, is intended to alert the user of the presence of uninsulated dangerous voltage within the product’s enclosure that may present a risk of electric shock. ATTENTION: This symbol, , when used on the product, is intended...
- Page 3 www.extron.com www.extron.com www.extron.com www.extron.com Copyright © 2009-2022 Extron. All rights reserved. www.extron.com Trademarks All trademarks mentioned in this guide are the properties of their respective owners. The following registered trademarks ( ® ), registered service marks ( ), and trademarks ( ) are the property of RGB Systems, Inc.
- Page 4 FCC Class A Notice This equipment has been tested and found to comply with the limits for a Class A digital device, pursuant to part 15 of the FCC rules. The Class A limits provide reasonable protection against harmful interference when the equipment is operated in a commercial environment.
- Page 5 Conventions Used in this Guide Notifications The following notifications are used in this guide: CAUTION: Risk of minor personal injury. ATTENTION : Risque de blessure mineure. ATTENTION: • Risk of property damage. • Risque de dommages matériels. NOTE: A note draws attention to important information. Specifications Availability Product specifications are available on the Extron website, www.extron.com.
-
Page 7: Table Of Contents
Front Panel Features ..........9 Mounting ..........10 Mounting the USB HUB4 ........10 Wall or Furniture Mounting ......10 Rack Mounting ..........14 UL Guidelines for Rack Mounting ....14 Extron Warranty ........16 USB HUB4 Series • Contents... -
Page 9: Introduction
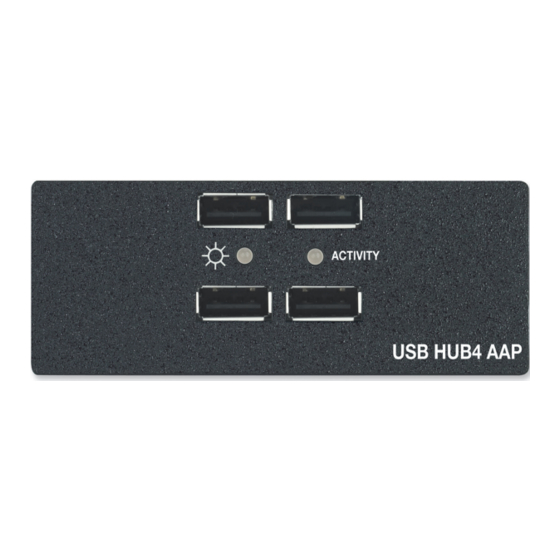
Front panel LEDs — The Activity LED lights when a peripheral device has been recognized by the host and is in communication with it. The Power LED lights with the USB HUB4 is receiving power. USB HUB4 Series • Introduction... -
Page 10: Application Diagram
USB HUB4 AAP MLC 104 IP Plus Four-Port USB 2.0 Hub One USB Cable from PC to USB HUB4 AAP Mouse H ADS INPU B 20 Keyboard Figure 1. Application Diagram for a USB HUB4 AAP USB HUB4 Series • Introduction... -
Page 11: Installation
Connect the peripheral USB devices to the front panel USB A ports. Power on the host PC and, if applicable, the desktop power supply. Check the front panel power indicator LED to verify that the HUB4 is receiving power. USB HUB4 Series • Installation... -
Page 12: Rear Panel Features
USB mini-B port. NOTE: Only one host can be connected to the USB In ports at a time. If two hosts are connected, the HUB4 defaults to the host attached to the USB mini-B port. USB HUB4 Series • Installation... -
Page 13: Connecting To The Captive Screw Usb Port
– /B — Ground. Connect the black wire to this port. S — Shield. Connect the braided shield to this port. • Plug the A end of the USB cable into a USB port on the computer (see figure 4 page 6). USB HUB4 Series • Installation... -
Page 14: Connecting The External Power Supply
100 mA. If only a keyboard and mouse are being powered, 100 mA is usually sufficient. • • Use only the Extron PS 1215 power supply with the USB HUB4. USB HUB4 Series • Installation... - Page 15 Si le produit n’est pas fourni avec une source d’alimentation, il doit être alimenté par une source d’alimentation certifiée UL de classe 2 ou LPS, avec une tension nominale 12 Vcc, 1,1 A minimum, et supporter une température ambiante de 50°C. USB HUB4 Series • Installation...
- Page 16 Front Rear Extender WM AAP USB HUB4 AAP Desktop Power Supply Figure 6. Providing Power to an External Device via the USB HUB4 Plug the external power supply IEC connector into an AC power source. USB HUB4 Series • Installation...
-
Page 17: Front Panel Features
PC is powered on. • If the HUB4 is powered by the optional Extron PS 1215 1.5 A, 12 VDC power supply, the LED illuminates regardless of whether or not the host computer is on. USB HUB4 Series • Installation... -
Page 18: Mounting
If using a wall box, feed the cables through the punched out holes in the box and secure the cable clamps to provide strain relief. Exposed cable shields (braids or foil) are potential sources of short circuits. Trim back or insulate shields with heat shrink (see figure 9 on page 11). USB HUB4 Series • Mounting... - Page 19 If using a mounting bracket, follow the directions included with the bracket to attach • the clips that fasten the bracket to the wall or furniture. NOTE: Cable and test the HUB4 before mounting it to the wall box, mounting bracket, or furniture. USB HUB4 Series • Mounting...
- Page 20 Attach all power and USB cables to the HUB4 rear panel ports and test the system. Attach the mounting frame with the attached HUB4 to the wall box, using the two included mounting screws (see figure 12 on page 13). NOTE: Use an AAP or MAAP blank for any unused faceplate openings. USB HUB4 Series • Mounting...
- Page 21 NOTE: Use an AAP or MAAP blank for any unused faceplate openings. Wall Wall Mounting Bracket IT Y T IV Extron USB HUB4 MAAP USB Hub Extron CPM101 Mounting Frame Figure 13. Mounting a USB HUB4 MAAP to a Mounting Bracket USB HUB4 Series • Mounting...
-
Page 22: Rack Mounting
Mise à la terre — Assurez-vous que l’équipement est correctement mis à la • terre. Accordez une attention particulière aux connexions électriques autres que les connexions directes au circuit de dérivation (ex. : les multiprises). USB HUB4 Series • Mounting... - Page 23 RSB 126 Rack Mount Shelf USB HUB4 MAAP TI VI (4) #4 - 40 Screws CPM130 A/V Connector Frame (2) #6 Screws Figure 15. Mounting a USB HUB4 MAAP on a Rack Shelf Using a CPM133 Frame USB HUB4 Series • Mounting...
-
Page 24: Extron Warranty
Extron Electronics makes no further warranties either expressed or implied with respect to the product and its quality, performance, merchantability, or fitness for any particular use. In no event will Extron Electronics be liable for direct, indirect, or consequential damages resulting from any defect in this product even if Extron Electronics has been advised of such damage.
Need help?
Do you have a question about the USB HUB4 Series and is the answer not in the manual?
Questions and answers