
Related Manuals for Sanus SONOS WSWM


Summary of Contents for Sanus SONOS WSWM
- Page 1 WSWM SONOS ® SPEAKER MOUNT INSTRUCTION MANUAL We’ll Make It Stress-Free If you have any questions along the way, just give us a call. 1-800-359-5520 We’re ready to help!
- Page 2 CAUTION: IMPORTANT SAFETY INSTRUCTIONS — PLEASE READ ENTIRE MANUAL PRIOR TO USE — SAVE THESE INSTRUCTIONS Before getting started, let’s make sure this product is perfect for you! ® Do you own a Sonos PLAY:1™ or PLAY:3™ speaker? This speaker mount is designed to support PLAY:1 and PLAY:3 speakers. Weight Limit: 10 lb (4.5 kg) Do you have all the tools needed? 1/8 in.
- Page 3 Dimensions SPEAKER INTERFACE PLAY:3 BRACKET 0.45 in. (INCLUDED) 2xø0.26 in. [11.5mm] [6.6mm] 2.21 in. [53.3mm] 3.83 in. [97.3mm] 1.99 in. [50.6mm] WALL PLATE TOP VIEW - SONOS PLAY:1 SIDE VIEW - SONOS PLAY:1 ø0.20 in. [5.1mm] THRU ø3.00 in. [76.3mm] 9.05º...
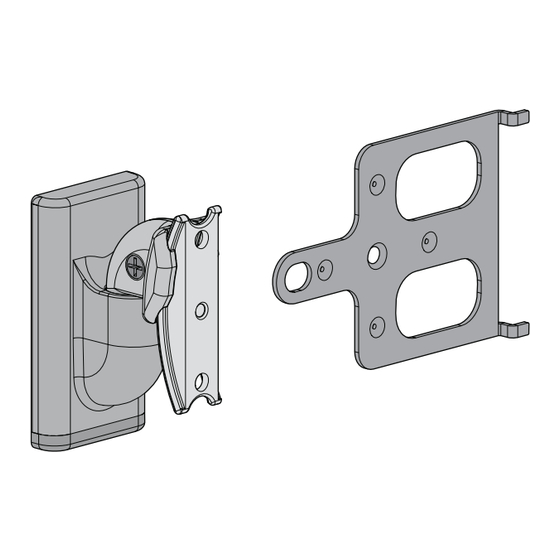
- Page 4 Supplied Parts and Hardware WARNING: This product contains small items that could be a choking hazard if swallowed. Before starting assembly, verify all parts are included and undamaged. If any parts are missing or damaged, do not return the damaged item to your dealer;...
- Page 5 STEP 2 Parts and Hardware (cont.) STEP 3 Parts Play:3 Interface Play:3 Interface Screw 10-24 x 1/2 in. Play:1 / Play:3 Screw 1/4-20 x 1/2 in.
- Page 6 STEP 1A Attach Wall Plate to Wall Wallboard Option CAUTION: Avoid potential personal injury or property damage! Drywall covering the wall, must not be less than 1/4 in. (6.4 mm) Make sure that the placement of the wall plate is not on a stud. Position the wall plate at your desired height and level the wall plate and mark the hole locations.
- Page 7 Install the wall plate with the two wall plate screws. CAUTION: Avoid potential personal injury or property damage! Both screws MUST BE firmly tightened to prevent unwanted movement of the wall plate . Ensure the wall plate is securely fastened to the wall before continuing on to the next step. NOTE : If needed, you can make small level adjustments...
- Page 8 STEP 1B Attach Wall Plate to Wall Wood Stud Option CAUTION: Avoid potential personal injury or property damage! Drywall covering the wall, must not exceed 5/8 in. (16 mm) Minimum wood stud size: nominal 2 x 4 in. (51 x 102 mm) actual 1½ x 3½ in. (38 x 89 mm) Stud center must be verified Locate your stud.
- Page 9 Install wall plate using two screws . Tighten the screws only until they are pulled firmly against the wall plate CAUTION: Avoid potential personal injury or property damage! Both screws MUST BE firmly tightened to prevent unwanted movement of the wall plate .
- Page 10 STEP 1C Attach Wall Plate to Wall Solid Concrete or Concrete Block Option CAUTION: Avoid potential personal injury or property damage! Mount the wall plate directly onto the concrete surface Minimum solid concrete thickness: 8 in. (203 mm) Minimum concrete block size: 8 x 8 x 16 in. (203 x 203 x 406 mm) Position the wall plate on the wall at your desired height.
- Page 11 Install wall plate using two screws . Tighten the screws only until they are pulled firmly against the wall plate CAUTION: Avoid potential personal injury or property damage! Both screws MUST BE firmly tightened to prevent unwanted movement of the wall plate .
- Page 12 ® STEP 2A Attach Wall Mount to Speaker SONOS PLAY:1 Attach the mount to the Play:1 speaker with the Play:1 / Play:3 screw NOTE Speaker may be installed in either the right-side-up position (shown) or up-side-down position, depending on need. NOTE Either mounting hole on the arm can be used.
- Page 13 ® STEP 2B Attach Wall Mount to Speaker SONOS PLAY:3 Vertical Option Attach the Play:3 Interface bracket to the mount with the Play:3 Interface screw Fit the assembly onto the Play:3 speaker by inserting the legs of the Play:3 Interface bracket into the 4th holes from the end and resting the bracket against the speaker.
- Page 14 ® STEP 2C Attach Wall Mount to Speaker SONOS PLAY:3 Horizontal Option Attach the Play:3 Interface bracket to the mount with the Play:3 Interface screw Fit the assembly onto the Play:3 speaker by inserting the legs of the Play:3 Interface bracket into the 4th holes from the end and resting the bracket against the speaker.
- Page 15 STEP 3 Mount Assembly to Wall Plate Slide the speaker/wall mount assembly Slide the cap onto the mount onto the wall plate to finish the assembly.
- Page 16 Adjustments 9.05° Play:1 66° 66º 132° 132º Play:3 The speakers can be rotated as desired on the mount. Play:3 Play:3 30° 35° 35º The speakers can be tilted on the mount. 70° 70º...
- Page 17 THIS PAGE INTENTIONALLY LEFT BLANK...
- Page 18 ESPAÑOL INSTRUCCIONES IMPORTANTES DE SEGURIDAD: GUARDE ESTAS INSTRUCCIONES Y LEA TODO EL MANUAL ANTES DE UTILIZAR ESTE PRODUCTO. Antes de empezar, asegúrese de que este es el producto adecuado para usted. Este soporte para altavoces está diseñado para sostener los altavoces Sonos ®...
- Page 19 ESPAÑOL Dimensiones página 3 Piezas y elementos de sujeción suministrados página 4 ADVERTENCIA: Este producto contiene piezas pequeñas que, en caso de ser tragadas, podrían causar asfixia. Antes de comenzar a montar la unidad, verifique que dispone de todas las piezas y que se encuentran en buen estado. Si no dispone de todas las piezas o alguna está...
- Page 20 ESPAÑOL Localice el montante. Verifique y marque el centro del montante buscando sus bordes con un punzón, un clavo fino o un localizador de montantes de borde a borde. Coloque la placa mural a la altura deseada y alinee los orificios con la línea central del montante. Nivele la placa mural y marque la posición de los orificios.
- Page 21 ESPAÑOL PASO 2A Fijar el soporte de pared al altavoz - Sonos ® Play:1 página 12 Fije el soporte al altavoz Play:1 con el tornillo del altavoz Play:1 / Play:3 NOTA: Puede instalar el altavoz con la parte derecha hacia arriba (como se muestra) o boca abajo, en función de sus necesidades. NOTA: Se puede utilizar cualquier orificio de montaje en el brazo.
- Page 22 THIS PAGE INTENTIONALLY LEFT BLANK...
- Page 23 THIS PAGE INTENTIONALLY LEFT BLANK...
- Page 24 Thank you for choosing Sanus! Please take a moment to let us know how we did: Email us: info@sanus.com Call us: 1-800-359-5520 UK: 0800 056 2853 Leave a review: sanus.com Milestone AV Technologies and its affi liated corporations and subsidiaries (collectively, “Milestone”), intend to make this manual accurate and complete. However, Milestone makes no claim that the information contained herein covers all details, conditions, or variations.
Need help?
Do you have a question about the SONOS WSWM and is the answer not in the manual?
Questions and answers