sauermann DBM 620 User Manual
Air flow meter & smartkap application
Hide thumbs
Also See for DBM 620:
- Manual (40 pages) ,
- User manual (39 pages) ,
- Quick start manual (10 pages)

Related Manuals for sauermann DBM 620


Summary of Contents for sauermann DBM 620
- Page 1 USER MANUAL DBM 620 AIR FLOW METER & SMARTKAP APPLICATION FOR DBM 620 www.sauermanngroup.com...
-
Page 3: Table Of Contents
Table of contents 1. SAFETY INSTRUCTIONS......................................5 1.1 SmartKap application........................................5 1.1.1 Exclusions and restrictions of liability..................................5 1.1.2 Exclusions and warranty limitations..................................5 1.2 DBM 620 air flow meter......................................... 5 1.2.1 Warning..........................................5 1.2.2 Environment protection......................................6 1.3 Symbols used..........................................6 2. -
Page 5: Safety Instructions
The application operation is under the exclusive customer or user entity responsibility, who acknowledges using this system at his/her own risks. The customer or user entity explicitly excludes Sauermann and every other company through which the it could have been sold of any kind of responsibility or warranty regarding any direct, indirect, accidental, consecutive or non-consecutive damage that could have been subjected, for some or all, by partial or total non-respect, voluntary or involuntary, of recommendations, conditions and prerequisites indicated hereafter. -
Page 6: Environment Protection
Please read carefully the information notes indicated after this symbol. © 2019 SAUERMANN. All rights reserved. Sauermann & SmartKap are the exclusive property of Sauermann. Non contractual document. The products functionalities and visual appearances can be modified without prior notice. Smartphone or tablet are not supplied with Sauermann products. -
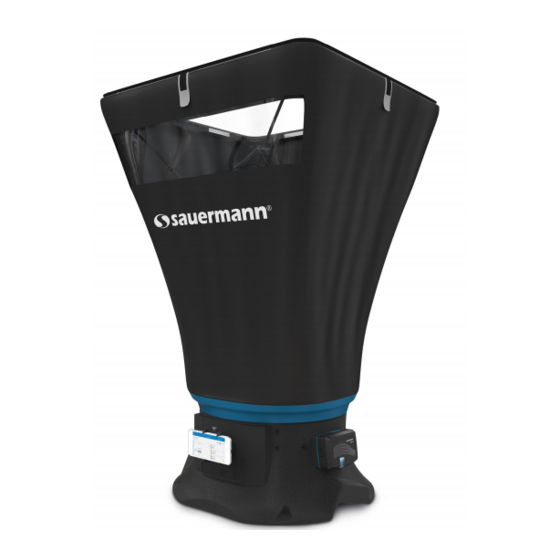
Page 7: Air Flow Meter Presentation
Measurement is performed using a differential pressure sensor, adjusted in atmospheric pressure and temperature, compensated in temperature. The Patented* DBM 620 folding frame limits space restrictions and allows for easier mounting. The measuring unit of the air flow meter, removable, can be used as a micromanometer. -
Page 8: Technical Features
2.2 Technical features Parameter Accuracy Measuring range Resolution Airflow (calculated ±3% of the measurement ±10 m From 35 to +4250 m parameter) Air velocity (calculated 0.01 m/s up to 3 m/s ±3% of the measured value ±0.04 m/s From 0.2 to 10 m/s parameter) and 0.1 m/s beyond ±0.2°C Temperature (NTC) -
Page 9: General Features
2.3 General features Display On smartphone or tablet Integrated support for Adjustable integrated support smartphone or tablet Smartphone or tablet max. dimensions: 6.2’’ Connectors/Pneumatic ABS connectors, Ø7 x 4 mm Maximum service pressure 500 mbar Storage capacity Standard size of a measurement dataset report: 1 Mo Module Shock-proof made of ABS Protection... -
Page 10: Standard
• Consult the dealer or an experienced radio/TV technician for help. • Any changes or modifications to this equipment not expressly approved by Sauermann may cause, harmful interference and void the FCC authorization to operate this equipment. 2.6.2 Canadian standard This device contains licence-exempt transmitter(s)/receiver(s) that comply with Innovation, Science and Economic Development Canada’s licence-exempt RSS(s). -
Page 11: Air Flow Meter Description
3. AIR FLOW METER DESCRIPTION 3.1 Base Outside of the base: • 1. DBM 620 electronic module 2. Electronic module connecting plugs 3. Thermo-hygrometric measurement platen 4. and 5. Press to connect or disconnect the module of the base Inside the base: •... -
Page 12: Electronic Module
The measurement grid allows to perform differential pressure measurements: attached to the base, it allows the measurement through 24 points all over the surface of the grid. Measurement is performed using a differential pressure sensor, adjusted in atmospheric pressure and temperature, compensated in temperature. 3.3 Electronic module 3.3.1 Features Shock-proof made of ABS... -
Page 13: Power Supply And Batteries Replacement
3.3.2 Power supply and batteries replacement The airflow meter is supplied in standard with 4 batteries type AA LR6 1.5V. To replace batteries: ➢ Remove the batteries cover then used batteries. ➢ Replace batteries respecting carefully the polarity. ➢ Replace the batteries cover. ➢... -
Page 14: Mounting Of The Hoods
3.4.2 Mounting of the hoods 3.4.3 First mounting Once the device received, please follow theses steps to mount the elements on the base: 1. Unfold the frame The foldable frame allows a quicker and easier mounting and a compact storage system. 2. - Page 15 4. Mount the measurement grid for a micromanometer mode use ➢ Mount the positioning struts on the grid. ➢ Clip the DBM 620 module on the last notch of the pole. Please respect a minimum distance of 15 cm between the measuring unit and the measurement grid.
-
Page 16: Elements Storage
3.4.4 Elements storage A complete disassembly is not necessary to store the elements in the transport case. Only fold the frame, hood and base assembly: ➢ Remove the rods. ➢ Fold the first sides of the frame by pressing the clips located on the top of the frame (1). ➢... -
Page 17: Troubleshooting
Problem Probable cause and possible solution Batteries can be defective or flat. Replace the old batteries by new The DBM 620 does not switch on. ones, respecting carefully the polarity. For batteries replacement, please see page 13. Do not use the device if it is broken or if it works abnormally. -
Page 18: Smartkap Mobile App
5. SMARTKAP MOBILE APP 5.1 Presentation SmartKap application allows the DBM 620 air flow meter measurements visualisation and exploitation. The application communicates with wireless connection via the smartphone/tablet and the DBM 620 module. 5.2 Minimal required configuration For an optimal operation, the following minimum required versions must be installed on the tablet or smartphone: Android 4.4 •... -
Page 19: Use Smartkap Application
6. USE SMARTKAP APPLICATION 6.1 Set the DBM 620 module The application allows to set 3 parameters for the DBM 620 module: automatic connection activation or deactivation • auto-shut-off • autozero interval • It also allows to get information on the DBM 620 module. To carry out these settings and get information, the DBM 620 module must be connected via wireless connection to the smartphone or the tablet. -
Page 20: Start, Hold Or Stop The Measurement
To start, hold or stop the measurement, use the mobile application buttons: “Rec”, “Stop” or “Pause”. It is also possible to use the button on the DBM 620 module. Dataset type Via the mobile application With the DBM 620 module button (micromanometer mode) Press “Rec” then “Validate” to start recording. Press “Rec” from the mobile application, then the DBM 620 module button to start recording. -
Page 21: Use The Application In Balometer Mode
6.3 Use the application in balometer mode 6.3.1 Connect the mobile device and the DBM 620 module Here is the procedure to follow to connect the smartphone or the tablet in wireless connection to the DBM 620 module: Wireless connection must be activated on the smartphone or the tablet. ➢... -
Page 22: Set The Measurements
The following screen displays: ➢ Press the air vent type on which measurements will be carried out. ➢ Press “Select” at the bottom of the screen. ➢ Position the air flow meter thanks to the animation explaining how to position correctly the air flow meter on the air vent. - Page 23 The available air vent types list displays: ➢ Press the required air vent type. ➢ Press “Select” at the bottom of the screen. To select a customized air vent type, it first needs to be created. From the parameters screen: ➢...
-
Page 24: Select A Standardised Airflow
➢ Fill in a name. ➢ Select the air vent type: rectangular or circular. ➢ Fill in the air vent dimensions: width then length. ➢ Fill in a coefficient for this air vent. ➢ Add a photo is needed. ➢ Press “Validate”. The created air vent appears in at the end of the available the air vents list. - Page 25 The list of available air vent types displays: ➢ Press the required air vent type. ➢ Press “Select” at the bottom of the screen. ➢ Once the air vent selected, click “Modify” icon on top of the screen. The air vent features screen displays: ➢...
-
Page 26: Save A Measurement Dataset
➢ Fill in the coefficient value. ➢ Press “Validate”. 6.3.4 Save a measurement dataset To save a measurement dataset, the DBM 620 module must be connected via wireless connection to the smartphone or to the tablet. The previous described parameters must also be correctly filled in. ➢... -
Page 27: Use The Application In Manometer Mode
Here is the procedure to follow to connect the smartphone or the tablet via wireless connection to the DBM 620 module in manometer mode: Wireless connection must be activated on the smartphone or the tablet. ➢ Switch on the DBM 620 module by pressing the DBM 620 button. It flashes quickly in blue. ➢ Launch SmartKap application. -
Page 28: Set The Measurements
The following screen displays: ➢ Press “Search devices” at the bottom of the screen. The smartphone/tablet searches available devices. The devices found are displayed as following: ”DBM 620 XX XX.XX.XXXXX” ➢ Press the line of the required device. A check mark appears on this line. Click “Connect”... -
Page 29: Select The Air Duct Type And Define Its Features
6.4.2.2 Select the air duct type and define its features The application allows to select an air duct type (rectangular or circular) or a factor (K factor, data supplied by the air vent manufacturer) during the measurement operation in manometer mode. From the measurement screen: ➢... -
Page 30: Record A Measurement Dataset
➢ Press this parameter. ➢ Fill in a static pressure. ➢ Press “Validate”. 6.4.4 Record a measurement dataset To record a measurement dataset, the DBM 620 must be connected via wireless connection to the smartphone or the tablet. The previous described parameters must also be correctly filled in. Three dataset types are available: •... -
Page 31: Save A Point By Point Dataset
➢ Fill in a name and a description for this record. ➢ Press “Save” to only keep the record. ➢ Add this record to a measurement dataset: • Press “Dataset” line then select the required dataset. If no dataset is saved: •... -
Page 32: Save An Automatic Point By Point Dataset
• Press “Dataset” line then select the required dataset. If no dataset is saved: • Press “Dataset” line. • Press “+” button in the upper-right corner of the screen. • Name the dataset then validate. 6.4.4.3 Save an automatic point by point dataset ➢... -
Page 33: Set The Correction Coefficient
The following screen displays: ➢ Fill in a name and a description for this record. ➢ Press “Save” to only keep the record. ➢ Add this record to a measurement dataset: • Press “Dataset” line then select the required dataset. If no dataset is saved: •... -
Page 34: Fill In Operator Information
The list of options to set displays. ➢ Press the line of the parameter to modify. ➢ Select the required unit. ➢ Press “Select” at the bottom of the screen. 6.7 Fill in operator information The application allows to fill in information on an operator. From the measurement screen: ➢... -
Page 35: Export The Values
The recorded values display: ➢ Press “Table” or “Graphic” icon to display the values table or graphic: 6.8.2 Export the values A record must be opened. ➢ Press “Export”. The following screen displays: USE SMARTKAP APPLICATION... -
Page 36: Air Change Rate" Function (Acr)
➢ Fill in the customer information. ➢ Information about operator previously filled in will be automatically reported when generating measurement reports. ➢ Fill in a comment. ➢ Define the measurement reports specificities: • Title • Type of report: pdf, csv or xml •... - Page 37 1. Record information 2. Device information 3. Measurement parameters 1. Graphic 1. Table of values 1. Attachments USE SMARTKAP APPLICATION...
- Page 38 USE SMARTKAP APPLICATION...
- Page 39 USE SMARTKAP APPLICATION...
- Page 40 NT_DBM 620 - SmartKap_EN – 14/04/21 – Non-contractual document – We reserve the right to modify the characteristics of our products without prior notice.
Need help?
Do you have a question about the DBM 620 and is the answer not in the manual?
Questions and answers