Table of Contents
Advertisement
Quick Links
Advertisement
Table of Contents

Related Manuals for Soundigital POWER SPORTS 2400.1 EVOPS


Summary of Contents for Soundigital POWER SPORTS 2400.1 EVOPS
- Page 1 OWNER’S MANUAL 00.1...
-
Page 2: Table Of Contents
TABLE OF CONTENTS Introduction ........................Features ........................Package contents ..................... Safety instructions ....................Technologies ® ......................Ultra Compact PCB ................. Robust Construction ............... I-Power Supply ................... Full Range ................... Marinization with protection index Ip64 ........Assembling and Disassembling the Plastic Seals ........Panels description Audio inputs and controls............. -
Page 3: Introduction
On this manual you will learn about the product, its features and characteristics, in order to obtain the best result and to be able to enjoy your music with SounDigital quality and power. -
Page 4: Safety Instructions
Make sure the cables are properly secured throughout the installation; Wear gloves, safety glasses and and all necessary PPE during the installation of SounDigital amplifiers. THIS "WARNING" SIGN ALERTS THE USER OF IMPORTANT INFO. NOT FOLLOWING THIS INSTRUCTIONS MAY CAUSE INJURIES TO THE USER OR DAMAGE TO THE EQUIPMENT. -
Page 5: Technologies
PCB were designed to withstand high vibrations, bumps and impacts. I - POWER SUPPLY SounDigital amplifiers are known for their low consumption of battery, and this feature was improved on the EVOPS Line . -
Page 6: Full Range
TECHNOLOGIES VIBRATION ABSORPTION ® DEVICE - VAD ® Our VAD Technology reduces all impact caused by vibration on the electronic circuit board. This can include road vibration and even vibration caused by sound waves, increasing the reliability of our amplifiers. 8.4"... -
Page 7: Assembling And Disassembling The Plastic Seals
ASSEMBLING AND DISASSEMBLING THE PLASTIC SEALS DISASSEMBLING THE PLASTICS SEALS 1. Squeeze the assembled Flexible Plastics Seals 2. Pull out the Plastics Seals *Merely illustrative images. ASSEMBLING THE PLASTICS SEALS Plastic Seal Potentiometer Plastic Seal Slide switch Plastic Seal 1. Hold the disassebled Flexible Plastics Seals and fit them in their specific housing; 2. -
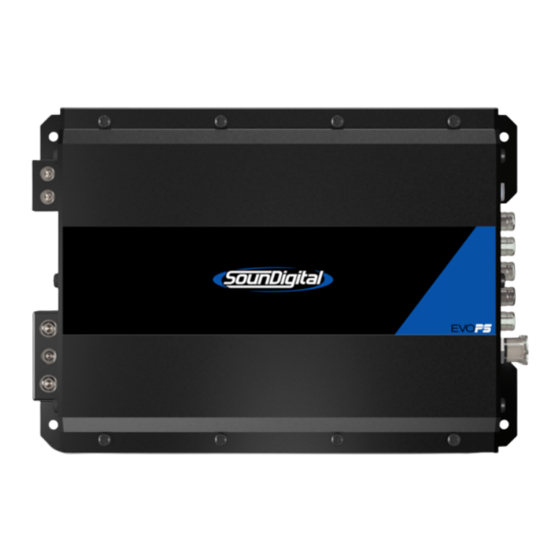
Page 8: Panels Description
PANELS DESCRIPTION Left Channel Audio inputs - RCA connectors Right Channel Variable Gain control Low Pass filter ON/OFF switch key Variable Low Pass filter control (50Hz ~ 500Hz) Variable Subsonic filter control (5Hz ~ 40Hz) Variable Bass Boost Control 50Hz (0dB ~ +12dB) Blue "Power ON"... -
Page 9: Power Inputs And Audio Outputs
ELECTRICAL DIMENSIONING AND AUDIO INPUTS ELECTRICAL DIMENSIONING For proper operation of your SounDigital amplifier, you need the proper dimensioning of the electrical system and the cables used. The table below shows the minimum section of GND cables, +12VDC cables and speaker output cables according to the power generated by the amplifier. -
Page 10: Installation Sequence
INSTALLATION SEQUENCE Warning! Mount the amplifier in such a way you have access to the connectors; Ø Install the power cables in the vehicle/vessel properly, starting from the battery to the Ø fuse holder or circuit breaker, use the cable with the appropriate size. Make all connections, install fuse holders or circuit breakers, but without placing the fuses or with the circuit breakers in the "OFF"... -
Page 11: Wiring Diagram
WIRING DIAGRAM All RCA inputs must be connected for the properly work of the amplifier. Minimum Impedance Model 2400.1 EVOPS 2Ω 2Ω 2400.1 EVOPS 4Ω 4Ω... -
Page 12: Procedure For Setting The Gain
GAIN SETTING GAIN SETTING Necessary equipament: ØDigital AC voltmeter; ØOn the CD player, adjust the audio positioning controls in the center (left ØMedia with sine wave test tone 60Hz and right fader controls); recorded at 0db; ØSet the Low Pass switch to "OFF"; ØScrewdriver 1/8"... -
Page 13: Crossovers Set Up
CROSSOVER SET UP Using Bass Boost The Amplifier Bass Boost setting enables the user to boost the sound intensity at low frequencies of the sound system, where boost intensity can be adjusted. This is a semi-parametric equalizer type circuit with ''Q'' value for the fixed filter, with an intensity boost adjustment from 0 to +12dB (16 times), and a central frequency adjustment of the filter in 50Hz, making it versatile for several types of sound systems. -
Page 14: Technical Specs
TECHNICAL SPECS PARAMETERS 2400.1 2Ω 2400.1 4Ω RMS Power @ 4 Ω** 1584W 2400W RMS Power @ 2 Ω** 2400W Frequency response 5Hz ~ 25kHz 5Hz ~ 25kHz Subsonic 5Hz ~ 40Hz 5Hz ~ 40Hz Low pass filter 50Hz ~ 500Hz 50Hz ~ 500Hz Bass boost 0dB ~ 12dB @ 50Hz...
Need help?
Do you have a question about the POWER SPORTS 2400.1 EVOPS and is the answer not in the manual?
Questions and answers