
Related Manuals for Jumper JPD-FR300


Summary of Contents for Jumper JPD-FR300
- Page 1 JPD-FR300 0482 Infrared Thermometer Instruction Manual Shenzhen Jumper Medical Equipment Co., Ltd Manual Version: 1.0 Date of Issue: 2021/04...
- Page 3 No part of this document may be changed, excerpted, copied, reproduced, or imitated in any form or by any means without the prior consent of Shenzhen Jumper Medical Equipment Co., Ltd.
-
Page 4: Table Of Contents
Contents Unpacking Check.................... 1 Package Contents.................... 1 Safety Precautions...................1 Warning......................3 Symbols......................4 Body Temperature Basics................5 Product Description..................6 Features......................7 Product Structure.....................8 Display Description..................9 Sounds and Backlight Color Instructions............9 Display and Operating Instructions..............10 Measuring Ear Temperature................. 17 Measuring Forehead Temperature..............19 Measuring Object Temperature.............. -
Page 5: Unpacking Check
In case of any damage or operation problem, please contact the dealer or contact Jumper directly. You will need the following information when making your claim: device model, serial number, purchase date, and your contact information and address. - Page 6 - Make sure that the thermometer is not exposed to lint, dust, light (including sunlight), etc. - Please note the effects of degraded sensors that can degrade performance or cause other problems. - Make sure that the thermometer is not exposed to pets, pests. If the thermometer is soiled or its infrared optical components ...
-
Page 7: Warning
Do not touch the tip of the temperature probe, on which a precise temperature sensor resides. Keep the temperature probe clean to make sure accurate readings. Before measuring the temperature from the ear canal, clean the earwax, if any. The ambient temperature must not be extremely high or low. -
Page 8: Symbols
Do not charge an alkaline dry-cell battery or throw it in fire. Otherwise, the battery may explode. Do not disassemble the thermometer or attempt to repair it. Otherwise, the thermometer may be damaged permanently. Do not take temperature measurements on body parts other than forehead and ears. -
Page 9: Body Temperature Basics
Symbol Description A personal injury or damage to the thermometer Warning may occur if the thermometer is not used correctly. Inaccurate reading or damage to the thermometer Attention may occur if the thermometer is not used correctly. Body Temperature Basics •... -
Page 10: Product Description
1°C (1.8°F) each day. Product Description Overview Infrared Thermometer JPD-FR300 measures the body temperature based on the infrared energy emitted from the eardrum or the forehead. Users can quickly get measurement results after positioning properly the temperature probe in the ear canal or forehead.It can also be used to measure the surface temperature of object.(such as milk and water) -
Page 11: Features
Intended use The JPD-FR300 Dual Mode Digital Infrared Thermometer is intended for the measurement of human body temperatures. The forehead mode is indicated for use by people of all ages and the eardrum mode is indicated for use by people above three months old. -
Page 12: Product Structure
● 20 readings recall ● Fever alert ● Switching between ºC and ºF ● Automatic power-off, power saving Extensive application scope ● Forehead temperature measurement applicable to all age groups ● Ear temperature measurement applicable to children older than three months, adults, and the elderly Child mode This mode is recommended for people under 12 years of age. -
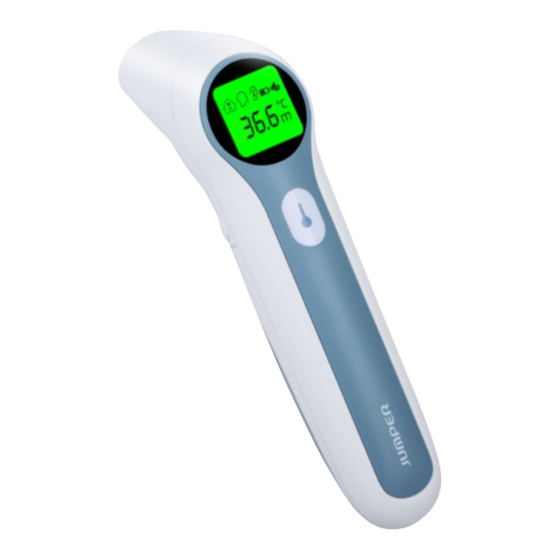
Page 13: Display Description
(5) Probe (take off the cover when measuring the ear temperature) (applied part) (6) Probe cover (Automatic switch among object, forehead and ear modes, by removing the probe cover to measure ear temperature and placing back the probe cover for object and forehead temperature measurement.) (7) Memory button / Sound switch (8) Battery cove Display Description... -
Page 14: Display And Operating Instructions
indicates that your body temperature is normal. When the forehead and ear temperature is between 37.6°C/99.6℉ and 43.0°C/109.4℉, there will be 3 short double beeps and a red backlight. This indicates that your body temperature is a little high. You may have a fever. - Page 15 Operating Instructions Sound and Screen Display Backlight Color Displayed State Take off the probe cover, press and release the Power button for 1 second to power on the thermometer. The symbol “ ” is displayed on the screen. See the table in the “Sounds and Switch to the adult or child backlight color...
- Page 16 Operating Instructions Sound and Screen Display Backlight Color Displayed State Put the cover on the probe, press and release the Power button for 1 second to power on the thermometer .The “Head” symbol is displayed on the screen. See the table in the Switch to the adult or child “Sounds and measurement mode by pressing the...
- Page 17 Operating Instructions Sound and Screen Display Backlight Color Displayed State Put the cover on the probe, switch to the object measurement mode by pressing the Mode button.The See the table in the thermometer enters the Object “Sounds and mode. The “House” symbol backlight color displayed on the screen.
- Page 18 Operating Instructions Sound and Screen Display Backlight Color Displayed State Recall 20 memories In a power-on state, press the Memory button enter the memory mode. When the Memory button is released, 01 will be shown, followed by the recorded reading. Press the Memory button again for the next recorded data.
- Page 19 Operating Instructions Sound and Screen Display Backlight Color Displayed State The display is as shown , when When the power is there is no more data checked while turned back on, recalling memories. Remove 2 dry there are a long batteries and after 10 seconds beep and a green re-install the power to clear all...
- Page 20 Operating Instructions Sound and Screen Display Backlight Color Displayed State When putting on the probe cover, press the Mode button to switch between object and forehead Silent, the modes. Ear mode (adult/child) will backlight is green. be activated by removing the probe cover.
-
Page 21: Measuring Ear Temperature
Operating Instructions Sound and Screen Display Backlight Color Displayed State Error information & low battery The ambient temperature is higher A long beeps,the than 40.0ºC (104.0ºF) or lower than backlight is red. 10.0ºC (50.0ºF). An error occurs when data is being read from or written to the memory, A long beeps,the or the temperature correction is not... - Page 22 ear temperature. 3. Press the Power button to power on the thermometer. 4. The “Ear” symbol is displayed on the screen. 5. Switch between “adult” and “child” modes by pressing Mode button. symbol shows up in “child” mode. 6. Insert the temperature probe into the ear canal. 7.
-
Page 23: Measuring Forehead Temperature
back to make sure the ear canal is straight, so that the temperature probe can receive an infrared ray from the eardrum. Be careful when taking temperature on a child, whose ear canal is small. Measuring Forehead Temperature Put the cover on the probe of thermometer. Press the Power button to power on the thermometer. - Page 24 Press the Power button to power on the thermometer. Press the Mode button, the thermometer enters the Object mode. The “ ” symbol is displayed on the screen. Point the thermometer probe to the center of the object, about “ 1-3cm” away from the object surface. Press and release the Measure button for 1 second.
-
Page 25: Replacing Batteries
Notes: (1) The thermometer is suitable for an indoor environment without strong air convection (for example, winds from a fan, an air-conditioner, or a heater) between the thermometer and the person. (2) Make sure that the ear canal is clean and dry before starting a measurement. -
Page 26: Cleaning And Disinfection
Make sure that the batteries are installed correctly. Otherwise, the thermometer may be damaged. If the low-battery symbol is displayed on the screen, replace the batteries. Batteries of a same type should be used. Dispose the used batteries in accordance with the local environmental policies. The thermometer is shipped with batteries. - Page 27 soft cloth. Clean the lens of the temperature probe with a cotton swab. (3) Wipe the thermometer body with a slightly damp soft cloth. Keep water out off the lens during the cleaning process. Otherwise, the lens may be damaged. The lens may be scratched if it is cleaned with a hard object, which might result in inaccurate readings.
-
Page 28: Maintenance
of repetitions per disinfection is not more than 2 times. Clean and disinfect the thermometer under the temperature of +10℃~+40℃(50℉-104℉), the relative humidity of 15%~85%RH (no condensation) and the barometric pressure of 86kPa~106kPa. Maintenance Preventive inspection & maintenance period Ensure the safety of thermometer, and check whether it has potential safety hazards in normal use each week, e.g. -
Page 29: Troubleshooting
Troubleshooting Problem Possible Cause Solution Low battery Change the batteries. Polarities of the Make sure that the The thermometer batteries are reversed. batteries are installed fails to power on. correctly. The thermometer is Contact the damaged. manufacturer. The ambient Take a measurement temperature is lower under an ambient "Er1"... -
Page 30: Specifications
Specifications Product Name Infrared Thermometer Product Model JPD-FR300 Power Supply Mode Internal power supply Operating Voltage DC 3V Battery Model AAA x 2 Operating Mode Continuous operating Display Segment LCD Measure time About 1 second Latency Time About 3 seconds Forehead mode: 22.0°C–43.0°C (71.6°F–109.4°F) -
Page 31: Security Class
Outer dimensions 155.9*40.2*49.2mm (mm) Weight (g) Thermometer (with batteries): 90g Manufacturing date see the label Service life 2 years Alkaline dry battery for around 20000 Battery life measurements Temperature: 10°C~ 40°C (50°F–104°F) Operating Humidity: 15%–95% RH, non-condensing Environment Atmospheric pressure: 86–106 kPa The infrared thermometer has been tested and conforms to the standard ASTM E1965-98. -
Page 32: Storage And Transportation
EMC and needs to be installed and put into service according to information provided the ACCOMPANYING DOCUMENTS. ● Portable and mobile RF communications equipment can affect Infrared Thermometer JPD-FR300. ● The Infrared Thermometer JPD-FR300 should not be used adjacent to or stacked with other equipment. - Page 33 Guidance and manufacturer´s declaration – Electromagnetic emission The Infrared Thermometer JPD-FR300 is intended for use in the electromagnetic environment specified below. The customer or the user of the Infrared Thermometer JPD-FR300 should assure that it is used in such an environment. Emissions...
- Page 34 Guidance and manufacturer´s declaration – Electromagnetic immunity The Infrared Thermometer JPD-FR300 is intended for use in the electromagnetic environment specified below. The customer or the user of the Infrared Thermometer JPD-FR300 should assure that it is used in such an environment. Immunity...
- Page 35 frequency transmitter. Recommended separation distance where p is the maximum output power rating of the transmitter in watts (W) according to the transmitter manufacturer and d is the recommended separation distance in metres (m). Field strengths from fixed transmitters, determined by an Electromagnetic site survey,a should be less than...
- Page 36 RF transmitters, an electromagnetic site survey should be considered. If the measured field strength in the location in which the JPD-FR300 is used exceeds the applicable RF compliance level above, the JPD-FR300 should be observed to verify normal operation. If abnormal performance is observed, additional measures may be necessary, such as re-orienting or relocating the JPD-FR300.
- Page 37 RF communications equipment (transmitters) Infrared Thermometer JPD-FR300 as recommended below, according to the maximum output power of the communications equipment. Rated Separation distance according to frequency of maximum transmitter output power 80 MHz to 800 MHz 800 MHz to 2.5 GHz...
-
Page 38: Warranty And After-Sale Service
2.Failure resulting from an unexpected dropping during application or transportation. 3.Failure resulting from not following the instructions in the user’s manual. After-sale service unit: Shenzhen Jumper Medical Equipment Co., Ltd. Address: D Building, No. 71, Xintian Road, Fuyong Street, Baoan, Shenzhen,Guangdong,China Tel: +86-755-26696279 Fax: +86-755-26852025 E-mail:info@jumper-medical.com... - Page 40 Shenzhen Jumper Medical Equipment Co., Ltd. Address: D Building, No. 71, Xintian Road, Fuyong Street, Baoan, Shenzhen, Guangdong, China Tel:+86-755-26696279 Fax:+86-755-26852025 Website: http://www.jumper-medical.com...
Need help?
Do you have a question about the JPD-FR300 and is the answer not in the manual?
Questions and answers
it shows bright red LO , yet i checked the batteries and they are ok
A bright red backlight with three short double beeps on the Jumper JPD-FR300 indicates that your body temperature is a little high and you may have a fever. It is advised to consult your doctor if unsure.
This answer is automatically generated