
Related Manuals for Evolution F210CMS


Summary of Contents for Evolution F210CMS
- Page 1 F210 Original Instructions Date Published: 01 / 08 / 2018 Originally written in UK English...
-
Page 2: Evolution Limited Guarantee
We sincerely thank you for selecting a product from Evolution Power Tools. EVOLUTION LIMITED GUARANTEE Evolution Power Tools reserves the right to make improvements and modifications to the product design without prior notice. Please refer to the guarantee registration leaflet and/or the packaging for details of the terms and conditions of the guarantee. -
Page 3: Machine Specifications
www.evolutionpowertools.com MACHINE SPECIFICATIONS MACHINE METRIC IMPERIAL Motor (230-240V ~ 50 Hz) 1200W Speed No Load 3750 min 3750 min Weight (Net) 5.8 kg 12.8 lb Dust Port Diameter 35mm 1-3/8 In. Tool Dimensions (H x W x L) (0° / 0°) 10-15⁄64 x 260 x 393 x 381mm 15-15⁄32 x 15 In. -
Page 4: Labels And Symbols
LABELS & SYMBOLS WARNING: Do not operate this machine if Wear Dust Protection warning and/or instruction labels are missing or damaged. Contact Evolution Power Tools for Wear Safety Gloves replacement labels. Note: All or some of the following symbols may Read Instructions appear in the manual or on the product. -
Page 5: Safety Precautions
POWER TOOL GENERAL (2.1) SAFETY INSTRUCTIONS Mitre Saw and has been designed to be used with special Evolution blades. Only use WARNING: Read all safety warnings and accessories designed for use in this machine instructions. Failure to follow the warnings... - Page 6 www.evolutionpowertools.com operation. If damaged, have the power tool extension cord and keep them away from the work area. repaired before use. Many accidents are e) Store idle tools caused by poorly maintained power tools. b) Use the power tool, accessories and tool •...
-
Page 7: Blade Safety
www.evolutionpowertools.com p) Remove adjusting keys and wrenches between 15°C and 30°C. The humidity level • Form the habit of checking to see that keys should be less than 60%. and adjusting wrenches are removed from MITRE SAW SPECIFIC SAFETY the tool before turning it on. (3.5) q) Avoid unintentional starting The following specific safety instructions for... -
Page 8: Perform Cuts Correctly And Safely
www.evolutionpowertools.com PERFORM CUTS CORRECTLY personal injury including the following. (3.8) AND SAFELY Read all these instructions before attempting to operate this product and Always ensure that before each cut the mitre save these instructions. saw is mounted in a stable position. If needed the mitre saw can be mounted on SAFE OPERATION a wooden base or work bench or attached... - Page 9 Check carefully to ensure that the machine with this machine the following accessories is in good condition and account for all the are also available from the Evolution online accessories listed in this manual. Also make shop at www.evolutionpowertools.com or sure that all the accessories are complete.
-
Page 10: Machine Overview
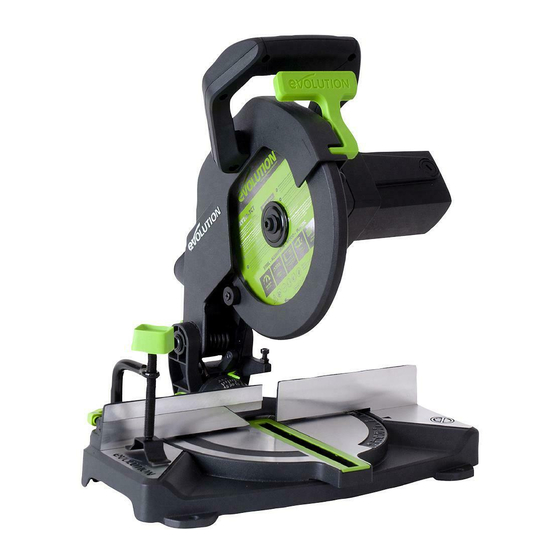
www.evolutionpowertools.com MACHINE OVERVIEW 1. ON/OFF TRIGGER SWITCH 11. UPPER BLADE GUARD 2. BEVEL LOCKING HANDLE 12. SLIDING FENCE 3. MITRE LOCKING SCREW 13. LOWER BLADE GUARD 14. ROTARY TABLE 4. HEAD LATCHING PIN 5. MITRE ANGLE SCALE 15. MACHINE BASE/TABLE TOP 6. -
Page 11: Assembly And Preparation
www.evolutionpowertools.com (7.1) ASSEMBLY AND PREPARATION WARNING: Always disconnect the saw from the power source before making any adjustments. (7.2) PERMANENTLY MOUNTING THE MITRE SAW To reduce the risk of injury from unexpected saw movement, place the saw in the desired location either on a workbench or other suitable machine stand. -
Page 12: The Sliding Upper Fence Section
www.evolutionpowertools.com (7.4) HOLD DOWN CLAMP (Fig. 4) Two sockets (one either side) are incorporated into the rear of the machines fence. These sockets are for positioning the top hold down clamp. • Fit the clamp to the retaining socket that best suits the cutting application, ensuring that it is fully pushed down. -
Page 13: Adjustment Of Precision Angles
www.evolutionpowertools.com (8.3) BODY AND HAND POSITIONING (Fig. 7) • Never place your hands within the ‘No Hands Zone’ (at least 150mm away from the blade). Keep hands No Hand away from the path of the blade. Zone • Secure the workpiece firmly to the table and against No-Hands Zone No-Hands Zone the fence to prevent any movement. -
Page 14: Cutting Head Travel
www.evolutionpowertools.com 45° Bevel Stop Adjustment • Loosen the bevel locking handle and tilt the cutting head completely to the left until it rests against the 45° stop. • Use a set square (avoiding the TCT tips of the blade teeth), check that the blade is at 45°... -
Page 15: Mitre Angle Scales & Pointer
www.evolutionpowertools.com • If adjustment is necessary, loosen the two fence attachment screws using a 5mm Hex key (Not supplied). • Re-position the fence in its elongated slots until alignment is achieved. • Securely tighten the socket head Hex screws. MITRE ANGLE SCALES & POINTER Note: There are dual mitre angle scales cast into the RH (Right Hand) side of the rotary table. -
Page 16: Chop Cutting
www.evolutionpowertools.com To release the cutting head from the locked down position: • Gently press down on the cutting handle. • Pull out the head latching pin (Fig. 16) and allow the cutting head to rise to its upper position. If release is difficult: •... - Page 17 www.evolutionpowertools.com Positive stops are provided at 45°, 30°, 22.5°, 15°, and 0° to both the right hand and left hand sides. • Loosen the mitre locking screw (Fig. 20) by turning it anti-clockwise. • Turn the rotary table to the desired angle. A mitre angle protractor scale is incorporated into the rotary table to aid setting.
-
Page 18: Clearing Jammed Material
Note: It is recommended that the operator wears protective gloves when handling the blade during installation or when changing the machines blade. Warning: Only use genuine Evolution blades or those blades specifically recommended by Evolution Power Tools and which Fig. 27 are designed for this machine. - Page 19 Ensure the hex key is removed and the arbor lock button has released before operating. Ensure the blade guard is fully functional before using the machine. (8.12) USE OF OPTIONAL EVOLUTION ACCESSORIES Not supplied as original equipment (see ‘Additional Accessories’). DUST BAG (8.13)
-
Page 20: Maintenance
If it is damaged or worn, it must be Note: Any maintenance must be carried replaced. Replacement inserts are available out with the machine switched off and from Evolution Power Tools. disconnected from the mains/battery power supply. Check that all safety features and Removing the Table Insert: guards operating correctly on a regular basis. -
Page 21: Ec Declaration Of Conformity
EC DECLARATION OF CONFORMITY The manufacturer of the product covered by this Declaration is: Evolution Power Tools, Venture One, Longacre Close, Holbrook Industrial Estate, Sheffield, S20 3FR. The manufacturer hereby declares that the machine as detailed in this declaration fulfils all the relevant provisions of the Machinery Directive and other appropriate directives as detailed below. - Page 22 www.evolutionpowertools.com Notes...
- Page 23 www.evolutionpowertools.com Notes...
- Page 24 Total Tools (Importing) Pty Ltd Evolution Power Tools SAS 20 Thackray Road 61 Avenue Lafontaine Port Melbourne 33560, Carbon-Blanc Vic 3207 Bordeaux T: 03 9261 1900 T: +33 (0)5 57 30 61 89 Evolution Power Tools Ltd Evolution Power Tools LLC...
Need help?
Do you have a question about the F210CMS and is the answer not in the manual?
Questions and answers