Table of Contents
Advertisement
Quick Links
Advertisement
Table of Contents

Related Manuals for Leica Geosystems LINO L6G


Summary of Contents for Leica Geosystems LINO L6G
- Page 1 Leica LINO L6R / L6G 1.800.561.8187 information@itm.com www. .com...
-
Page 2: Table Of Contents
Overview Technical data Instrument Set-up Operations How to use the smart adapters Message Codes Accuracy Check Care Warranty Safety instructions Leica Lino L6R/L6G 1.800.561.8187 information@itm.com www. .com... -
Page 3: Overview
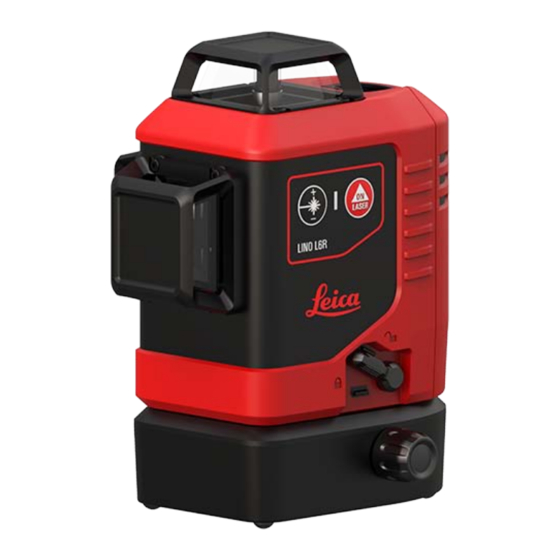
Overview Ov e r v i e w The Leica Lino L6R/L6G is a self-levelling mul- There are 2 different types available: 1 Laser key (on keypad), ON/OFF tifunctional laser. It combines the advantage of three 360° line lasers in one tool and an integrated L6R (red laser) 2 Status LED (on keypad) fine adjustment knob. -
Page 4: Technical Data
Technical data T e c h n i c a l d a t a Description Beam direction/fan angle 2 x Vertical 360°, 1 x Horizontal 360° Intersection point direction Up, down, right, left, front, back (90°/180°) Range/Diameter* 25 m/50 m (82 ft/164 ft) 35 m/70 m (115 ft/230 ft) Range/Diameter* with receiver 70 m/140 m (230 ft/460 ft)**... -
Page 5: Instrument Set-Up
Instrument Set-up I n s t r u me n t S e t - u p Levelling locked Introduction Levelling lock Turn the levelling lock in order to transport or tilt The safety instructions (see Safety Instruc- the instrument beyond the self-levelling range. Levelling unlocked tions) and the user manual should be read When locked, the pendulum is fixed and the self-... - Page 6 Instrument Set-up Laser receiver Li-Ion battery CAUTION To be able to detect the laser lines over long dis- Connecting the charger using the wrong adapter Charge Li-Ion battery tances or in unfavourable lighting conditions, a may cause serious damage to the instrument. Any laser receiver can be used.
- Page 7 Instrument Set-up Insert Li-Ion battery Insert the battery-pack Alkaline batteries To ensure a reliable use, we recommend using high quality Alkaline batteries. Insert Alkaline batteries Insert the battery-pack by pressing it down and Insert the battery-pack by pressing it down and then tilting it towards the housing as shown until it then tilting it towards the housing as shown until it snaps in.
-
Page 8: Operations
Operations Op e r a t i o n s Switching ON/OFF Auto power-off Place the lock switch to the unlocked position (see Levelling lock). To activate auto power- off after 30 min operation press and hold the ON button at start for 5 sec. The status LED blinks 3 times in green colour. - Page 9 Operations Functions Laser on/Vertical and horizontal mode All on mode* Layout mode Check if self-levelling is required and cor- Horizontal mode Vertical side mode respondingly activated. (See Levelling lock for details) * In very hot environments it can be that maximum two lines work simultaneously (see Message Codes).
- Page 10 Operations Vertical front mode Switching line intensity Saving operating mode Place the lock switch to the unlocked position (see Levelling lock). To save the favourite operating mode, press and hold the ON and power adjust- ment button during operation for 2 sec. The status LED blinks 3 times in green colour.
-
Page 11: How To Use The Smart Adapters
How to use the smart adapters Ho wt o u s e t h e s ma r t a d a p t e r s Setup device to adapter Alignment of vertical laser lines Alignment of horizontal laser lines Turn the adjustment knob of UAL130 to fine adjust the horizontal line to the desired reference level. - Page 12 How to use the smart adapters Different fixing applications Leica Lino L6R/L6G 1.800.561.8187 information@itm.com www. .com...
-
Page 13: Message Codes
Message Codes Me s s a g e Co d e s Laser Cause Correction ON/OFF lights red Instrument has low power Charge Li-Ion battery or change Alkaline bat- teries ON/blinks lights orange Instrument is close to temperature limit. In Cool down instrument very hot environments it can be that maximum two lines work simultaneously. -
Page 14: Accuracy Check
If the difference does not exceed 2 mm, then the instrument is within tolerance. Should your instrument be outside of the spe- cified tolerance, please contact a local dealer or an authorised Leica Geosystems dis- tributor. Leica Lino L6R/L6G 1.800.561.8187 information@itm.com... - Page 15 If the difference does not exceed 2 mm, then the instrument is within tolerance. Should your instrument be outside of the spe- cified tolerance, please contact a local dealer or an authorised Leica Geosystems dis- tributor. Leica Lino L6R/L6G 1.800.561.8187 information@itm.com...
- Page 16 B1, then the instrument is within tol- from point B1, then the instrument is within tol- erance. erance. Should your instrument be outside of the spe- cified tolerance, please contact a local dealer or an authorised Leica Geosystems dis- tributor. Leica Lino L6R/L6G 1.800.561.8187 information@itm.com www.
- Page 17 Should your instrument be outside of the spe- Should your instrument be outside of the spe- cified tolerance, please contact a local dealer cified tolerance, please contact a local dealer or an authorised Leica Geosystems dis- or an authorised Leica Geosystems dis- tributor. tributor.
-
Page 18: Care
Care Ca r e Never immerse the device in water. Wipe off dirt with a damp soft cloth. Never use aggressive cleaning agents or solvents. Treat the instrument with the same care that you would apply to bin- oculars or a camera. Dropping or violent shaking of the instrument may damage it. -
Page 19: Warranty
More detailed information about the International Limited Warranty can be found on the internet at: Calibration and repair service Leica Geosystems recommend to check the device within regular intervals to prove the function and reliability in accordance with standards and requirements. At least one time per year. -
Page 20: Safety Instructions
Permitted use Safety instructions 1. Projection of horizontal and vertical laser lines. Sa f e t y i n s t r u c t i o n s Areas of responsibility The person responsible for the instrument must ensure that all users understand these directions and adhere to them. - Page 21 WARNING Changes or modifications not expressively approved by Leica Geosystems/manufacturer for compliance could void the user´s authority to oper- ate the equipment. WARNING Laser/adapters should not be used in the vicinity of pacemaker because of integrated magnets which can affect the function of the pacemaker.
- Page 22 Safety instructions Disposal Transport WARNING High mechanical stress, high ambient tem- Transport of instrument CAUTION peratures or immersion into fluids can cause leak- Always set the device in "Locked" position by turn- age, fire or explosion of the batteries. Flat batteries must not be disposed of with house- ing the lock switch when transporting the device hold waste.
- Page 23 Safety instructions 2. this instrument must accept any inter- Electromagnetic Compatibility FCC statement (applicable in U.S.) ference received, including interference that may cause undesired operation. (EMC) This equipment has been tested and found to com- ply with the limits for a Class B digital instrument, ISED statement (applicable in Canada) pursuant to part 15 of the FCC rules.
- Page 24 Safety instructions Laser classification Laser Class 2 products Beam divergence line Do not stare into the laser beam or direct it 0.05 mrad * 360° towards other people unnecessarily. Eye pro- tection is normally afforded by aversion responses including the blink reflex. WARNING Looking directly into the beam with optical aids (e.g.
- Page 25 Safety instructions Labelling Subject to change (drawings, descriptions and technical data) without prior notice. Art. No. 913010a Leica Lino L6R/L6G 1.800.561.8187 information@itm.com www. .com...
Need help?
Do you have a question about the LINO L6G and is the answer not in the manual?
Questions and answers