
Related Manuals for Outsunny 840-236


Summary of Contents for Outsunny 840-236
- Page 1 INboc022_DE_EN 840-236 IMPORTANT, RETAIN FOR FUTURE REFERENCE: READ CAREFULLY ASSEMBLY & INSTRUCTION MANUAL...
- Page 2 8-12...
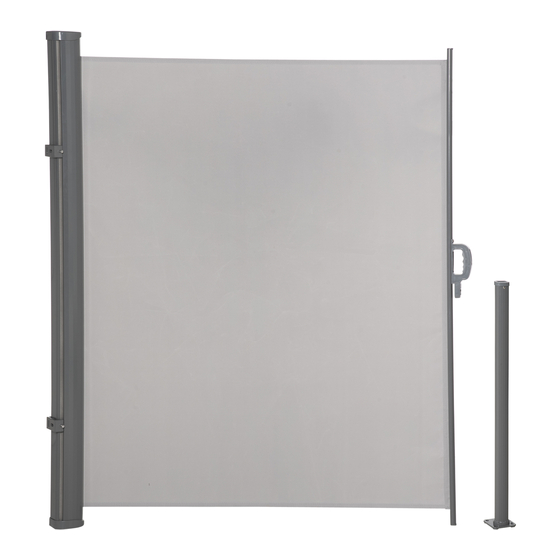
- Page 3 TEILELISTE Das Kassettenteil Ständersäule Halterungen Ø10×50 Kunststoffdübel M6 × 60 Sechskant- Blechschraube Ø6 Unterlegscheibe M8 × 75 Sechskant- Blechschraube Ø8 Unterlegscheibe HINWEIS: Bereiten Sie vor der Installation die folgenden Werkzeuge vor (diese Werkzeuge sind nicht im Lieferumfang enthalten) 1.Maßband 2.Sechskantschlüssel CR-V5 mm 3.Kreuzschraubendreher 4.Schlagbohrer...
- Page 4 Warnung: Wenn Sie die Markise montieren, halten Sie das Kassettenteil und die Standsäule auf einer Linie, sonst verformt sich der Stoff und lässt sich nur schwer öffnen und schließen. 1.bohren Sie 6 cm tiefe Löcher in der Größe, wie in der folgenden Abbildung gezeigt 30mm Querschnitt...
- Page 5 2.Einen Ø10 x 50 mm Kunststoffdübel in jedes der Löcher einführen. 3.Befestigen Sie die Halterung mit der Sechskantschraube M6 x 60 4.Kassettenteil in die Halterung einsetzen, flache Linsenkopfschraube M6 x 16 mm mit Sechskantschlüssel CR-V5mm anziehen 5.Bohren Sie vier Löcher mit 10 mm Durchmesser in den Boden in der Größe, wie in der folgenden Abbildung gezeigt Querschnitt der Wand...
-
Page 6: Richtige Verwendung
6.Setzen Sie in jedes der Löcher einen Ø10 x 50 mm großen Kunststoffdübel (4 Stück) ein. 7. Richten Sie das linke untere Loch der Ständersäule und das Loch im Boden aus und ziehen Sie sie mit der Sechskantschraube M8 x 75 fest. RICHTIGE VERWENDUNG 1. - Page 7 1. Allgemeine Warnhinweise Lesen Sie alle Anweisungen und Warnhinweise sorgfältig durch, bevor Sie dieses Produkt verwenden. Die Nichtbeachtung von Warnhinweisen und Anweisungen kann zu schweren Verletzungen, Tod oder Sachschäden führen. Überprüfen Sie vor der Installation, ob alle Zubehörteile vollständig und unbeschädigt sind. Falls nicht, wenden Sie sich an den Kundendienst.
- Page 8 PAST LIST The cassette part Stand column Brackets Ø10×50 plastic expansion tube M6×60 hexagon tapping bolt Ø6 washer M8×75 hexagon tapping bolt Ø8 washer NOTE: Preparing the following tools before installation (these tools are not provided) 1. Tape measure 2. Hexagonal spanner CR-V5mm 3.
- Page 9 Warning: When mounting the awning, keep the cassette part and stand column on the horizon, or the fabric will deformation and difficult to open and close. 1.Drill 6cm deep holes in the size as the following picture shows 30mm 30mm...
- Page 10 2. Insert oneØ10x50mm plastic expansion tube in each of holes. 3. Fix the bracket with M6x60 hexagon tapping bolt 4. Insert the cassette part into the bracket, tighten the flat fillister head screw M6x16mm with Hexagonal spanner CR-V5mm 5.Drill four 10mm diameter holes on the floor in the size as the following pic- ture shows -10-...
-
Page 11: Correct Use
6.sert one Ø10x50 mm plastic expan- sion tube(4pcs)in each of holes 7. Make the left bottom hole of stand column and the hole on the floor alignment, and tighten them with M8x75 hexagon tapping bolt. CORRECT USE 1.Keep the front bar upright, hold the handle and pull it over the column. Hold the handle tightly, See the figure below for details -11-... - Page 12 1.General warnings Read all the instructions and warnings carefully before using this product. Failure to follow warnings and instructions can result in severe injury, death, or property damage. Before installation, check if all accessories are complete and without damage. If not, contact customer service. Keep these instructions in a safe place for future reference.
Need help?
Do you have a question about the 840-236 and is the answer not in the manual?
Questions and answers