Advertisement
Quick Links
IN221200424V01_GL_840-014_840-014V01
EN_IMPORTANT, RETAIN FOR FUTURE REFERENCE: READ CAREFULLY.
FR_IMPORTANT:A LIRE ATTENTIVEMENT ET À CONSERVER POUR CONSULTATION
ULTÉRIEURE.
ES_IMPORTANTE, LEA Y GUARDE PARA FUTURAS REFERENCIAS.
PT_IMPORTANTE, RETER PARA REFERÊNCIA FUTURA: LEIA ATENTAMENTE.
DE_WICHTIG! SORGFÄLTIG LESEN UND FÜR SPÄTER NACHSCHLAGEN AUFBEWAHREN.
IT _ IMPORTANTE! CONSERVARE IL PRESENTE MANUALE PER FUTURO RIFERIMENTO E
LEGGERLO ATTENTAMENTE.
IN221200424V01_GL
US_CA
Advertisement

Related Manuals for Outsunny 840-014


Summary of Contents for Outsunny 840-014
- Page 1 IN221200424V01_GL IN221200424V01_GL_840-014_840-014V01 EN_IMPORTANT, RETAIN FOR FUTURE REFERENCE: READ CAREFULLY. FR_IMPORTANT:A LIRE ATTENTIVEMENT ET À CONSERVER POUR CONSULTATION ULTÉRIEURE. ES_IMPORTANTE, LEA Y GUARDE PARA FUTURAS REFERENCIAS. PT_IMPORTANTE, RETER PARA REFERÊNCIA FUTURA: LEIA ATENTAMENTE. DE_WICHTIG! SORGFÄLTIG LESEN UND FÜR SPÄTER NACHSCHLAGEN AUFBEWAHREN. IT _ IMPORTANTE! CONSERVARE IL PRESENTE MANUALE PER FUTURO RIFERIMENTO E LEGGERLO ATTENTAMENTE.
- Page 9 PART...
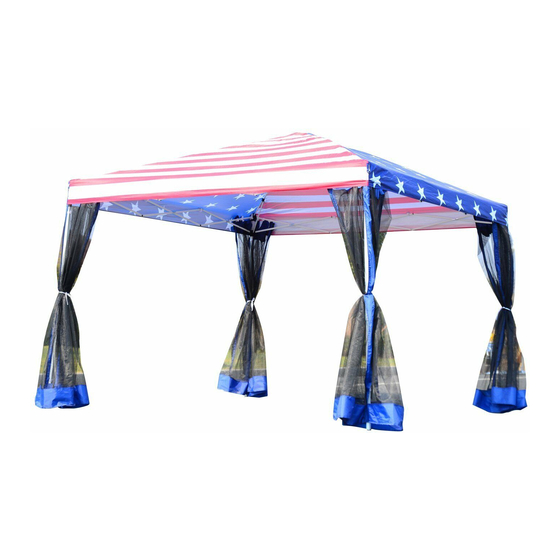
- Page 10 EN_STEP 2-Attach roof canopy (image 2). Lay the roof canopy over the frame. Position each corner of the roof canopy at the top of each frame pole. FR_ÉTAPE 2 - Fixez l'auvent du toit (image 2). Posez le toit en toile sur le cadre. Placez chaque coin de l'auvent au sommet de chaque poteau du cadre.
- Page 11 EN_STEP 3-Secure roof canopy (image 3). Secure each corner of the roof canopy to the top of each frame pole using the fastening tabs. Ensure roof canopy completely covers all sides of the roof frame. FR_ÉTAPE 3 - Fixez l'auvent du toit (image 3). Fixez chaque coin de l'auvent au sommet de chaque poteau du cadre à...
- Page 12 EN_STEP 4-Extend and lock roof frame (image 4) & (image 5). Position one hand below the roof frame. Standing at opposite corners, pull out roof frame to extend fully. At the same time, push up roof frame with other hand until it 'clicks' into the locked position. Repeat at all four corners.
- Page 13 EN_STEP 5- Extend poles (image 6). Standing at opposite corners on the pole base, pull up the roof frame by holding the lower section of the pole. Pull up the roof frame until the pole 'clicks' into the right height position. FR_ÉTAPE 5- Déployez les poteaux (image 6).
- Page 14 EN_STEP 6- Fitting net wall (image 7). Connect the net wall with beam pole by velcro Be sure the zipper door in mid and at opposite side. FR_ÉTAPE 6- Montage de la paroi du filet (image 7). Reliez la paroi du filet au poteau de la poutre à l'aide de velcro. Assurez-vous que la porte de la fermeture éclair est au milieu et sur le côté...
- Page 15 EN_STEP 7- Secure gazebo (image 8). Secure the gazebo by driving 1*tent peg through the hole on each of the poles bases. Tie one end of the guy rope to each corner of the roof canopy using the tabs provided. Secure the other end of the guy rope to the ground using 1*tent peg.
Need help?
Do you have a question about the 840-014 and is the answer not in the manual?
Questions and answers
I need a replacement part for one of the corner plastic connector. Where can I find the part number and order it?