Advertisement
Quick Links
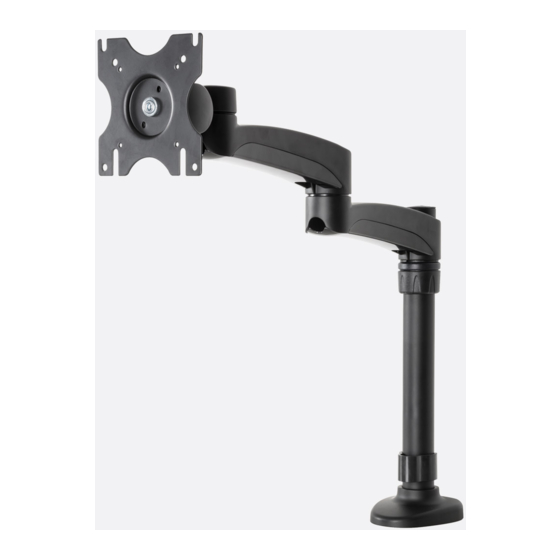
BT7373
DESK MOUNT WITH ARTICULATED ARM
INSTALLATION GUIDE & PARTS LIST
This Pack Contains 1 Desk Mount
PLEASE KEEP THIS FOR FUTURE REFERENCE
REGISTERED DESIGN NO. 001713280-0040
Installation Safety Notes.....................................................................................................................2
Parts List.............................................................................................................................................4
Installation Instructions.......................................................................................................................6
Product Dimensions..........................................................................................................................15
B-Tech Contact Details.....................................................................................................................16
INSTALLATION TOOLS REQUIRED
Crosshead
screwdriver
B-TECH AUDIO VIDEO MOUNTS
FEATURES
Designed for screens up to 24" (61cm) / 9kg (20lbs)
Fits screens with VESA mounting patterns:
75 x 75mm and 100 x 100mm
Optional desk clamp and grommet included
Easy tilt adjustment +/-40° tilt
Maximum extension is 457mm (18")
Features three swivel points: 360° at pole,
360° at both pivot points and 180° at interface
Simple installation with all mounting hardware included
CONTENTS
2.5mm Hex Key
(Supplied)
www.btechavmounts.com
4mm Hex Key
(Supplied)
Advertisement

Related Manuals for B-Tech BT7373


Summary of Contents for B-Tech BT7373
-
Page 1: Table Of Contents
Simple installation with all mounting hardware included REGISTERED DESIGN NO. 001713280-0040 CONTENTS Installation Safety Notes........................2 Parts List.............................4 Installation Instructions........................6 Product Dimensions..........................15 B-Tech Contact Details........................16 INSTALLATION TOOLS REQUIRED Crosshead 2.5mm Hex Key 4mm Hex Key screwdriver (Supplied) (Supplied) B-TECH AUDIO VIDEO MOUNTS www.btechavmounts.com... - Page 3 Spoleþnost B-Tech International Ltd. doporuþuje provést instalaci tohoto produktu prost ednictvím odborného instalátora AV þi jinak zp sobilé osoby. Spoleþnost B-Tech International Ltd, její distributo i a prodejci nenesou odpov dnost za škody nebo zran ní zp sobená nevhodnou instalací. Tento výrobek je nutno umístit do vhodné...
-
Page 4: Parts List
BT7373 PARTS LIST GROMMET CLAMP Suitable for loads up to 9kg (20lbs) - Page 5 PART NAME INTERFACE ASSEMBLY HEIGHT ADJUSTMENT COLLAR M6 x 15mm HEX SCREW M5 x 5mm GRUB SCREW M6 x 10mm HEX SCREW CIRCULAR FOAM PAD RECTANGULAR FOAM PAD ANGLED PLASTIC CAP 2.5mm HEX KEY (FOR PART 10) 4mm HEX KEY (FOR PARTS 9 & 11) INTERFACE KIT PLEASE KEEP THIS FOR FUTURE REFERENCE...
-
Page 6: Installation Instructions
INSTALLATION INSTRUCTIONS Choose a preferred mounting method. i. Clamp (page 6) ii. Grommet (page 8) i. Desk clamp option. Max 70mm (2.8") - Page 7 Attach the foam pads to the underside of the clamp base. Place the mount over edge of the desk and tighten the short handwheel. DESKTOP...
- Page 8 ii. Grommet Clamp Max 95mm (3.7")
- Page 9 Remove the desk clamp and attach the grommet plate. Then attach the foam pads onto the grommet plate. Place the mount over the cable management hole and screw the handwheel into the grommet plate, then tighten the nut to clamp the desk. DESKTOP...
- Page 10 Attach the interface plate to the flat screen. FLAT SCREEN To lock the adjustment collar, hold the top of the collar and rotate the lower part of the adjustment collar. LOCK COLLAR...
- Page 11 Slide the flat screen and arms onto the pole, adjust height, then tighten the grub screw. FLAT SCREEN iii. LOCK COLLAR UNLOCK COLLAR...
- Page 12 OPTIONAL : Cable Management. Insert the cable into the cable management slots on the underside of the arms. WARNING: Ensure articulating arms are fully extended before connecting cables. FLAT SCREEN CABLE CABLE CABLE CAUTION: Ensure there is adequate cable slack for movement of the screen, and that cables will not be pinched when the mount is closed.
- Page 13 To increase tilt resistance, tighten part 9. +/-40° If this does not hold the screen at the required tilt, remove the flat screen from the interface. Then remove plastic nut cover and tighten the M8 nyloc nut. M8 nyloc nut...
- Page 14 Tilt and swivel. 360° 360° 360° +/-90° FLAT SCREEN...
-
Page 15: Product Dimensions
DESK CLAMP, GROMMET & BASE INTERFACE PLATE 169mm 6.7" 100mm 3.9" 75mm 3" 72mm 83.7mm 2.8" 3.3" 120mm 4.7" THESE INSTRUCTIONS ARE INTENDED AS A GUIDE ONLY AND B-TECH ACCEPTS NO LIABILITY FOR THE ACCURACY OF THE INFORMATION CONTAINED IN THIS DOCUMENT. -
Page 16: B-Tech Contact Details
©2011 B-Tech International Ltd. All rights reserved. B-Tech Audio Video Mounts is a division of B-Tech International Ltd. B-Tech & Better By Design are registered trademarks of B-Tech International Ltd. All other brands and product names are trademarks of their respective owners.
Need help?
Do you have a question about the BT7373 and is the answer not in the manual?
Questions and answers