Audio Technica AT-LP5 Installation And Operations
Direct drive turntable with analog and usb outputs
Hide thumbs
Also See for AT-LP5:
- Installation and operation manual (49 pages) ,
- Installation and operation manual (17 pages) ,
- Installation and operation manual (21 pages)
Table of Contents
Advertisement
Quick Links
Direct Drive Turntable
- AT-LP5 with Analog and USB Outputs -
Platine tourne-disque à entraînement direct
AT-LP5 sorties RCA analogiques et USB
Giradisco de tracciòn directa
AT-LP5 con salidas RCA estéreo analogico y USB
Installation and Operation Pages 2-7
Installation et utilisation Pages 8-13
Instalación y funcionamiento Páginas 14-19
Advertisement
Table of Contents

Subscribe to Our Youtube Channel
Related Manuals for Audio Technica AT-LP5


Summary of Contents for Audio Technica AT-LP5
- Page 1 Direct Drive Turntable - AT-LP5 with Analog and USB Outputs - Platine tourne-disque à entraînement direct AT-LP5 sorties RCA analogiques et USB Giradisco de tracciòn directa AT-LP5 con salidas RCA estéreo analogico y USB Installation and Operation Pages 2-7 Installation et utilisation Pages 8-13...
- Page 2 Direct Drive Turntable with Analog and USB Outputs Safety instructions 1. Read these instructions. Warning: To reduce the risk of fire or electric shock, do not expose this apparatus to rain or moisture. The apparatus shall not be exposed 2. Keep these instructions. to dripping or splashing and that no objects filled with liquids, such as 3.
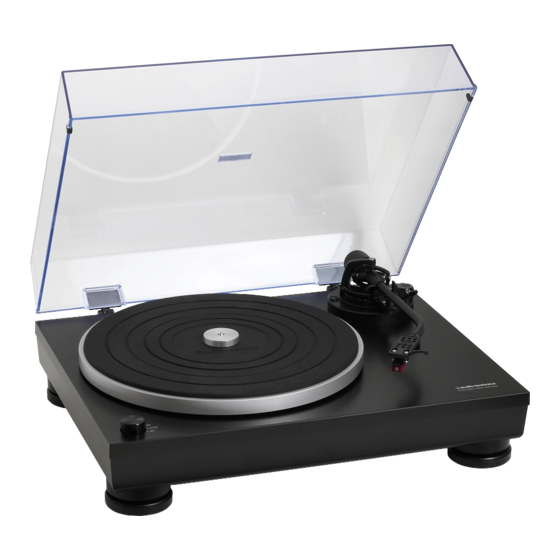
- Page 3 English Main Features Introduction Thank you for purchasing this AT-LP5 Direct Drive Analog and USB • J-shaped tonearm assembly with: Turntable. Audio-Technica brings its legendary quality and audio fidelity Adjustable counterweight • to the authentic home-use turntable. In the box, you'll find everything you Anti-skate adjustment •...
- Page 4 Tonearm Assembly Diagram Figure 2 8. HEADSHELL and CARTRIDGE Exclusively high performance AT95EX cartridge is mounted with headshell. AT-HS10 light weight headshell suits perfectly with J-shaped tonearm. 9. HEADSHELL LOCKING RING Rotate counter-clockwise (to the left) to draw the inserted. headshell firmly into its seated, locked position.
- Page 5 Assembling the Turntable installed, the flat part of the cover hinges should be facing away from The AT-LP5 requires some assembly before first use. the turntable housing at about a 45° angle. IMPORTANT: Do not connect the AC power cable until assembly is 2.
- Page 6 Digital Audio USB Connection to Computers with USB Input The USB cable (included) connects your AT-LP5 turntable to your Installing a new Cartridge computer without need for special drivers. Your Audio-Technica AT-LP5 turntable is supplied with Audacity recording Mechanical Assembly software for your convenience.
- Page 7 Signal-to-noise ratio > 50 dB Outputs levels 4. The pre-amplifier selector switch of the AT-LP5 is set in the wrong “PHONO” (Pre-amp bypassed) 4 mV nominal at 1 kHz, 5 cm/sec position. Verify that it is set to the correct output to match amplifier “LINE”...
- Page 8 Visit our Web Site: www.audio-technica.com One-Year Limited Warranty Audio-Technica brand products purchased in the U.S.A. are warranted for one year from date of purchase by Audio-Technica U.S., Inc. (A. T .U.S.) to be free of defects in materials and workmanship. In event of such defect, product will be repaired promptly without charge or, at our option, replaced with a new product of equal or superior value if delivered to A.
Need help?
Do you have a question about the AT-LP5 and is the answer not in the manual?
Questions and answers