
Related Manuals for Bticino HC4601


Summary of Contents for Bticino HC4601
- Page 1 Centrale antifurto art. HC/HS/HD/L/N/NT4601 Burglar-alarm Unit item HC/HS/HD/L/N/NT4601 Manuale d’uso User manual...
-
Page 3: Table Of Contents
Indice 1 Introduzione La Centrale Antifurto ■ La tastiera ■ Il display ■ Cosa segnala il display ■ 2 Funzionamento Inserisci – disinserisci l'antifurto ■ Scenari di attivazione ■ Attiva – disattiva le zone ■ Interrompi il suono della sirena ■... -
Page 5: Introduzione
1 Introduzione La Centrale Antifurto ■ La tastiera ■ I tasti di navigazione La tastiera alfanumerica Il display ■ Schermata iniziale In caso di allarme Menù di personalizzazione Cosa segnala il display ■... -
Page 6: La Centrale Antifurto
Introduzione La Centrale Antifurto L’Antifurto vigila sulla sicurezza della tua casa; l’impianto è suddiviso in ■ zone che puoi attivare indipendentemente le une dalle altre; ad esem- pio, durante la notte, puoi attivare la protezione solo nella zona giorno oppure solo sul perimetro della casa, avendo così la possibilità di muoverti liberamente anche con impianto inserito. -
Page 7: La Tastiera
Introduzione La tastiera ■ I tasti di navigazione La tastiera alfanumerica Scrittura del testo - Tasto di annullamento della Premi più volte un tasto numerico finchè non viene visualizzato il carat- ◆ selezione e ritorno alla schermata tere desiderato; se la lettera desiderata si trova in corrispondenza dello precedente;... -
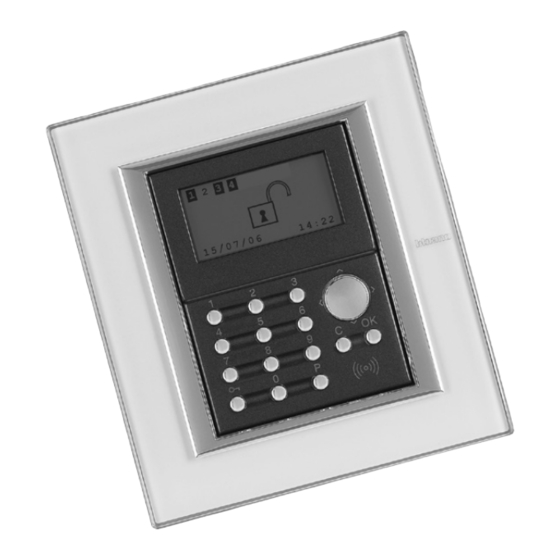
Page 8: Il Display
Introduzione Il display Cosa segnala il display ■ ■ Schermata iniziale Zone dell’impianto 1 2 3 4 1 2 3 4 (max 4 zone) Impianto disinserito, es: zone 1, 2, 3, 4 attive Indicazione inserito/disinserito Data e ora 1 5 / 0 7 / 0 8 1 4 : 2 2 1 5 / 0 7 / 0 8 1 4 : 2 2... - Page 9 Introduzione Cosa segnala il display ■ 1 2 3 4 1 2 3 4 Impianto disinserito, batteria del Impianto inserito, segnalazione di sistema antifurto scarica o guasta e allarme intrusione segnalazione di allarme tecnico 1 2 3 4 1 2 3 4 Impianto disinserito, uno o più...
- Page 10 Introduzione...
-
Page 11: Funzionamento
2 Funzionamento Inserisci – disinserisci l'antifurto ■ Con il codice utente Con la chiave transponder Inserimento rapido Scenari di attivazione ■ Attiva – disattiva le zone ■ Con il codice utente Con la chiave transponder Dal menù... -
Page 12: Inserisci - Disinserisci L'antifurto
Funzionamento Inserisci – disinserisci l'antifurto ■ Con il codice utente Con la chiave transponder 1 2 3 4 1 2 3 4 Quando l’antifurto è disinserito, Quando l’antifurto è disinserito, al centro del display compare un al centro del display compare un lucchetto aperto lucchetto aperto 2 5 / 0 2 / 0 8... -
Page 13: Scenari Di Attivazione
Funzionamento Scenari di attivazione ■ Inserimento rapido La Centrale può memorizzare fino a 4 scenari di attivazione, è possibile selezionare quello voluto nel seguente modo: 1 2 3 4 Quando l’antifurto è disinserito, 1 2 3 4 al centro del display compare un lucchetto aperto 2 5 / 0 5 / 0 8 1 2 : 2 3... -
Page 14: Attiva - Disattiva Le Zone
Funzionamento Attiva – disattiva le zone ■ Con il codice utente In qualsiasi momento puoi scegliere di disattivare ( o riattivare) una o più zone, questo ti permette di personalizzare il funzionamento dell’impianto antifurto secondo le tue esigenze. 1 2 3 4 Se ad esempio desideri la protezione dalle intrusioni anche quando sei Le zone (max 4) dell’impianto sono in casa, puoi disattivare le zone relative ai sensori ad infrarossi lasciando... - Page 15 Funzionamento Con la chiave transponder Dal menù zone 1 2 3 4 Dopo aver eseguito l’accesso al Le zone (max 4) dell’impianto sono Codice/Chiave menù di personalizzazione (capi- tutte attive (es. 1-2-3-4) tolo successivo) 2 5 / 0 2 / 0 8 1 2 : 2 3 Per disattivare la zona 3, premi il A N T I F U R T O...
-
Page 16: Interrompi Il Suono Della Sirena
Funzionamento Interrompi il suono della sirena ■ Se durante la tua presenza scatta l’allarme, puoi interrompere il suono della sirena nei seguenti modi: Con il codice utente Con la chiave transponder 1 2 3 4 1 2 3 4 Accertati che in casa non ci siano Accertati che in casa non ci siano degli intrusi... -
Page 17: Il Telecomando Radio
Funzionamento Il telecomando radio ■ Le azioni descritte precedentemente possono essere eseguite anche utilizzando il telecomando radio opportunamente configurato. Per maggiori informazioni contatta il tuo installatore di fiducia. Inserimento Disinserimento 1 2 3 4 1 2 3 4 1 2 3 4 1 2 3 4 2 5 / 0 2 / 0 8 1 2 : 2 3... -
Page 18: Che Tipo Di Allarme Si È Verificato
Funzionamento Che tipo di allarme si è verificato? ■ Quando sul display compare una segnalazione di allarme, puoi conoscer- In caso di allarme tecnico (appare il simbolo relativo), puoi conoscere il ne il tipo (intrusione, tecnico, ecc.), e il sensore che lo ha rilevato; ad ogni dispositivo che ha generato l’allarme ed anche resettarlo. -
Page 19: Abilitazione Delle Automazioni
A N T I F U R T O S c e n a r i Z o n e Funzionamento D i s p o s i t i v i M e m o r i a e v e n t i Abilitazione delle automazioni ■... -
Page 20: Abilitazione Chiavi E Codici Numerici
Funzionamento A N T I F U R T O D a t a e o r a C o m a n d i Abilitazione chiavi e codici numerici ■ A u t o m a z i o n i I m p o s t a z i o n i Telecomandi, chiavi transponder e codici numerici possono essere abilitati o disabilitati in funzione delle tue esigenze. -
Page 21: Personalizzazioni
3 Personalizzazioni Il menù della Centrale ■ Accedi al menù di personalizzazione ■ Imposta la data e l'ora ■ Segnalazione acustica ■ Cambia il codice utente ■ Cambia i codici numerici ■... -
Page 22: Il Menù Della Centrale
Personalizzazioni Il menù della Centrale Accedi al menù di personalizzazione ■ ■ In questo manuale si è ritenuto di illustrare le personalizzazioni che ti Questa procedura è necessaria per accedere al menù di personalizzazione: potranno essere utili per l’uso corrente della Centrale, alle quali potrai tranquillamente accedere senza rischiare di compromettere il corretto funzionamento della Centrale e quindi la sicurezza di casa tua. -
Page 23: Imposta La Data E L'ora
Z o n e D i s p o s i t i v i M e m o r i a e v e n t i Personalizzazioni Imposta la data e l'ora A N T I F U R T O ■... -
Page 24: Segnalazione Acustica
D i s p o s i t i v i M e m o r i a e v e n t i Personalizzazioni Segnalazione acustica A N T I F U R T O ■ D a t a e O r a Se nel tuo impianto sono presenti dei sensori ritardati in ingresso e/o in C o m a n d i A u t o m a z i o n i... - Page 25 Personalizzazioni A N T I F U R T O D a t a e o r a Cambia il codice utente C o m a n d i O P E N ■ A u t o m a z i o n i I m p o s t a z i o n i La Centrale antifurto è...
-
Page 26: Cambia I Codici Numerici
C o d i c e u t e n t e C o d i c e / c h i a v i S e l e z i o n a Personalizzazioni Cambia i codici numerici ■ I M P O S T A Z I O N I T r a n s p o n d e r 1 : T r a n s p o n d e r 2... -
Page 27: Cambia Il Codice Utente 25 Gb English
Contents Introduction The Burglar-alarm Unit ■ The keypad ■ The display ■ What is the display showing? ■ Operation Enabling - disabling the burglar alarm ■ Activation scenarios ■ Activating - deactivating the zones ■ Stopping the siren sound ■ The radio remote control ■... -
Page 29: Introduction
Introduction The Burglar-alarm Unit ■ The keypad ■ Navigation keys Alphanumeric keypad The display ■ Initial page In case of an alarm Edit menu What is the display showing? ■... -
Page 30: The Burglar-Alarm Unit
Introduction The Burglar-alarm Unit The Burglar Alarm guards the safety of your house; the system is split ■ into zones that can be activated separately; for example, at night, you can have protection only in the day zone or only around your house, so you can move around freely even when the system is on. -
Page 31: The Keypad
Introduction The keypad ■ Navigation keys Alphanumeric keypad Writing the text - Key for cancelling the selection Press a numeric key several times until the required character is ◆ and for returning to the previous displayed; if the required letter is near the same key as the present page –... -
Page 32: The Display
Introduction The display What is the display showing? ■ ■ Initial page System zones 1 2 3 4 1 2 3 4 (max. 4 zones) System off, e.g.: zones 1, 2, 3, 4 active ON/OFF indication Date and hour 1 5 / 0 7 / 0 8 1 4 : 2 2 1 5 / 0 7 / 0 8... - Page 33 Introduction What is the display showing? ■ 1 2 3 4 1 2 3 4 System off, Burglar-alarm (anti- System on, intrusion alarm signal theft) battery dead or damaged and technical alarm signal 1 2 3 4 1 2 3 4 System off, one or more sensors disabled (Important Unit functions System off, Unit battery dead or...
- Page 34 Introduction...
-
Page 35: Operation
Operation Enabling - disabling the burglar alarm ■ With user code With transponder key Rapid enabling Activation scenarios ■ Activating - deactivating the zones ■ With user code With transponder key From the zone menu ... -
Page 36: Enabling - Disabling The Burglar Alarm
Operation Enabling - disabling the burglar alarm ■ With user code With transponder key 1 2 3 4 1 2 3 4 When the burglar alarm (antitheft) When the burglar alarm (antitheft) is disabled, an open lock appears in is disabled, an open lock appears in the middle of the display the middle of the display... -
Page 37: Activation Scenarios
Operation Activation scenarios ■ Rapid enabling The Unit can save up to 4 activation scenarios and you can select the one you want as follows: 1 2 3 4 1 2 3 4 When the burglar alarm (antitheft) is disabled, an open lock appears in the middle of the display 2 5 / 0 5 / 0 8 1 2 : 2 3... -
Page 38: Activating - Deactivating The Zones
Operation Activating - deactivating the zones ■ With user code You can deactivate (reactivate) one or more zones at any time. This will allow you to personalise the burglar-alarm operation according to your needs. 1 2 3 4 For instance, if you want to have protection even if you’re not at home, The zones (max. - Page 39 Operation With transponder key From the zone menu 1 2 3 4 After accessing the edit menu (next The zones (max 4) of the system are Code/key section) all active (e.g. 1-2-3-4) 2 5 / 0 2 / 0 8 1 2 : 2 3 Press the corresponding key on the A N T I T H E F T...
-
Page 40: Stopping The Siren Sound
Operation Stopping the siren sound ■ With transponder key If the alarm goes on while you’re there, you can stop the siren as follows: With user code 1 2 3 4 1 2 3 4 Make sure there are no trespassers Make sure there are no trespassers in the house in the house... -
Page 41: The Radio Remote Control
Operation The radio remote control ■ The actions described previously can also be carried out using the correctly configured radio remote control. For more information consult your installer. Enabling Disabling 1 2 3 4 1 2 3 4 1 2 3 4 1 2 3 4 2 5 / 0 2 / 0 8 2 5 / 0 2 / 0 8... -
Page 42: What Type Of Alarm Occurred
Operation What type of alarm occurred? ■ When an alarm signal is displayed, you can find out what type it is (intru- In case of a technical alarm (its symbol appears), you can find out which sion, technical, etc.) and which detector has detected it; a name has been device has produced the alarm and reset it as well. -
Page 43: Enabling The Automations
Z o n e s D e v i c e s E v e n t m e m o r y Operation Enabling the automations ■ A N T I T H E F T The burglar-alarm unit can be programmed so that an automation is E v e n t m e m o r y D a t e a n d h o u r linked to a particular event. -
Page 44: Enabling Keys And Numeric Codes
Operation A N T I T H E F T D a t e a n d h o u r C o m m a n d s Enabling keys and numeric codes ■ A u t o m a t i o n s S e t t i n g s You can enable or disable remote controls, transponder keys and numeric codes as you require. -
Page 45: Editing
Editing The Unit menu ■ Accessing the edit menu ■ Setting the date and hour ■ Sound signalling ■ Changing the user code ■ Changing the numeric codes ■... -
Page 46: The Unit Menu
Editing The Unit menu Accessing the edit menu ■ ■ This manual describes the editings that are considered to be helpful when This procedure is necessary to access the edit menu: using the Unit. You can access these editings without jeopardizing the proper functioning of the Unit as well as the safety of your house. -
Page 47: Setting The Date And Hour
D e v i c e s E v e n t m e m o r y D a t e a n d h o u r Editing Setting the date and hour A N T I T H E F T ■... -
Page 48: Sound Signalling
D e v i c e s E v e n t m e m o r y Editing Sound signalling A N T I T H E F T ■ D a t e a n d h o u r If your system has sensors which are delayed in input and/or output you C o m m a n d s can enable an audible signal for the time set for the delay. -
Page 49: Changing The User Code
Editing A N T I T H E F T Changing the user code D a t e a n d h o u r ■ C o m m a n d s A u t o m a t i o n s The Burglar-alarm Unit is protected by two codes which originally are S e t t i n g s identical (0000). -
Page 50: Changing The Numeric Codes
U s e r c o d e C o d e / k e y S e l e c t Editing Changing the numeric codes ■ S E T T I N G S T r a n s p o n d e r 1 : T r a n s p o n d e r 2 It is possible to edit the numeric codes stored by the installer in the Unit : C o d e 1... - Page 52 Timbro Installatore BTicino SpA Via Messina, 38 20154 Milano - Italy www.bticino.it Servizio Clienti...
Need help?
Do you have a question about the HC4601 and is the answer not in the manual?
Questions and answers