Table of Contents

Related Manuals for Omnitronic EM-650B


Summary of Contents for Omnitronic EM-650B
- Page 1 BEDIENUNGSANLEITUNG USER MANUAL EM-650 Entertainment Mixer © Für weiteren Gebrauch aufbewahren! Copyright Keep this manual for future needs! Nachdruck verboten! Reproduction prohibited!
-
Page 2: Table Of Contents
10007110 This user manual is valid for the article numbers: 10007110 Das neueste Update dieser Bedienungsanleitung finden Sie im Internet unter: You can find the latest update of this user manual in the Internet under: www.omnitronic.com 2/20 00039532.DOC, Version 2.0... - Page 3 3/20 00039532.DOC, Version 2.0...
-
Page 4: Einführung
- sich die letzte Version der Anleitung im Internet herunter laden 1. EINFÜHRUNG Wir freuen uns, dass Sie sich für einen OMNITRONIC Entertainment-Mixer entschieden haben. Sie haben hiermit ein zuverlässiges und leistungsstarkes Gerät erworben. Wenn Sie nachfolgende Hinweise beachten, sind wir sicher, dass Sie lange Zeit Freude an Ihrem Kauf haben werden. -
Page 5: Bestimmungsgemässe Verwendung
Das Netzteil immer als letztes einstecken. Vergewissern Sie sich, dass der Netzschalter auf „OFF“ steht, wenn Sie das Gerät ans Netz anschließen. Halten Sie das Gerät von Hitzequellen wie Heizkörpern oder Heizlüftern fern. Das Gerät darf nicht in Betrieb genommen werden, nachdem es von einem kalten in einen warmen Raum gebracht wurde. -
Page 6: Gerätebeschreibung
Reinigen Sie das Gerät niemals mit Lösungsmitteln oder scharfen Reinigungsmitteln, sondern verwenden Sie ein weiches und angefeuchtetes Tuch. Soll das Gerät transportiert werden, verwenden Sie bitte die Originalverpackung, um Transportschäden zu vermeiden. Beachten Sie bitte, dass eigenmächtige Veränderungen an dem Gerät aus Sicherheitsgründen verboten sind. -
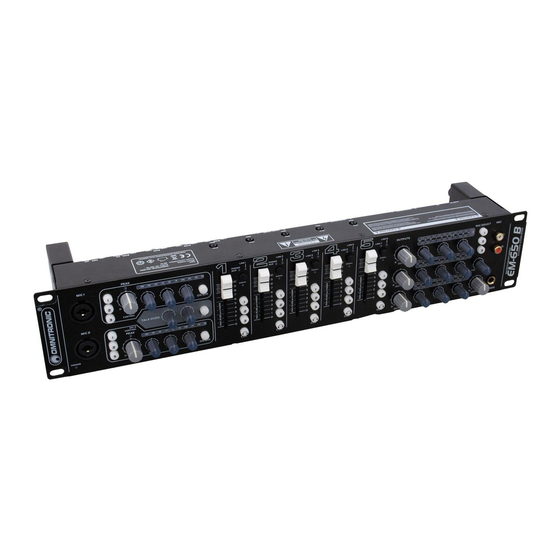
Page 7: Bedienelemente Und Anschlüsse
4.2 Bedienelemente und Anschlüsse Mikrofoneingänge MIC 1 und MIC 2 Taste 1 gedrückt: Eingangskanal auf ZONE 1 geschaltet, Taste 2 gedrückt: Eingangskanal auf ZONE 2 geschaltet, Eingangsbuchsen (sym.) für Anschluss Taste 3 gedrückt: Eingangskanal auf ZONE 3 geschaltet. Mikrofonen über XLR- oder 6,3 mm Klinkenstecker. Eingangsumschalter Zuordungstasten 1-3 Zur Auswahl der Eingangsquelle für die Kanäle 1-5. - Page 8 abgehört. In der Mittelstellung wird ein Mischsignal aus Kanalfader Pre-Fader-Pegel und laufendem Musikprogramm gehört. Lautstärkeregler für Kanal 1-5. Lautstärkeregler für die Masterkanäle Zeitregler für die Talkoverfunktion Regelt Reaktionszeit Absenkung Tasten CUE Mikrofondurchsagen. Taste zum Vorhören des jeweiligen Kanals vor den Masterreglern über einen angeschlossenen Kopfhörer.
-
Page 9: Installation
5. INSTALLATION 5.1 Rackinstallation Stellen Sie das Gerät auf einer ebenen Fläche auf oder installieren Sie es in Ihrem Rack. Für den Einbau in ein 19"-Rack (483 mm) werden 2 HE benötigt. Achten Sie bei der Standortwahl des Geräts darauf, dass die warme Luft aus dem Rack entweichen kann und genügend Abstand zu anderen Geräten vorhanden ist. -
Page 10: Aussteuerung Der Mikrofonkanäle
7. Regeln Sie den Eingangskanal anhand der LED-Pegelanzeige des verwendeten Masterkanals mit dem Vorverstärkerregler optimal aus. Optimale Aussteuerung liegt vor, wenn bei durchschnittlich lauten Passagen Pegelwerte im Bereich von 0 dB angezeigt werden. Leuchten die roten LEDs der Pegelanzeige auf, ist der Kanal übersteuert. 8. -
Page 11: Vorhören Der Kanäle
6.5 Vorhören der Kanäle Mit der Vorhörfunktion CUE können Sie jeden der Eingangskanäle 1-5 über einen Kopfhörer abhören, auch wenn der dazugehörige Kanalfader auf Minimum steht. Dadurch kann z. B. der richtige Zeitpunkt zum Einblenden einer Tonquelle abgepasst werden. Alternativ ist es auch möglich, das laufende Musikprogramm vor den Masterreglern OUT 1-3 abzuhören. - Page 12 Bitte beachten Sie: Technische Änderungen ohne vorherige Ankündigung und Irrtum vorbehalten. 04.06.2009 © 12/20 00039532.DOC, Version 2.0...
-
Page 13: Introduction
- download the latest version of the user manual from the Internet 1 INTRODUCTION Thank you for having chosen an OMNITRONIC entertainment mixer. You have acquired a reliable and powerful device. If you follow the instructions given in this manual, we can assure you that you will enjoy this device for many years. -
Page 14: Operating Determinations
Always plug in the power unit least. Make sure that the power switch is set to OFF position before you connect the device to the mains. Keep away from heaters and other heating sources! If the device has been exposed to drastic temperature fluctuation (e.g. after transportation), do not switch it on immediately. -
Page 15: Description
Please consider that unauthorized modifications on the device are forbidden due to safety reasons! Never remove the serial barcode from the device as this would make the guarantee void. If this device will be operated in any way different to the one described in this manual, the product may suffer damages and the guarantee becomes void. -
Page 16: Operating Elements And Connections
4.2 Operating elements and connections Microphone inputs MIC 1 and MIC 2 Assignment switches 1-3 Input jacks (bal.) for connecting microphones via XLR or Assignment switches 1-3 (with LED), to assign the inputs 6.3 mm jack plug. channels 1-5 individually to the three master channels: button 1 pressed: input channel switched to ZONE 1, button 2 pressed: input channel switched to ZONE 2, Assignment switches 1-3... - Page 17 Control CUE/PGM channel headphones. This button lights For crossfading the monitoring signal for the headphone immediately indicate that the channel is monitored. output: Left position CUE: the pre fader level of the input channel of which the CUE button is pressed is monitored. Channel faders Right position PGM: the music program currently playing Level controls for channel 1-5.
-
Page 18: Installation
5 INSTALLATION 5.1 Rack installation Install the unit on a plane surface or in your rack. For 19" (483 mm) rack installation, 2 units are required. When mounting the unit into the rack, please make sure that there is enough space around the device so that the heated air can be passed on. -
Page 19: Level Control The Microphone Channels
6.2 Level control the microphone channels Set all tone controls of the microphone channels to mid-position. Switch on the corresponding microphone with the button ON AIR of the channel (LED lights). Use one of the assignment switches (LED lights) to switch the microphone channel to one of the master channels to monitor the signal via the speakers of a PA system connected: button 1 for master channel ZONE 1, button 2 for master channel ZONE 2, button 3 for master channel ZONE 3. -
Page 20: Cleaning And Maintenance
7 CLEANING AND MAINTENANCE DANGER TO LIFE! Disconnect from mains before starting maintenance operation! We recommend a frequent cleaning of the device. Please use a soft lint-free and moistened cloth. Never use alcohol or solvents! There are no serviceable parts inside the device. Maintenance and service operations are only to be carried out by authorized dealers.
Need help?
Do you have a question about the EM-650B and is the answer not in the manual?
Questions and answers