Table of Contents
Advertisement
Available languages
Available languages
Quick Links
Advertisement
Chapters
Table of Contents

Related Manuals for Omnitronic EM-550B MK2


Summary of Contents for Omnitronic EM-550B MK2
-
Page 3: Table Of Contents
Inhalt 1 Einführung 1 Einführung ..........3 Willkommen bei Omnitronic! Schön, dass Sie sich für eines unserer Produkte entschieden haben. Produktmerkmale ........3 2 Sicherheitshinweise ......... 4 Diese Bedienungsanleitung zeigt Ihnen, wie Sie 3 Bestimmungsgemäße Verwendung ..5 den Mixer in Betrieb nehmen und nutzen. Damit 4 Bedienelemente und Anschlüsse ... -
Page 4: Sicherheitshinweise
• Die Kabeleinführung oder die Kupplung am 2 Sicherheitshinweise Gerät dürfen nicht durch Zug belastet werden. Es muss stets eine ausreichende Kabellänge zum Gerät hin vorhanden sein. Andernfalls kann Achtung! das Kabel beschädigt werden, was zu tödlichen Stromschlägen führen kann. Gerät vor Feuchtigkeit und Nässe schützen! •... -
Page 5: Bestimmungsgemäße Verwendung
3 Bestimmungsgemäße Verwendung • Beim Einsatz von Nebelgeräten ist zu beachten, Das Gerät dient zum Mixen von Audioquellen und dass das Gerät nie direkt dem Nebelstrahl wurde speziell für professionelle Anwendungen ausgesetzt ist und mindestens 0,5 m von einem konzipiert. Nebelgerät entfernt betrieben wird. -
Page 6: Bedienelemente Und Anschlüsse
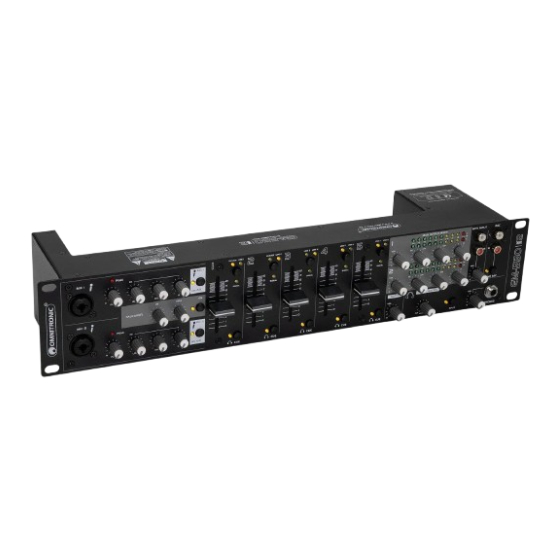
4 Bedienelemente und Anschlüsse Frontseite Element Funktion Mikrofoneingänge MIC 1/2 Eingangsbuchsen für den Anschluss von Mikrofonen über einen XLR- oder 6,3-mm-Klinkenstecker. Lautstärkeregler VOL Lautstärkeregler für die Mikrofonkanäle MIC 1 und MIC 2. Leuchtet die LED PEAK ständig, ist der jeweilige Kanal übersteuert. Klangregler LOW, MID, HI 3-fache Klangregelung für die Mikrofonkanäle MIC 1 und MIC 2: LOW = Bässe, MID = Mitten, HI = Höhen. -
Page 7: Rückseite
Regler CUE/PGM Wählt und überblendet das Abhörsignal für den Kopfhörerausgang. • Linke Position CUE: Der Pre-Fader-Pegel des Eingangskanals, dessen Taste CUE gedrückt ist, wird abgehört. • Rechte Position PGM: Das laufende Musikprogramm wird vor den Ausgangsreglern abgehört. • In der Mittelstellung wird ein Mischsignal aus Pre-Fader-Pegel und laufendem Musikprogramm gehört. -
Page 8: Inbetriebnahme
5 Inbetriebnahme Installation Stellen Sie das Gerät auf einer ebenen Fläche auf oder installieren Sie es in Ihrem Rack. Für den Einbau in ein 19"-Rack (483 mm) werden 2 HE benötigt. Achten Sie bei der Standortwahl des Geräts darauf, dass die warme Luft aus dem Rack entweichen kann und genügend Abstand zu anderen Geräten vorhanden ist. -
Page 9: Bedienung
6 Bedienung Grundeinstellung der Eingangskanäle Stellen Sie alle Vorverstärkerregler auf der Rückseite und Klangregler in die Mittelposition. Wählen Sie mit den Eingangsumschaltern die Signalquellen an, die an den Kanälen 1-5 angeschlossen sind. Geben Sie zum Aussteuern eines Eingangskanals ein Tonsignal (Testsignal oder Musikstück) auf den Kanal und heben Sie dessen Fader auf ca. -
Page 10: Reinigung Und Wartung
7 Reinigung und Wartung Das Gerät sollte regelmäßig von Verunreinigungen wie Staub usw. gereinigt werden. Bevor Sie das Gerät reinigen, trennen Sie es von der Stromversorgung. Verwenden Sie zur Reinigung ein fusselfreies, angefeuchtetes Tuch. Auf keinen Fall Alkohol oder irgendwelche Lösungsmittel zur Reinigung verwenden! Im Geräteinneren befinden sich außer der Sicherung keine zu wartenden Teile. -
Page 12: Introduction
1 Introduction Contents Welcome to Omnitronic! Thank you for choosing 1 Introduction ..........12 one of our products. Product features ........12 2 Safety Instructions ......... 13 This user manual will show you how to install and 3 Operating Determinations ..... 14 operate the mixer. -
Page 13: Safety Instructions
• If extension cords are used, make sure that the 2 Safety Instructions core diameter is sufficient for the required power consumption device. warnings concerning the power cords are also valid for Caution! possible extension cords. • Always disconnect from the mains, when the Keep this device away from rain and moisture! device is not in use or before cleaning it. -
Page 14: Operating Determinations
Cleaning and Service 3 Operating • Disconnect from mains before cleaning! Never use solvents or aggressive detergents in order Determinations to clean the device! Rather use a soft and damp cloth. This device is used to mix audio sources. It has •... -
Page 15: Operating Elements And Connections
4 Operating Elements and Connections Front panel Element Function MIC 1/2 inputs Balanced inputs for connecting microphones via XLR or 6.3 mm jack plug. VOL control Level controls for the microphone channels MIC 1/2. If the PEAK LED lights permanently, the corresponding channel is overloaded. LOW, MID, HI controls 3-way equalizer for the microphone channels MIC 1/2: HI, MID, LOW. -
Page 16: Rear Panel
CUE/PGM control For selecting and crossfading the monitoring signal for the headphones output: • Left position CUE: the prefader level of the input channel of which the button CUE is pressed is monitored. • Right position PGM: the music program currently playing is monitored ahead of the output controls. -
Page 17: Setup
If the mixer is connected to both a computer and to a unit grounded via the mains cable (e.g. amplifier), noise interference may occur due to ground loops. To eliminate this interference, a ground isolator (e. g. OMNITRONIC LH-082) may be used to connect the mixer to the unit. Connector... -
Page 18: Operation
6 Operation Basic adjustment of the input channels Set all rear gain controls and tone controls to mid-position. Use the input selector buttons to select the signal sources connected to the channels 1-5. To control a channel, feed an audio signal (test signal or music piece) to the respective input channel and advance the channel fader to approx. -
Page 19: Cleaning And Maintenance
7 Cleaning and Maintenance Disconnect from mains before starting maintenance operation! We recommend a frequent cleaning of the device. Please use a soft lint-free and moistened cloth. Never use alcohol or solvents! There are no serviceable parts inside the device. Maintenance and service operations are only to be carried out by authorized dealers. - Page 20 Omnitronic is a brand of Steinigke Showtechnic GmbH · Andreas-Bauer-Str. 5 · 97297 Waldbüttelbrunn Germany D00147450 Version 1.0 Publ. 26/04/2023...
Need help?
Do you have a question about the EM-550B MK2 and is the answer not in the manual?
Questions and answers