
Subscribe to Our Youtube Channel
Related Manuals for HighPoint RocketStor RS6124V


Summary of Contents for HighPoint RocketStor RS6124V
- Page 1 RocketStor 6124V User Manual Sept. 04, 2018 Revision 1.03 HighPoint Technologies, Inc.
- Page 2 Backup your important data before using HighPoint's products and use at your own risk. In no event shall HighPoint be liable for any loss of profits, or for direct, indirect, special, incidental or consequential damages arising from any defect or error in HighPoint's products or manuals.
-
Page 3: Table Of Contents
Driver Installation ......................... 19 Installing the HighPoint RocketStor Manager(HRM) ............. 20 Using a new RAID Volume ....................21 Section 3: The HighPoint RocketStor Manager (HRM)..........22 How to Login: ......................... 22 Remote Login ......................... 22 Navigating the HRM ......................24 Overview Tab ......................... - Page 4 Critical array becomes disabled when you removed faulty disk ....... 48 Help ............................49 Table 1. HRM Icon Guide ..................... 49 Table 2. RAID Level Reference Guide ................52 HighPoint Recommended List of Hard Drives or SSDs ..........53 Contacting Technical Support ................... 53...
-
Page 5: Product Overview
Product Overview The RocketStor 6124V utilizes high-performance USB 3.1 Gen 2 Type-C connectivity to directly support up to 4 SATA Hard Drives or SSDs in one or more RAID storage configurations. The ease of use, universal availability and affordability of USB-C connectivity, combined with the robust bandwidth delivered by USB 3.1 Gen 2 technology, make for a truly a cost-effective high-performance RAID solution for any Mac platform. - Page 6 Material Brushed aluminum housing Dimension 5.71"(W) x 7.67"(H) x 10.23" (D) Weight 11.9 lb (W/O Hard Disk) Warranty 2 Years Configurable RAID Block Size up to 1MB Storage Health Inspector Multiple RAID Partitions supported Online Array Roaming Online RAID Level Migration (ORLM) Online Capacity Expansion (OCE) RAID Initialization Background/Foreground/Quick Advanced RAID Features...
-
Page 7: Section 1: Hardware Installation
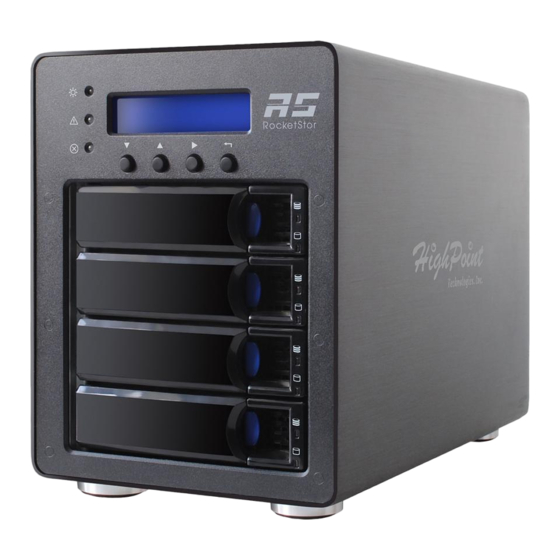
Section 1: Hardware Installation Hardware Overview Panel Layout-Front View Disk Present LED: Solid Blue Disk Active LED: Flash Blue Disk Fail LED: Solid Red Disk Rebuilding LED: Flash Red Disk Identify LED: Flash Blue and Red Enclosure Power LED: Solid Blue Temperature Warning LED: Solid Yellow Fan/Temperature Fail LED: Solid Red Panel Layout-Rear View... -
Page 8: System Requirements
System Requirements 1. PC or Mac with a USB type C port or Thunderbolt™ 3 USB-C Port 2. Windows 10 and later macOS 10.12 and later Enclosure Setup 1. Place the RocketStor 6124V on a level surface and remove each disk tray. 2. - Page 9 3. After installing the hard drives, connect the RocketStor 6124V to a power source. 4. With the power cord connected to the power source, turn on the RocketStor 6124V using the power switch on the rear panel (click the button to power on the RocketStor 6124V).
-
Page 10: Lcd Screen
LCD Screen • There are four main options within the LCD menu • Temperature • Fan Speed • Beeper • Backlight 1. To navigate through the menu please click on the right arrow button. a. By pressing the right arrow key it will take you into the option you have chosen 2. -
Page 11: Section 2: Setting Up The Software For Mac Platforms
Boot up the Windows operating system. 2. Download the Windows driver package from the HighPoint website: http://highpoint-tech.com/USA_new/series-rs6124v-download.htm 3. Extract the package and click the setup.exe program to install the driver. The installation program will install the RocketStor 6124V driver, automatically. - Page 12 Device Manager. 3. Click the Storage controllers tab: • If the driver is installed, it will show as HighPoint USB RAID Controller. • Click Properties, then click the Driver Tab to check the version: Figure 1: Driver version 1.1.18.0 for a RocketStor 6124V Driver...
- Page 13 Uninstalling the Drivers Please start the Windows Control Panel→Programs→Programs and Features, select and uninstall the “HighPoint USB Driver”.
- Page 14 Installing the HighPoint RocketStor Manager (HRM) The HighPoint RocketStor Manager (HRM) is the primary link between you and your RAID array. Using the management utilities and menus offered by the HRM, you would be able to access, create, and maintain your RAID arrays.
- Page 15 Formatting the RAID Volumes After creating a RAID array, your operating system will recognize that array as a logical disk. However, the array will not be accessible until it is formatted by the operating system. Format the volume when you have finished the following procedures: •...
- Page 16 4. Once initialized, right click the unallocated disk space for your disk 5. click New Simple Volume.
- Page 17 6. Follow the instructions on screen to receive a drive letter. 7. Once finished, the drive will appear in your OS with the letter you assigned. Figure 2. Disk formatted as NTFS and assigned drive letter D:...
- Page 18 Your disk may initially appear offline to the operating system, and you may have to bring it online: 1. In Disk Management, right click the disk you wish to bring online. 2. The disk status will change to Not Initialized; right click the disk again to initialize it.
-
Page 19: Driver Installation
Section 3: Setting up the software for Mac Platforms Driver Installation 1. Once downloaded, locate the folder you downloaded the driver to and double click on the file named “RS61xxV_Mac_xxx.dmg” . 2. The file will be mounted onto the operating system, click on RS61xxV.pkg located on the mounted drive. -
Page 20: Installing The Highpoint Rocketstor Manager(Hrm)
Mac… → System Report →Software →Extensions→rs61xx. Installing the HighPoint RocketStor Manager(HRM) The HighPoint HRM is the primary link between you and your RAID array. Using the management utilities and menus offered by the HRM, you will be able to access, create, and maintain your RAID arrays. -
Page 21: Using A New Raid Volume
Using a new RAID Volume After the new RAID volume has been configured or installed a new disk, OS X will display a pop-up window. Click the Initialize button to start the disk utility. Select the RAID volume that has been built, and select Erase on top, name the RAID volume in the center part, and then select Erase on bottom right of the pane to format the RAID volume. -
Page 22: Section 3: The Highpoint Rocketstor Manager (Hrm)
Section 4: The HighPoint RocketStor Manager (HRM) The HRM is a universal, web-based management interface designed for HighPoint RAID storage products and solutions. The HRM is compatible with all mainstream browsers and shares a common interface regardless of hardware or operating system platform. - Page 23 6. Restart the System Figure 3. Example: The IPv4 address is under Ethernet adapter Ethernet 4 and is 192.168.1.143 Note: Make sure Restrict to localhost access is disabled in HRM Setting (Refer to The HRM, Setting tab). You can then remotely access the HRM using any other computer that is in your local network by opening any web browser and typing http://{IP address of host computer}:7404 (default port).
-
Page 24: Navigating The Hrm
Navigating the HRM The HRM allows you to do several key things: Create and remove arrays • Monitor disk health • Update firmware and BIOS • Change enclosure settings • Troubleshoot faulty drives • View general system overview • Tab Name Function Overview View Enclosure and Storage Properties... -
Page 25: Overview Tab
Overview Tab The GUI Global view provides an overview of what each HighPoint Enclosure connected to your computer detects. It is also the first page you see when logging in. • Enclosure Properties • Storage Properties On the top left of the page is a drop down menu that allows you to select which controller you want to manage (if you have multiple HighPoint controllers connected). -
Page 26: Viewing Storage Properties
• Disk installed: number of drives seen by the controller Viewing Storage Properties 1. Log into the HRM 2. Select the controller from drop down menu on the top left Click Overview Storage Properties • Total: the combined capacity of each physical disk connected to the controller. •... -
Page 27: Advanced Config
Advanced Config. 1. Log into the HRM 2. Click Advanced Config. The Advanced Config. tab is where you can edit, delete, and maintain your RAID configurations, as well as review the Physical Device information. The Advanced Config.tab has the following functions: •... -
Page 28: Creating Array
Creating Array To create an array: 1. Click Advanced Config. 2. Click Create Array An array is a collection of physical disks that will be seen as one virtual drive by your Operating System (OS). Array Type: • JBOD – Just a Bunch of Disks •... - Page 29 Initialization Method : Initialization of a disk sets all data bits to 0, essentially clearing all the data on the drive. It is important to initialize disks as previous data physically stored on the drive may interfere with new data. •...
- Page 30 A block size of 64k is recommended because it strikes a balance between the two I/O usage scenarios. Capacity (Default: Maximum) The total amount of space you want the RAID array to take up. When creating RAID levels, disk capacities are limited by the smallest disk. An example of how disk capacities are limited by smallest disk.
-
Page 31: Adding Spare Disks
Adding Spare Disks Spare disks are physical disks that will immediately replace critical disks in an array. To add spare disks: 1. Click Advanced Config. 2. Click Spare Pool: 3. Check the box for the disk you want as a spare under Available Disks. 4. -
Page 32: Obtaining Logical Device Information
5. The disk has now been assigned as a spare. Click OK to confirm: Disks added to the spare pool will be displayed under Spare Pool and can be removed by checking the box before the target drive, then clicking the Remove Spare button. Physical drives marked as a spare will automatically be added to an array whenever there is a disk failure. -
Page 33: Array Information &Maintenance Options: Normal Status
Array Information &Maintenance Options: Normal Status Arrays with the Normal status are healthy and functioning properly. Arrays with the Normal status will have the following options: Delete – deletes the selected RAID array Unplug – powers off the selected RAID array – once powered off, the physical disks can be safely removed from the RAID controller Verify –... -
Page 34: Array Information & Maintenance Options: Critical Status
Array Information & Maintenance Options: Critical Status Arrays in the Critical status can be accessed and utilized, but are no longer fault tolerant. A Critical array should be rebuilt as soon as possible to restore redundancy. A critical status array has all the normal status options except the following: •... -
Page 35: Array Information & Maintenance Options: Disabled Status
Array Information & Maintenance Options: Disabled Status An array with the Disabled status means that the RAID level does not have enough disks to function. • Your data will be inaccessible • Rebuilding will not trigger, since the RAID array does not have enough parity data to rebuild. -
Page 36: Expanding An Existing Array
Expanding an Existing Array Important: It is recommended that the array be Verified/Rebuilt before Expanding or Migrating. Once you start an OCE/ORLM procedure, you can stop the process, but it must be resumed until completion. To add more capacity to your current configuration follows these steps: Click Advanced Config. -
Page 37: Physical Device Information
The Logical Device Information will change the status to migrating. Physical Device Information • Location – which controller and port the drive is located in • Model – model number of the drive connected • Capacity – total capacity of the drive •... - Page 38 Rescan Clicking rescan will force the drivers to report the array status. For any disk(s) you hot plug into the device; do not click rescan until all physical drives are detected and appear under Logical Device Information. The following properties are part of the Physical Devices Information box under the physical tab.
-
Page 39: Settings Tab
Settings Tab Using this tab, you can change the following: Enclosure Email Notification Security System setting Enclosure: Review the RocketStor 6124V’s S/N... - Page 40 Email Notification: Setting up the event notification via SMTP Email server. The following topics are covered under email: • SMTP Setting • Adding Recipients You can instruct the controller to send an email out to the recipients of your choosing when certain events trigger (for more information, see Event Tab).
- Page 41 6. Check support SSL box if SSL is supported by your ISP (port value will change to 465). Note: After you click Change Setting, the password box will become blank. You need to Add Recipients to receive the events that are seen in the WebGUI How to Add Recipients You can add multiple email addresses as receivers of a notice.
-
Page 42: Password Settings
Security: Setting the HRM’s log in password, remote log in availability and the port number. Restrict to localhost access (default: Enabled) Remote access to the controller will be restricted when enabled; other users in your network will be unable to remotely log in to the HRM. Port Number (default: 7404) The default port that the HRM listens on is 7404. - Page 43 When the rebuild is finished, the data may be accessible but may also be inconsistent, due to any bad sectors that were ignored during the procedure. If this option is enabled, HighPoint recommends checking the event log periodically for bad sectors warnings.
-
Page 44: Event Tab
Event Tab The event view is a basic error logging tool built into the HRM. Icon Name Definition Includes general administrative tasks: • Create/delete arrays Information • Configuring spares • Rebuilding arrays • Configuring event notifications • Configuring maintenance Alerts issued by the Host Adapter: Warning •... -
Page 45: How To Enable Smart Monitoring
How to Enable SMART Monitoring To access SMART attributes of an individual disk: 1. Log in to the HRM 2. Select the proper controller using the drop down menu on the top left 3. Click the SHI tab 4. Click Enable to enable SMART monitoring Disabling SMART monitoring You have the option the disable SMART monitoring on each individual disk. -
Page 46: How To Use The Scheduler
How to Use the Scheduler The Scheduler enables you to schedule disk/array checkups to ensure disks/array are functioning optimally. How to Create a New Verify Task All arrays will appear under New Verify Task 1. Log into the HRM 2. Select the proper controller from the top left drop down 3. -
Page 47: Section 4: Troubleshooting
Section 4: Troubleshooting This section provides guidelines to some problems you may encounter: • Handling Critical Arrays • Handling Disabled Arrays • PC hangs when card is installed. Handling Critical Arrays When your disk status turns critical, your array as a whole is still accessible, but one or more disks are faulty (depending on your RAID level), and the array is in danger of failing. -
Page 48: Rebuilding Stops Due To Bad Sectors
Rebuilding Stops Due to Bad Sectors If rebuilding fails to complete due to bad disk sector errors (check in the Event Log), there is an option to continue rebuilding on error in the HighPoint HRM. 1. Log into the HRM 2. -
Page 49: Help
Configuration Record: collect the RocketStor’s storage information and send it to the HighPoint support team. It is required to register the product on HighPoint Web Support Portal and request the support ID before submit the Configuration Record: Table 1. HRM Icon Guide Critical –... - Page 50 Uninitialized The array initialization process has been interrupted, and the process is incomplete. Not Initialized Disk is not initialized yet, and needs to be initialized before use OCE/ORLM Array is performing a OCE/ORLM operation OCE/ORLM has stopped The array expansion process has been stopped. Legacy An existing file system has been detected on the disk.
- Page 51 The array is performing a data consistency check. Array status will show ‘verifying’. Disabled The array does not have enough disks to maintain the RAID level. A disabled array is not accessible. OCE/ORLM Array is expanding its capacity or migrating to a different raid level. Status will display ‘Expanding/Migrating’...
- Page 52 Table 2. RAID Level Reference Guide Type Description Min. disks Usable space Advantage Disadvantage Application No fault tolerance - failure Each drive can be accessed JBOD Just a bunch of disk 100% of one drive results in Backup as a single volume complete data loss No fault tolerance –...
-
Page 53: Highpoint Recommended List Of Hard Drives Or Ssds
HighPoint Recommended List of Hard Drives or SSDs HighPoint maintains a list of tested hard drives suitable for RAID applications. Since not every hard drive in the market can be tested, this list is meant to be a general guideline for selecting hard drives operating in a RAID environment. Regular, desktop grade drives are highly not recommended for RAID use.
Need help?
Do you have a question about the RocketStor RS6124V and is the answer not in the manual?
Questions and answers