
Related Manuals for Arec LS-200


Summary of Contents for Arec LS-200
- Page 1 LS-200 Media Station User Manual English AREC Inc.© All Rights Reserved 2018. l www.arec.com All information contained in this document is Proprietary...
-
Page 2: Table Of Contents
LS-200 User Manual Table of Contents Introduction Specifications Package Contents Product Appearance Connection Front Panel Buttons and Indicators External Control via USB Numeric Keypad Getting start Overview of the Web Interface Chapter 1 Administrator 1.1 Media I/O 1.1.1 Video inputs 1.1.1.1 Content / Cam 1... - Page 3 LS-200 User Manual Table of Contents 2.1.1 Background 2.1.2 Layout 2.1.3 Overlay 2.1.4 Theme 2.1.5 Volume control 2.1.6 Recording control buttons 2.2 Visual Sources Monitoring 2.3 Recording/Streaming setup 2.3.1 Recording settings 2.3.2 Streaming settings 2.3.3 Content settings Chapter 3 Video Manager 3.1 Upload the recording...
-
Page 4: Introduction
LS-200 User Manual Introduction Featuring a compact and stand-alone design, AREC LS-200 Media Station consists of diverse features and functionality, including multi-signals capturing, recording synchronously, codec, streaming online, live broadcasting, and web-based monitor page, providing complete presentation or lecture capture solution. -
Page 5: Product Appearance
Connected to antenna for wireless microphone RS-232 Captive screw connector for control over RS-232 Reset button Restoring devices to its factory default state NOTE: The LS-200 can detect and record to USB storage devices using FAT32, NTFS file systems. www.arec.com... -
Page 6: Connection
LS-200 User Manual Connection Setting PC AREC Wireless Microphone AREC projector Speaker Network Camera Power Video output VGA / HDMI Audio output RS-232 Mic audio input Audio input Ethernet Video input VGA / HDMI RS-232 network notebook amplifier document cam... -
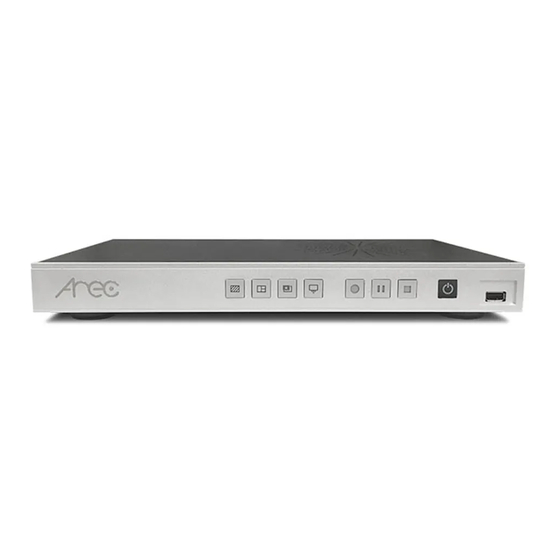
Page 7: Front Panel Buttons And Indicators
LS-200 User Manual Front Panel Buttons and Indicators Button Brief introduction Change Background / Layout / Overlay cycling. Background / Layout / Overlay Switch image sources to monitor individual image inputs. Display Button Display method of indicator Product status Record button glows red Recording in progress. -
Page 8: External Control Via Usb Numeric Keypad
Administrator webpages. Overview of the Web Interface LS-200 web interface has three user types, which are described in detail in the following chapters : For quick start recording, log in Online director from the initial login page with default Online Director username director and password director. -
Page 9: Chapter 1 Administrator
LS-200 User Manual Chapter 1 Administrator The Administrator web pages provide a system administration interface of the LS-200: it can perform Media I/O, Video, Storage,Scheduler,Account, Upload, System settings and confirm operations. The Media I/O settings make sure each input source are properly connected, and adjust the audio volume. The... -
Page 10: Video Inputs
LS-200 User Manual 1.1.1 Video inputs The LS-200 is capable to process up to three video inputs. The name of these inputs are user configurable; by default are Content, Cam 1. 1.1.1.1 Content / Cam 1 Video Source can be choose from... -
Page 11: Advanced Configuration
Cancel button to give it up. Note: If you use AREC CI-xxx network camera with TP-100, you can change preset of TP-100's Home. 7. Brightness, sharpness, and contrast: Slide the adjust bar leftward or rightward to change the camera image settings. -
Page 12: Network Device Manager
Enter the username and password of the camera or Auto-Tracking Mount to complete the authentication. Take AREC network camera for example,enter the default username and password admin/ admin. The status then changes to OK, which indicates it is available for video input selection. -
Page 13: Ptz Control Port
The LS-200 facilitate the web-based users control PTZ cameras using RS-232 protocol. Connect an USB-to-RS-232 adapter to the LS-200 back USB port in advance. Before making any changes to this page, please get to know about the RS-232 settings of the desired PTZ camera. The following configurations must be identical to the external device settings. -
Page 14: Display
LS-200 User Manual 1.1.5 Display Set the LS-200 on screen display language. 1.2 Video The pages within Video construct a collection of settings that defines the operating characteristics for a streaming/recording, include: Recording Configure Encoder settings and Bookmark settings for recording. -
Page 15: Recording
You may customize your own user defined option. Front USB recording: Set ON/OFF to enable/disable LS-200 front USB recording function. Make sure the front USB drive connected can be normally read and written and have enough space for the recorded files. -
Page 16: Streaming
Audio shift- Adjust the delay of sound after video transmission. Synchronize the video and audio with consistency. 1.2.2 Streaming AREC Media Station support two streaming address with same video compression. The page provides user to change streaming settings. It is essential that the configurations follow the streaming protocol and recommended settings your server system supports. - Page 17 URL — The available protocol on the LS-200 are RTP and RTMP, the URL format is as follows : In the protocol setting field, copy and paste the Server or Stream URL and Stream name provided by you CDN RTMP or server administrator in the format rtmp://serverurl/streamname.
- Page 18 Followings are some popular examples for streaming settings. Streaming to Facebook Live Copy the contents of the Single Field, Server or Stream URL, and paste in the LS-200 streaming protocol setting field. Streaming to Ustream Combine the contents of both fields: RTMP URL and Stream Key, insert a slash between them. Paste this string into the LS- 200 streaming protocol setting field.
-
Page 19: Content
1.2.3 Content The LS-200 contains up to 13 user-configurable elements for describing content. These elements and texts will be saved in the recording data of the newly created content. Enter text in the content settings fields if desired. Click Apply button at the bottom corner when finished to apply the settings. - Page 20 Note: The user can use the mouse to drag the order of the display. Theme : Theme is integrated with "Overlay”, “Background” and “Layout”. LS-200 by factory default provides four themes by different types of overlays, backgrounds and layouts. Click [ ] to set the theme type.
-
Page 21: Storage
LS-200 User Manual 1.3 Storage The recording files produced by the LS-200 are stored on its own internal hard drive. This page provides user to set local storage drive or USB and reveals the disk information in the lower section. -
Page 22: Scheduler
Username: Opencast user account c. Password: Opencast user password 2. Click Apply. The event schedule is added and appears in the calendar on the Scheduled Events page. 3. Go to Opencast admin, and check if the LS-200 is correctly registered on Opencast. www.arec.com... - Page 23 LS-200 User Manual “Opencast Admin” -> “Capture” -> “Locations” Manual Calendar import 1. Click Import. An Open window opens. 2. Locate and select the iCalendar file for import. The file must have a .ics file extension. 3. Click Open. The Open window closes and the file name is displayed within the Manual Calendar Import panel area. The Import button is active.
-
Page 24: Upload
LS-200 User Manual 1.5 Upload The LS-200 is able to automatically upload recordings from its internal drive to a network server. In this page, user can configure the upload destination and tests the connection. Auto upload- Select from the drop-down list. Start uploading "after recording is completed”, or turn “OFF” the function. -
Page 25: System
LS-200 User Manual 1.6 System The pages within System include the following: Contains device identification, date and time configuration, and System settings booting settings. Network The device IP assignment in the networking. Displays the current firmware version, and provides web-based Firmware user a way to update firmware for the device. -
Page 26: Network
LS-200 User Manual 1.6.2 Network By default LS-200 uses DHCP to obtain an IP Address via a router or any DHCP server. To use a static IP address for your device, configure the network settings in this webpage. IP assignment – Select DHCP to have IP address be allocated by a router or any DHCP server being connected; or Select Static IP and enter the required network settings including IP address / subnet mask / default gateway/ DNS server. -
Page 27: Firmware
LS-200 User Manual 1.6.3 Firmware This page displays the device firmware version. To update the firmware, click “Update" and a dialog box opens asking you to select the file. Select the desired file and click “Open”, the dialog box closes and the file name appears underneath. Click “Apply”... -
Page 28: Account
LS-200 User Manual 1.7 Account Users can set the system account password etc. Changing username and password with Administration/ Online Director / Video Manager : (1) New User: Enter a user login name that you want. (2) New Password: Enter the user login password that you want. -
Page 29: Chapter 2 Online Director
Chapter 2 Online Director The LS-200 embedded Online Director web pages allow user to control recording and have a live stream view of the output video. This director control panel makes it easy to apply layout, select background, and control the audio recorded during the recording process. -
Page 30: Recording Controls Panel
2.1.1 Background Display the available background images for Online Director controlling. Click the background thumbnail to apply it to the video. LS-200 by factory default provides one plain black background and three user-configurable backgrounds.See Administrator \ Video \ Theme for more detail. -
Page 31: Theme
LS-200 User Manual 2.1.4 Theme Theme is integrated with "Overlay”, “Background” and “Layout”. LS-200 by factory default provides themes by different overlays, backgrounds and layouts. See Administrator \ Video \ Theme for more details. 2.1.5 Volume control The audio control bar is to adjust the recorded volume from each audio input. -
Page 32: Recording Control Buttons
LS-200 User Manual 2.1.6 Recording control buttons Buttons are: Record Click Record and recording begins. The Record button is red to indicate active recording. Click Pause to pause recording. The preview and the output video are also suspended while Pause recording is paused. -
Page 33: Recording/Streaming Setup
LS-200 User Manual 2.3 Recording/Streaming setup The page provides user to change settings for recording, streaming, content, logo and bookmark adding. LS-200 2.3.1 Recording settings Recording mode: Available options are MP4 Mixed video and MP4 Mixed video/ Original source. Video compression: There are 7 preset recording video compression profiles for different resolution and bitrate. -
Page 34: Content Settings
2.3.3 Content settings The LS-200 contains up to 13 user-configurable elements for describing content. These elements and texts will be saved in the recording data of the newly created content. Enter text in the content settings fields if desired. Click to open more elements of content description. -
Page 35: Chapter 3 Video Manager
LS-200 User Manual Chapter 3 Video Manager The LS-200 embedded Video Manager provides access to recordings produced by LS-200 itself and stored in the internal storage drive or USB. The video list is in descending order by the time of occurrence. -
Page 36: Upload The Recording
The upload destination is pre-configured by system administrator. See Administrator\ Upload for more details. The LS-200 arranges the upload sequence automatically and indicates the upload status/result on the corresponding recordings. The following indicators are used: Icon Upload Status The recording package are uploaded successfully. -
Page 37: Playback The Recording
LS-200 User Manual 3.4 Playback the recording Click on the desired recording and you will be directed to the content information page. Use the player controls at the bottom of the window to watch the video. There might be more than one files listed under the window if the content is recorded in MP4 Mixed video/ Original source recording mode. -
Page 38: Table Of On Screen Disaplay Icons
LS-200 User Manual Table of On Screen Display Icons The LS-200 provides a HDMI preview output for recording monitoring. On screen display there are recording/streaming indicators, event icons and sometimes the error operation warnings. Recording/ Streaming timer Device WAN IP Address... - Page 39 LS-200 User Manual Front USB recording error HDCP protected source Operation is denied Front USB recording Disk failure Uploading Front USB drive mount Recording is paused Firmware updating Fan failure Firmware update failure Shutdown confirmation www.arec.com...
- Page 40 All information contained in this document is Proprietary Made in Taiwan Date : 2018.9.1 Version : 2.5 AREC have the right to change or improve product specifications, without obligation to notify any user. Go to www.arec.com get the latest information related to the product or additional information.
Need help?
Do you have a question about the LS-200 and is the answer not in the manual?
Questions and answers