Table of Contents
Advertisement
Quick Links
2 Drive 2.5in Trayless Hot Swap SATA
Mobile Rack Backplane
HSB220SAT25B
Rev 1
DE: Bedienungsanleitung - de.startech.com
FR: Guide de l'utilisateur - fr.startech.com
ES: Guía del usuario - es.startech.com
IT: Guida per l'uso - it.startech.com
NL: Gebruiksaanwijzing - nl.startech.com
PT: Guia do usuário - pt.startech.com
For the most up-to-date information, please visit: www.startech.com
Manual Revision: 02/01/2019
*actual product may vary from photos
Advertisement
Table of Contents

Related Manuals for StarTech.com 8STHSB220SAT25B


Summary of Contents for StarTech.com 8STHSB220SAT25B
- Page 1 DE: Bedienungsanleitung - de.startech.com FR: Guide de l'utilisateur - fr.startech.com ES: Guía del usuario - es.startech.com IT: Guida per l'uso - it.startech.com NL: Gebruiksaanwijzing - nl.startech.com PT: Guia do usuário - pt.startech.com For the most up-to-date information, please visit: www.startech.com Manual Revision: 02/01/2019...
- Page 2 StarTech.com. Where they occur these references are for illustrative purposes only and do not represent an endorsement of a product or service by StarTech.com, or an endorsement of the product(s) to which this manual applies by the third-party company in question. Regardless of any direct acknowledgement elsewhere in the body of this document, StarTech.com hereby...
-
Page 3: Table Of Contents
Table of Contents Introduction ....................1 Features ................................ 1 Packaging Contents ..........................1 Installation and Usage................2 Hardware Installation ..........................2 Drive Installation ............................3 Drive Removal ............................5 Specifications ..................6 Technical Support ..................7 Warranty Information ................7 Instruction Manual... -
Page 4: Introduction
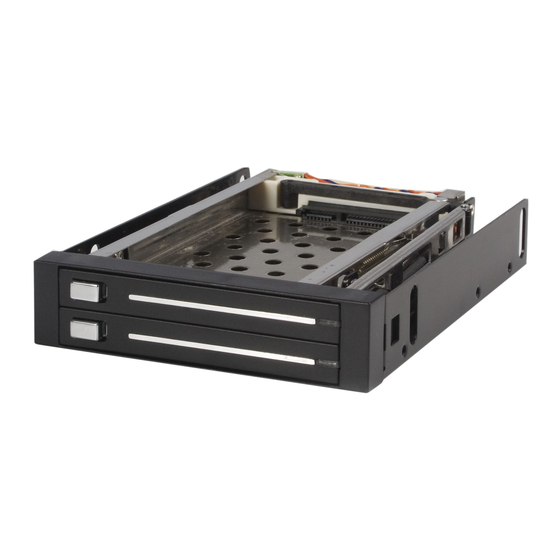
Introduction Thank you for purchasing a StarTech.com 3.5” Dual SATA Hard Drive Hot-Swap Bay - the ideal solution for simplifying drive removals and insertions as part of the system building process. Also a perfect addition for operating system image deployment and... -
Page 5: Installation And Usage
Installation and Usage Hardware Installation To prepare HSB220SAT25B for installation within the computer: (4-pin) LED Connector (15-pin) SATA Power (7-pin) SATA Data Connector Connector 1. Connect the 15-pin SATA Power Connector and 4-pin LED connector (provided by an included LP4-to-4-pin LED/15-pin SATA Power Y-cable) to the appropriate ports on the rear panel of HSB220SAT25B, as shown above.Repeat this connection with the second (included) Y-cable, connecting to the remaining ports on the rear panel of HSB220SAT25B. -
Page 6: Drive Installation
3. Ensuring the computer is powered down, remove the slot cover from a 3.5” floppy drive bay on the host computer. 4. Gently, slide HSB220SAT25B into the now vacant 3.5” floppy drive bay, threading the connected cables through the opening, until the front panel of HSB220SAT25B is flush with the computer case front panel. - Page 7 Please note: It is essential that the drive be positioned properly within the drive bay. Attempting to install a drive with its interface improperly aligned with the drive bay interface could cause serious damage to both the drive and the drive bay. 2.
-
Page 8: Drive Removal
Please note: It is strongly recommended that the computer be powered down when removing drives from HSB220SAT25B, as removing drives while in use can damage the drive and any data contained within. Drive Removal To remove a drive from HSB220SAT25B: 1. -
Page 9: Specifications
Specifications Bus Type SATA I, SATA II, SATA III Supported Drive Form Factor 9.5 mm, 2.5” SATA/DRIVES 2 x 15-pin SATA Power Female (external) 2 x 15-pin SATA Power Female (internal) Connector Types 2 x SATA 7-pin Data Female (external) 2 x SATA 7-pin Data Female (external) 2 x 4-pin LED Weight... -
Page 10: Technical Support
Limitation of Liability In no event shall the liability of StarTech.com Ltd. and StarTech.com USA LLP (or their officers, directors, employees or agents) for any damages (whether direct or indirect, special, punitive, incidental, consequential, or otherwise), loss of profits, loss of business, or any pecuniary loss, arising out of or related to the use of the product exceed the actual price paid for the product. - Page 11 StarTech.com is an ISO 9001 Registered manufacturer of connectivity and technology parts. StarTech.com was founded in 1985 and has operations in the United States, Canada, the United Kingdom and Taiwan servicing a worldwide market.
Need help?
Do you have a question about the 8STHSB220SAT25B and is the answer not in the manual?
Questions and answers