Table of Contents
Advertisement
Quick Links
Wine Coolers
USER MANUAL
PREMIUM SERIES
This manual contains important information including safety and
installation instructions of the appliances. Please read it carefully before
use and follow all safety information & instructions. It is recommended
to keep this manual for easy reference so that you can be familiar with the
operation of the appliance.
V2/2021
Advertisement
Table of Contents

Related Manuals for Temptech PREMIUM Series


Summary of Contents for Temptech PREMIUM Series
- Page 1 Wine Coolers USER MANUAL PREMIUM SERIES This manual contains important information including safety and installation instructions of the appliances. Please read it carefully before use and follow all safety information & instructions. It is recommended to keep this manual for easy reference so that you can be familiar with the operation of the appliance.
-
Page 2: Table Of Contents
--CONTENTS-- 01 ENERGY SAVING AND ECOLOGICAL PROTECTION 02 IMPORTANT SAFETY INFORMATION Conformity Energy Saving Service 07 DESCRIPTION OF APPLIANCE AND INSTALLATION 07 WPQ15SCB / WPQ15SCS 07 WPQ30SCB / WPQ30SCS 08 WPQ38SCS / WPQ38SCB / WPQ38DCB / WPQ38DCS 08 WP2DQ60DCB / WP2DQ60DCS 09 WPX60DCB / WPX60DCS 09 WPQ60SCB / WPQ60SCS / WPQ60DCB / WPQ60DCS 09 WFQ60SCB /WFQ60SCS... - Page 3 31 INSTALL REMOVABLE FRONT GRILLE 31 WPX60DCB / WPX60DCS 32 HOW TO FIND OTHER LANGUAGE USER MANUAL...
-
Page 4: Energy Saving And Ecological Protection
INSTRUCTION MANUAL • Please removed all packaging, stickers and films from the products surface and clean the product’ s surfaces with a damp cloth and mild deturgent before using for the first time. • Let the appliance stand upright for approximately hours before connecting it to the power source, which helps to reduce the possibility of a cooling-system malfunction from handling during transportation. -
Page 5: Important Safety Information
16 °C to 43 °C’; (o) How to find the model information in the product database: Please visit our website https://temptech.no/ to find the instruction about how to find production information in EU database. IMPORTANT SAFETY INFORMATION This appliance uses flammable refrigerants and flammable insulation blowing gases. - Page 6 INSTRUCTION MANUAL shock, or injury when using the appliance, follow these basic precautions: ● This appliance is for domestic purposes and is intended to be used exclusively for the storage of sealed bottled wines. ● The appliance must be positioned so that the plug is accessible. ●Make sure the voltage/current marked on the rating label corresponds with your supply voltage.
- Page 7 INSTRUCTION MANUAL hazardous. ● Please keep the products away from the fire or similar glowing substance before you dispose the appliance. ● GWP (Global Warming Potential): R600a=3 ● When you dispose the appliance, take off the door and leave the shelves in place so that children may not easily climb inside.
-
Page 8: Conformity
INSTRUCTION MANUAL – WARNING: Do not use electrical appliances inside the food storage compartments of the appliance, unless they are of the type recommended by the manufacturer. - WARNING: When positioning the appliance, ensure the supply cord is not trapped or damaged. - WARNING: Do not locate multiple portable socket- outlets or portable power suppliers at the rear of the appliance. -
Page 9: Energy Saving
INSTRUCTION MANUAL the legislation for this product. „ Energy Saving --Always ensure good ventilation. Do not cover ventilation opening or grille. --Always keep fan louvers clear. --Do not place appliance in areas of direct sunlight or close to a stove, heather or similar object. -
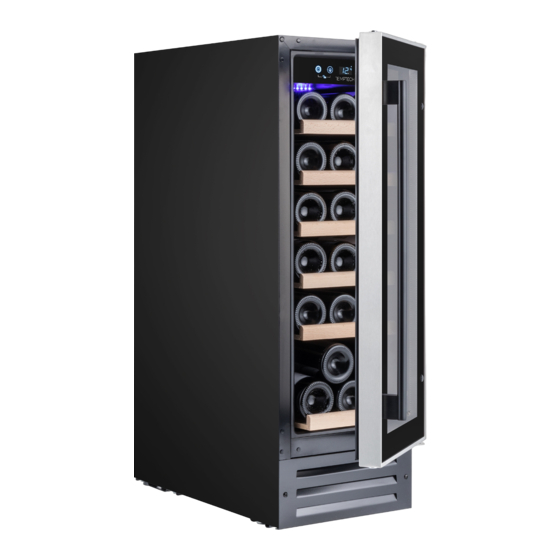
Page 10: Description Of Appliance And Installation
INSTRUCTION MANUAL DESCRIPTION OF APPLIANCE AND INSTALLATION The following pictures only show description of appliance. The dimension and shelf quantity may differ among the models of the same series. „ WPQ15SCB / WPQ15SCS • Height Adjustable: 863-883mm „ WPQ30SCB / WPQ30SCS •... -
Page 11: Wpq38Scs / Wpq38Scb / Wpq38Dcb / Wpq38Dcs
INSTRUCTION MANUAL „ WPQ38SCS / WPQ38SCB / WPQ38DCB / WPQ38DCS • Height Adjustable: 853-873mm „ WP2DQ60DCB / WP2DQ60DCS • Height Adjustable: 863-883mm .08. -
Page 12: Wpx60Dcb / Wpx60Dcs
INSTRUCTION MANUAL „ WPX60DCB / WPX60DCS • Height Adjustable: 813-833mm „ WPQ60SCB / WPQ60SCS / WPQ60DCB / WPQ60DCS „ WFQ60SCB /WFQ60SCS • Height Adjustable: 863-883mm .09. -
Page 13: Wp120Dcb / Wp120Dcs
INSTRUCTION MANUAL „ WP120DCB / WP120DCS „ W180SCB / WP180SCS / WP180DCB / WP180DCS .10. -
Page 14: Accessory Installation Before Operating
INSTRUCTION MANUAL ACCESSORY INSTALLATION BEFORE OPERATING „ UNPACKING AND CLEANING THE WINE COOLER • Remove the exterior and interior packing materials. • 24 hours Let the appliance stand upright for approximately before connecting it to the power source, which helps to reduce the possibility of a cooling-system malfunction from handling during transportation. -
Page 15: Installing The Handle
INSTRUCTION MANUAL affected. IMPORTANT: Do not move the appliance when the feet are adjusted high. „ Installing The Handle Gasket Handle Washer Handle Screws ● Remove the door Gasket slightly to expose the two screw holes. ● Fix the Handle by screwing the two Handle Screws tightly, the Handle Screws with Washers are pre-installed inside the screw holes, pls.do not unscrew the Handle Screws too much in case the Washers fell off. -
Page 16: Wine Storage
INSTRUCTION MANUAL 16 - 38 °C (61 ºF-100ºF) 16 - 43 °C (61 ºF-109ºF) • If the ambient temperature is above or below the designed climate range, the performance of the unit may be affected. For example, the appliance operating in extreme cold or hot conditions may cause interior temperatures to fluctuate, and the temperature set 5-22°C may not be reached sometimes. -
Page 17: Control Panel (Control In Cabinet)
INSTRUCTION MANUAL „ CONTROL PANEL (Control In Cabinet) • For Single Zone A. Power B. Lighting C. Display Window D. Temp. Plus E. Temp.Minus F. Lock / Unlock G. Function Indicator H. ºC/ºF Switch ** For models WP2DQ60DCB and WP2DQ60DCS, they are without the Function Indicator •... -
Page 18: Unlocking The Control Panel
INSTRUCTION MANUAL Warning: To avoid damaging the compressor, please do not turn on the appliance again within 5 minutes after you turn it off. „ UNLOCKING THE CONTROL PANEL • To unlock the control panel, touch the power mark and lighting mark with 2 fingers at the same time and hold for 3 seconds . -
Page 19: Selecting Fahrenheit(ºf) & Celsius (ºc) Display
INSTRUCTION MANUAL • The first touch on mark will recall the previous set temperature displayed. • to increase the set temperature by 1 ºC (or by 1ºF) . On the Touch the mark to decrease the set temperature by 1 ºC (or by 1ºF) . contrary, touch the mark For Dual Zone •... -
Page 20: Cleaning The Wine Cooler
INSTRUCTION MANUAL For Single Zone o The Indicator 1 will flash every 2 seconds when the unit is plugged in; o The Indicator 1 will stay on when the compressor starts to work; o The Indicator 2 will flash every 3 seconds when the heating function of lower zone starts to work;... -
Page 21: Carbon Filter Change (Option)
INSTRUCTION MANUAL A. Cut B. Plastic Stopper • For a model with Telescopic Rail, pls. lift the whole Shelf upwards horizontally to get it off from the 4 Locating Pins of Telescopic Rail. Stopper Locating Pin „ Carbon Filter Change (Option) A good ambient air quality is important for wine maturing. -
Page 22: Moving Your Wine Cooler
INSTRUCTION MANUAL o Defrosting occurs automatically inside of the Wine Cooler during operation. The defrost water is collected by the evaporating tray and evaporates automatically. o The evaporating tray and defrost water drain hole should be cleaned periodically. This will prevent water from collecting in the bottom of the Wine Cooler, instead of flowing down the defrost drainage channel and drain hole. -
Page 23: Disconnecting From Power
INSTRUCTION MANUAL Long vacations: o If your appliance is not going to be in use for a period of time, you should remove the bottles of wine and switch off the appliance o The interior should be cleaned with a solution of bicarbonate of soda and lukewarm water. -
Page 24: Reverse The Door Swing
INSTRUCTION MANUAL PROBLEM PROBLEM POSSIBLE CAUSE / MEASURE The rattling noise may come from the flow of the refrigerant, which is normal. As each cycle ends, you may hear gurgling sounds The wine cooler seems to make caused by the flow of refrigerant. too much noise Contraction and expansion of the inside walls may cause popping and crackling noises. - Page 25 INSTRUCTION MANUAL Bottom Right Hinge Pivot Hinge Min. Screw Carefully remove the door from the Upper Right Hinge and prevent it from scratching. Take out the Pivot Hinge from the door hinge hole. Upper Right Hinge Door Bottom Right Hinge Pivot Hinge Min.
- Page 26 INSTRUCTION MANUAL Pull out the 6 Plastic Caps at the front left corner of the cabinet. And move them all to the right side. Plastic Caps (6pcs) Install the Upper Left Hinge and Bottom Left Hinge to the left side of the cabinet. Make sure the screws are tightened.
- Page 27 INSTRUCTION MANUAL Remove the Handle Hole Cap (2pcs) on the right side of Door by prying it out gently with small flat screwdriver. Handle Hole Cap Gently pull the door gasket to one side to reveal the Handle Screws (2pcs) on the left side of the Door.Unscrew it with a cross screwdriver and Remove the Handle (Leave the Washers as where it is).
- Page 28 INSTRUCTION MANUAL Install the Handle to the right side of the door by screwing tightly the Handle Screws (2PCS). Handle Screw Washer Handle .Push the Handle Hole Cap (2pcs) into the Handle Holes on the left side of the Door. Handle Hole Cap .25.
-
Page 29: Wp120Dcb / Wp120Dcs / Wp180Dcb / Wp180Dcs / Wp180Scb / Wp180Scs
INSTRUCTION MANUAL .Insert the Pivot Hinge into the bottom hinge hole of the door. Pivot Hinge .Install the door to the left hinge side by tightening the Pivot Hinge with the 2 screws. Bottom Left Hinge Pivot Hinge Screws (2pcs) „... - Page 30 INSTRUCTION MANUAL Hole Cover Upper Hinge Cover Hex Head Screw (4pcs) Upper Hinge Door Move the Hinge Hole Cap (at the top of the door) from the left side to the right side. Move the Pivot Hinge (at the bottom of the door) from the right to the left side. Hinge Hole Cap Pivot Hinge Remove the Bottom Hinge Cover by prying it off gently with small flat screwdriver.
- Page 31 INSTRUCTION MANUAL Hinge Washer Hinge Washer Pan Head Hex Head Screw(4pcs) Screw(4pcs) Bottom Hex Head Bottom Bottom Bottom Pan Head Hinge Cover Screw(4pcs) Hinge Hinge Cover Hinge Screw(4pcs) Hold the Door carefully with your assistant and place it on the top of Bottom Hinge , make sure the Pivot Hinge is at correct place through the Hinge Washer.
- Page 32 INSTRUCTION MANUAL Remove the Handle Hole Cap (2pcs) on the right side of Door by prying it out gently with small flat screwdriver. Handle Hole Cap Gently pull the door gasket to one side to reveal the Handle Screws (2pcs) on the left side of the Door.Unscrew it with a cross screwdriver and Remove the Handle (Leave the Washers as where it is).
- Page 33 INSTRUCTION MANUAL nstall the Handle to the right side of the door by screwing tightly the Handle Screws (2PCS). Handle Screw Washer Handle Push the Handle Hole Cap (2pcs) into the Handle Holes on the left side of the Door. Handle Hole Cap .30.
- Page 34 INSTRUCTION MANUAL INSTRUCTION MANUAL INSTRUCTION MANUAL INSTRUCTION MANUAL INSTRUCTION MANUAL ACCESSORY INSTALLATION BEFORE OPERATING ACCESSORY INSTALLATION BEFORE OPERATING ACCESSORY INSTALLATION BEFORE OPERATING INSTALL REMOVABLE FRONT GRILLE ACCESSORY INSTALLATION BEFORE OPERATING „ Install Removable Front Grille „ Install Removable Front Grille „...
- Page 35 INSTRUCTION MANUAL HOW TO FIND OTHER LANGUAGE USER MANUAL You can find Norwegian, Swedish, Finnish and Danish user manual from below website. You can download Norwegian user manual at https://temptech.no/manualer-og- installasjon/ You can download Swedish user manual at https://temptech.se/manualar-och- installation You can download Finnish user manua at https://temptech.fi/kayttoohjeet-ja-...
Need help?
Do you have a question about the PREMIUM Series and is the answer not in the manual?
Questions and answers