Advertisement
Quick Links
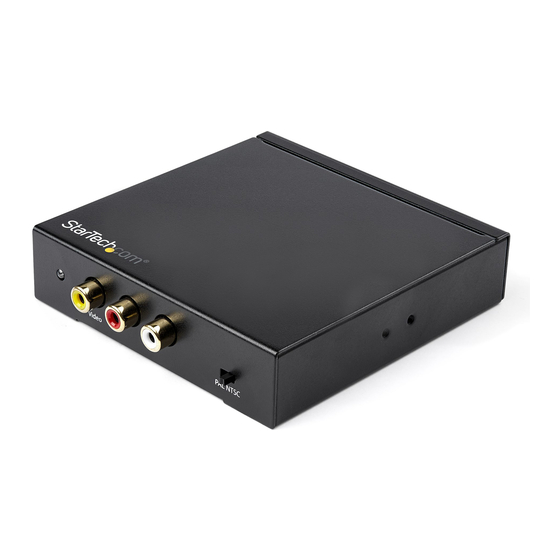
HDMI® to Composite Video Converter with Audio
Product Diagram (HD2VID2)
1
2
Port/LED
• Indicates that video is connected using the
1
Composite LED
HDMI Port.
Composite Video Port
• Used to connect a Display Device to the
2
(Yellow)
Converter.
• Used to connect an Audio Device to the
Stereo Port L/R (Red/
3
Converter.
White)
• Used to toggle between PAL and NTSC video
4
PAL/NTSC Switch
modes.
5
6
Port/LED
• Used with the Universal Power Adapter to
5
DC/5V Port
power the Converter.
• Indicates that the Converter is receiving
6
Power LED
power.
• Used to connect a Video Source Device to the
7
HDMI Input Port
Converter.
To view manuals, FAQs, videos, drivers, downloads, technical drawings, and more, visit www.startech.com/support.
4
3
Function
7
Function
Requirements
For the latest requirements, please visit www.startech.com/HD2VID2.
Note: All Required items are sold separately.
• HDMI Enabled Video Source x 1
• Composite Video Enabled Display Device (e.g. Monitor, Projector, HDTV, etc.) x 1
• HDMI Cable x 1
• RCA Composite Video Cable x 1
• Phillips Head Screwdriver x 1
• Composite Audio Cable x 1
Installation
Note: Power off all devices before connecting the Converter.
1. Connect an HDMI Cable to the HDMI Port on the Converter and connect the other
end of the HDMI Cable to the HDMI port on the Video Source Device.
2. Connect an RCA Composite Cable (sold separately) to the Composite Video Port
on the Converter and connect the other end of the RCA Composite Cable to the
composite video port on the Display Device.
3. If HDMI audio is being used, connect Composite Audio Cables (sold separately)
to the Stereo Port L and R Ports on the Converter and the other end of the
Composite Audio Cables to the Speakers/Audio Receiver.
4. Connect the Universal Power Adapter to the DC/5V Port on the Converter and
other end to an AC Electrical Outlet. The Power LED will light up solid.
5. Power on the Video Display Device and the HDMI Video Source.
6. Slide the PAL/NTSC Switch to adjust the video mode to either PAL or NTSC.
Connecting a Regional Power Clip
1. Select a Regional Power Clip.
2. Align the two Side Tabs on the Regional Power Clip with the notches on the face
of the Universal Power Adapter.
3. Slide the Regional Power Clip down until you hear a click, connecting the contact
prongs on the Regional Power Clip with the contact prongs on the Universal
Power Adapter.
Quick-Start Guide
Advertisement

Subscribe to Our Youtube Channel
Related Manuals for StarTech.com HD2VID2


Summary of Contents for StarTech.com HD2VID2
- Page 1 Regional Power Clip with the contact prongs on the Universal • Used to connect a Video Source Device to the Power Adapter. HDMI Input Port Converter. To view manuals, FAQs, videos, drivers, downloads, technical drawings, and more, visit www.startech.com/support.
- Page 2 (1) This device may not cause harmful interference, and (2) this device must accept any interference received, including In no event shall it be the liability of StarTech.com Ltd. and StarTech.com USA LLP (or their officers, directors, employees or interference that may cause undesired operation. Changes or modifications not expressly approved by StarTech.com could void agents) for any damages (whether direct or indirect, special, punitive, incidental, consequential, or otherwise), loss of profits, loss the user’s authority to operate the equipment.
Need help?
Do you have a question about the HD2VID2 and is the answer not in the manual?
Questions and answers