Table of Contents
Advertisement
Quick Links
Advertisement
Table of Contents
Troubleshooting

Related Manuals for Tait orca 5000 Series


Summary of Contents for Tait orca 5000 Series
- Page 1 T A I T O R C A 5 0 1 8 C O N V E N T I O N A L 5 0 0 0 S E R I E S...
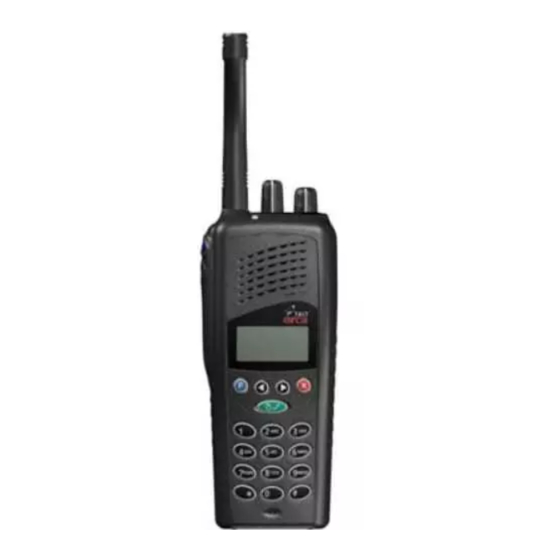
- Page 2 5 0 0 0 S E R I E S 16-way Selector Power/Volume Control LED Indicator Function Key 1 Speaker Function Key 2 Standard Microphone PTT Key (Press-To-Talk) Display Right Arrow Left Arrow Key Function Key 3 Clear Key Menu Key Handset Microphone...
- Page 3 Replace or recharge your battery as soon as the radio indicates the battery is low. Tait Electronics Ltd has made every effort to ensure the accuracy of the information in this manual. However, Tait Electronics Ltd reserves the right to update the radio and/or this manual without notice.
-
Page 4: Menu Map
Menu Map Note: Some menu options may not be available on your radio, depending on how it has been programmed. Main Menu Queue Select Channel Select Bank Send Selcall Select Status Alpha Symbols User Settings Handset Low Pwr [Low Power Transmit] Keylock Economy Squelch... -
Page 5: Table Of Contents
Contents Menu Map ............... 2 Before Using Your Radio ........... 7 About Your Radio .............. 8 For Your Safety ..............9 Preparing Your Radio for First Use ........10 Installing and Removing the Battery Pack ....10 Installing a Belt Clip ..........10 Removing a Belt Clip .......... - Page 6 Improving Your Radio’s Reception (Squelch) ..... 33 Selecting a Factory Setting (City or Country) ..... 33 Hearing All Activity on a Channel (Squelch Override) . 34 Checking That a Channel Is Clear (Monitor) ..... 35 Using the Menu ............35 Using Other Ways to Activate/Deactivate Monitor ..
- Page 7 Turning Audible Tones On and Off ......63 Adjusting the Level of Audible Tones ......63 Changing Scanning and Voting Group Settings ....64 Configuring Scan Groups .......... 64 Changing Flexiscan Scan Group Settings ......67 Configuring Flexiscan Scan Groups ......67 Changing Subaudible Signalling Settings ......
-
Page 9: Before Using Your Radio
Before Using Your Radio This section covers: About Your Radio For Your Safety Preparing Your Radio for First Use Before Using Your Radio... -
Page 10: About Your Radio
‘Custom Settings’ page on the inside back cover of this manual. When you receive your radio, make sure all items you ordered are included. Typically, you should receive the following: Tait Orca portable radio unit. Battery pack. Antenna. User’s Manual (this document). Compliance Information (separate document). -
Page 11: For Your Safety
Do not use a handheld microphone or radio while driving, or operating machinery. Only use Tait Orca battery chargers to charge the radio’s battery. Avoid using unnecessarily high volume levels if using the radio with an earphone or headset. -
Page 12: Preparing Your Radio For First Use
To remove the battery pack: Push the battery catch down From the sides, pull the battery away from the radio. Installing a Belt Clip Most Tait Orca batteries are designed to be fitted with belt clips. Before Using Your Radio... -
Page 13: Removing A Belt Clip
Two types of belt clip are available: 38 mm belt clip. 55 mm spring-loaded belt clip. For both types of belt clip, slide the belt clip into the two slots on the top of the battery. Push down until the clip snaps into place. - Page 14 Belt Clip Release Tab Battery Clip Battery Note: Should the small battery clip come loose while removing either belt clip, it can easily be refitted by sliding it into the slot at the top of the battery until it snaps into place. Before Using Your Radio...
-
Page 15: Getting Started
Getting Started This section covers: Using the Radio Controls Understanding the Radio Indicators Understanding Display Messages Using the Menu Getting Started... -
Page 16: Using The Radio Controls
Using the Radio Controls Your radio controls include the power/volume control, 16-way selector, function keys, keypad, menu, and various radio indicators. Some keys have more than one function assigned, which can be accessed by a short or long keypress: A short keypress is defined as less than 1 second. A long keypress is defined as more than 1 second. -
Page 17: Using The 16-Way Channel/Bank Selector
Using the 16-way Channel/Bank Selector The 16-way selector accesses channels, scan groups or channel banks, depending on how the radio has been programmed. See ‘Selecting Channels and Channel Banks’ on page 26 for more information. Note: The 16-way selector may have been disabled when the radio was programmed. -
Page 18: Using The Keypad
option. See ‘Changing Operation Settings (User Settings Menu)’ on page 57. To access menu options using the F3 key: Press the F3 key. Pressing once accesses the last selected option, while each subsequent press accesses the next option, moving in a continuous loop. Using the Keypad The key functions for your radio are outlined in the following table. -
Page 19: Understanding The Radio Indicators
Understanding the Radio Indicators The radio’s LED indicator and audible tones provide you with information on the radio’s status. The meaning of the radio indicators is summarised on the ‘Radio Indicators’ page on the inside back cover of this manual. LED Indicators The radio’s LED is the main indicator for displaying the state the radio is in. -
Page 20: Audible Tones
Radio programmed incor- Fast Green rectly or faulty. Contact your Tait dealer. Audible Tones Your radio uses a variety of beeps and tones to supplement the information provided by the LED. The most common audible tones are summarised on the ‘Radio Indicators’... -
Page 21: Understanding Display Messages
Understanding Display Messages Note: Throughout this user’s manual, messages that appear in the display are shown BOLD ALLCAPS The radio display provides you with information on a number of aspects of the radio’s operation. A typical display is shown below: Active modes Current operation... - Page 22 The meaning of these icons is outlined in the following table. Icon Meaning Flashing: Recharge the battery. Steady: The battery is charged. Steady: The radio is in DTMF dialling mode. Steady: Monitor or squelch override is active. Steady: Scrolling is permitted. Steady: The radio is scanning a group of channels for activity.
-
Page 23: Using The Menu
Using the Menu The radio menu allows you to: Customise your radio’s settings. Access specific features and functions of the radio. The table below summarises the options that can be accessed through the main menu. The available options vary depending on how your radio was programmed. Display Operation QUEUE... -
Page 24: Entering Menu Mode
Display Operation ADVANCED Modify the make-up of scanning, voting SETTINGS and Flexiscan scan groups; change subaudible channel settings or check radio version information. See page 64, 67 and 69. Entering Menu Mode To enter menu mode: Long press the menu key ( ). -
Page 25: Exiting Menu Mode
Exiting Menu Mode To exit menu mode: Long press the menu key ( Getting Started... - Page 26 Getting Started...
-
Page 27: Making And Receiving Calls
Making and Receiving Calls This section covers: Accessing Channels and Channel Banking Making a Call Receiving a Call Scanning for Channel Activity Improving Your Radio’s Reception (Squelch) Checking That a Channel Is Clear (Monitor) Making and Receiving Calls... -
Page 28: Accessing Channels And Channel Banking
Accessing Channels and Channel Banking In order to make and receive calls you first need to select a channel. The procedure for selecting a channel varies depending on how your radio has been programmed. About Channel Banking Channel banking is an optional feature that allows easy access to large numbers of channels by grouping them into ‘banks’. - Page 29 Note: On some radios the 16-way selector is disabled. In this case channels can only be selected using the menu. Using the Menu To select a channel using the menu: Note: Skip to step 4 if the radio is already in channel mode.
- Page 30 Understanding Channel Numbering and Display The number of channels in each bank differs according to the radio’s configuration: Configuration Number of Channels Per Bank 16-way selector Up to 16 channels in each selects channels. bank. 16-way selector Up to 32 channels in each selects channel bank.
-
Page 31: Making A Call
Making a Call To make a call: Select the desired channel as described in ‘Selecting Channels and Channel Banks’ on page 26. Hold down the PTT key, once the channel is free, and speak clearly into the radio. Identify yourself and the party you are calling using the call signs you have been assigned. -
Page 32: Receiving A Call
Receiving a Call Your radio remains quiet until there is valid activity on the channel your radio is currently on. To receive a call: Select the desired channel as described in ‘Selecting Channels and Channel Banks’ on page 26. To respond to a call: Press the PTT key and talk. -
Page 33: Scanning For Channel Activity
Scanning for Channel Activity A series of channels can be grouped together so that the radio can scan through them looking for activity automatically. Scan groups are selected in the same way as channels (see ‘Selecting Channels and Channel Banks’ on page 26). -
Page 34: Scanning For The Strongest Signal (Voting)
Scanning for the Strongest Signal (Voting) With this type of scanning the scan group’s member channels carry the same traffic, and the radio searches for the channel with the strongest signal. Background Scanning (Flexiscan) The Flexiscan scanning feature allows you to commu- nicate on a selected channel, while a group of channels is scanned for valid activity in the background. -
Page 35: Improving Your Radio's Reception (Squelch)
Improving Your Radio’s Reception (Squelch) Your radio will normally be programmed to minimise unwanted noise or interference from other channels (known as ‘squelch’). Without squelch, the radio would ‘chatter’ on and off in low signal strength areas. However, it may sometimes to be necessary to adjust the squelch settings when you are having difficulty hearing a call, or when entering a low signal strength area. -
Page 36: Hearing All Activity On A Channel (Squelch Override)
Hearing All Activity on a Channel (Squelch Override) Squelch override allows you to hear all activity on a channel no matter how faint or noisy. This setting is useful when a caller is very hard to hear. To turn squelch override on and off: Press the assigned function key. -
Page 37: Checking That A Channel Is Clear (Monitor)
Checking That a Channel Is Clear (Monitor) Your radio is capable of segregating individuals or groups of users by means of audible or subaudible tones (known as signalling). This means that in normal operation you may not be able to hear all calls being transmitted on a channel. -
Page 38: Using Other Ways To Activate/Deactivate Monitor
Using Other Ways to Activate/Deactivate Monitor Your radio may be programmed to activate monitor mode when you: Turn on the radio. Send specific types of calls. Press a function key (if assigned). The monitor may be deactivated by: Your despatcher. Receiving specific types of calls. -
Page 39: Making And Receiving Different Types Of Calls
Making and Receiving Different Types of Calls This section covers: Making an Individual or Group Call (Selcall) Resending Calls Automatically Receiving an Individual or Group Call Responding to Missed Calls Sending a Status Message Calling a Telephone or a Remote Device (DTMF) Making an Emergency Call Making Calls from a Predefined List (Alphanumeric Labels) -
Page 40: Making An Individual Or Group Call (Selcall)
Making an Individual or Group Call (Selcall) You can use your radio to make calls to an individual or a specific group using Selcall (selective calling). Your radio is able to make preset Selcalls only. Making a Preset Call Two preset individual or group calls can be assigned to each channel that has Selcall. -
Page 41: Resending Calls Automatically
Resending Calls Automatically Your radio may have been programmed to resend individual and group calls when they are not answered. Your radio has two automatic callback features: Deferred calling. No acknowledgement retries. Deferred Calling When you attempt to make a call on a channel that is busy, the radio can store and send the call once the channel is free. -
Page 42: Receiving An Individual Or Group Call
Receiving an Individual or Group Call When a call is received that contains your radio’s identity, will flash in the display. The radio also CALL gives a ringing tone and the LED indicator flashes amber at fast flash rate. Different ringing tones will sound when different types of calls are received. -
Page 43: Responding To Missed Calls
Responding to Missed Calls Your radio may be programmed with two features to help you manage missed individual and group calls: Immediate callback. Call queuing. Using Immediate Callback When you miss a call the LED will flash amber at fast flash rate, the display will flash and the caller’s CALL,... -
Page 44: Understanding How Calls Are Queued
The first call in the queue will be displayed: Caller identity Call details The meaning of each element in the display message (above) is as follows: I DAVEW: The caller’s identity. I P: A priority call is queued. I 01: The current queued call. - Page 45 Calls will be queued until the queue is full. However, if a priority call is received when the queue is full, the most recent individual call will be discarded to allow the priority call to be saved. Making and Receiving Different Types of Calls...
-
Page 46: Sending A Status Message
Sending a Status Message Your radio may be programmed with the capability to attach a status message when you send an individual or group call. About Status Messages A status message contains information about your current activity or location, which is sent to the called radio. - Page 47 When you next send a selcall, a status message will be attached. To send a selcall, see ‘Making an Individual or Group Call (Selcall)’ on page 38. Making and Receiving Different Types of Calls...
-
Page 48: Calling A Telephone Or A Remote Device (Dtmf)
Calling a Telephone or a Remote Device (DTMF) You can call a telephone or send control codes to a remote device using a feature called DTMF (the tone- based system used by the world telephone network). Your radio is able to make preset DTMF calls only. Making a Preset Call A preset DTMF call will be assigned to one of the function keys (if programmed). -
Page 49: Making An Emergency Call
Making an Emergency Call Your radio may be programmed with an emergency call function. About Emergency calls There are two different types of emergency call that may be programmed for your radio, both of which are activated using an assigned function key: Selective emergency call (Selcall): Sends an emergency call sequence to a group or individual. -
Page 50: Activating The Automated Emergency Call Feature
To make an emergency call using a double short press: Short press the assigned function key twice within 3 seconds. To make an emergency call using a double long press: Long press the assigned function key twice within 5 seconds. Exiting Emergency Mode To reset the radio to normal operation: Turn the radio off, then on again. -
Page 51: Making Calls From A Predefined List (Alphanumeric Labels)
Making Calls from a Prede- fined List (Alphanumeric Labels) You can use your radio to make up to 20 preset calls known as alphanumeric labels (if programmed). These calls can be accessed in much the same way as an electronic phone book. Each preset call has a label using numbers and/or letters. - Page 52 Making and Receiving Different Types of Calls...
-
Page 53: Receiving Short Data Messages (Sdms)
Receiving Short Data Messages (SDMs) This section covers: Reading Short Data Messages Note: You cannot send SDM messages with your radio. Receiving Short Data Messages (SDMs) -
Page 54: Reading Short Data Messages
Reading Short Data Messages Your radio may be programmed with the capability to receive short data messages called SDMs. When your radio receives a message, flashes in the lower left-hand corner of the display and the radio gives three short, medium-pitched beeps. To read a message: Long press the menu key. -
Page 55: Changing Your Radio's Settings
Changing Your Radio’s Settings This section covers: Display Settings (Display Menu) Operation Settings (User Settings Menu) Audible Tone Settings (Alert Settings Menu) Scanning and Voting Group Settings (Advanced Menu) Flexiscan Scan Group Settings (Advanced Menu) Subaudible Signalling Settings (Advanced Menu) Changing Your Radio’s Settings... -
Page 56: Changing Display Settings
Changing Display Settings (Display Menu) Note: Some display features may not be available or modifiable on your radio. Display settings can be modified using a function key (if assigned) or the display settings menu. To access the display settings menu: Long press the menu key to enter menu mode (if the radio displays a submenu option, press the clear key to enter the main menu). - Page 57 automatically return to its previous mode of operation after a few seconds of inactivity. Using a Function Key To use a function key: Press the assigned function key. The message CONTRAST ADJUSTMENT is displayed. Use the arrow keys to adjust the contrast to the desired level.
- Page 58 Displaying the Received Signal Strength Indicator (RSSI) When this option is turned on, the strength of the received signal is displayed in the lower left-hand corner of the menu display. To turn RSSI on and off: Enter the display settings menu as described at the beginning of this section.
-
Page 59: Changing Operation Settings
Changing Operation Settings (User Settings Menu) Note: Some operation features may not be available or modifiable on your radio. Operation settings can be modified by using a function key (if assigned) or the user settings menu. To access the user settings menu: Long press the menu key to enter menu mode (if the radio displays a submenu option, press the clear key to enter the main menu). -
Page 60: Choosing A Radio Microphone Setting
Turning Economy Mode On and Off To turn economy mode on and off: Press the assigned function key. Enter the user settings menu as described at the beginning of this section. Short press the menu key, then scroll through the available menu options until ECONOMY is displayed. -
Page 61: Locking The Keypad
When handset mode is turned on, the radio’s handset microphone operates. Note: The radio may have been programmed so that handset microphone is the default setting. Caution: While using the handset micro- phone, do not hold the speaker pressed against your ear, or allow the antenna to touch your body. - Page 62 The current status ( ) is LOCKED UNLOCKED displayed underneath. Short press the menu key to lock and unlock the keypad. The keypad lock can also be deactivated by a long press the clear key. Long press the menu key to exit menu mode . When a locked key is pressed, the radio will give a long, low-pitched beep and display the message KEYPAD...
-
Page 63: Bypassing Repeater Stations
Bypassing Repeater Stations (Communicating Directly with Other Radios) If you are out of range of a repeater you can commu- nicate directly with another radio by using a feature called ‘repeater talkaround’. To activate repeater talkaround: Press the assigned function key. To deactivate repeater talkaround: Press the function key again or change to another channel. -
Page 64: Changing Audible Tone Settings
Changing Audible Tone Settings (Alert Settings Menu) Note: Some or all audible tone features may not be available or modifiable on your radio. Key tone settings (see below) can be modified using the alert settings menu. Audible tones can be modified using the alert settings menu or a function key (if assigned). -
Page 65: Turning Audible Tones On And Off
Turning Audible Tones On and Off To turn audible tones on and off: Press the assigned function key. Enter the user settings menu as described at the beginning of this section. Short press the menu key, then scroll through the available menu options until is displayed. -
Page 66: Changing Scanning And Voting Group Settings
Changing Scanning and Voting Group Settings (Advanced Menu) Note: Scan group features may not be available or modifiable on your radio. Configuring Scan Groups You can modify the mix of channels in your radio’s scan groups in the following ways by: Removing channels. - Page 67 Press the menu key to enter group programming mode. GPGM is displayed in the top left-hand corner. Scroll through the available scan groups using the arrow keys until the desired group is displayed. Press the menu key to select the chosen group. The name of the first channel in the group will be displayed: Mode...
- Page 68 Membership Rules There are several rules which govern the make-up of scan groups. When modifying the settings a prompt message will be displayed if an action is not permitted. Message Rule Meaning/Action A scan group must No more channels CANNOT have a minimum of can be deleted, DELETE...
-
Page 69: Changing Flexiscan Scan Group Settings
Changing Flexiscan Scan Group Settings (Advanced Menu) Note: Flexiscan scan group features may not be available or modifiable on your radio. Configuring Flexiscan Scan Groups Flexiscan scan groups can be modified in the same ways as Scanning and Voting groups (see ‘Configuring Scan Groups’... - Page 70 Press the menu key to select the chosen group. The name of the first channel in the group will be displayed: Mode Channel Channel status in the lower left-hand corner indicates the current membership status of the channel. Use the arrow keys to select the channel whose membership you want to alter.
-
Page 71: Changing Subaudible Signalling Settings
Changing Subaudible Signalling Settings (Advanced Menu) Note: Subaudible signalling may not be available or modifiable on your radio. To change the signalling used on a channel: Long press the menu key to enter menu mode (if the radio displays a submenu option, press the clear key to enter the main menu). - Page 72 Note: After 10 seconds of inactivity the radio will automatically leave signal programming mode. Changing Your Radio’s Settings...
-
Page 73: Maintaining Your Radio
Maintaining Your Radio This section covers: Battery Charging and Conditioning Preserving Battery Life Caring for Your Radio Options and Accessories Specifications Maintaining Your Radio... -
Page 74: Battery Charging And Conditioning
Battery Charging and Conditioning There are two types of chargers available for your radio: A desktop fast charger (shown left) and a multi-charger (see page 79). Instructions for using the fast charger also apply Conditioning to the multi-charger. Button A vehicle charging kit is also available, allowing the radio to be charged from a vehicle’s power supply. -
Page 75: Charging The Battery
Note: If the message displays, BATTERY IS FLAT the battery is too low, and the radio will stop operating. Turn off the radio immediately and recharge. Short condition the radio’s battery: Weekly. Long condition the radio’s battery: When battery performance has deteriorated. Following prolonged storage. -
Page 76: Short Conditioning The Battery
Battery charging. Steady Battery not seated properly in charger, Flashing battery or charger contacts dirty, or battery faulty. If this occurs at the end of a long condition, consult your Tait dealer. Green Battery charged. Steady Green Battery trickle charging. -
Page 77: Long Conditioning The Battery
Release the conditioning button. The battery is ready for use when the indicator glows steady green. If the charger LED flashes red at the end of a long conditioning cycle, consult your Tait dealer. Troubleshooting Problem: When inserting the battery/radio in the charger, the state indicated by the charger LED is not as expected. -
Page 78: Warning: Disposing Of Used Nicd Batteries
Warning: Disposing of Used NiCd Batteries Warning: NiCd batteries contain a small amount of cadmium, a potentially toxic substance that must be disposed of properly. When no longer in use, contact your Tait dealer for recycling details. Maintaining Your Radio... -
Page 79: Preserving Battery Life
Avoid leaving the battery in a charger for more than a few days. Turn the radio off when it is unattended for long periods. Use Tait-recommended chargers only. Maintain an ambient temperature of between 5°C and 40°C during recharging. Optimum battery performance will be obtained between 15°C and 25°C. -
Page 80: Caring For Your Radio
Does the battery need conditioning? Is the battery charger working properly? Is the radio or antenna damaged? If all appears to be in order but your radio still fails to operate properly, consult your local Tait dealer for assistance. Maintaining Your Radio... -
Page 81: Options And Accessories
Options and Accessories Tait offers a large range of radio accessories. Contact your local dealer for more information. Antennas 6-Way Multi-Charger Belt Loop Battery Charger D-Clip Battery Carry Cases Earphones,Palm and Lapel Microphones Accessory Connector Kits Headset Speaker Microphones Accessory... -
Page 82: D-Clip And Accessory Connectors
D-Clip and Accessory Connectors The D-clip connector enables the radio to be installed on the belt loop. The accessory connector enables acces- sories to be installed on the radio. Installing the Connector Place the two connector pegs into the bottom holes on the radio. -
Page 83: Specifications
Specifications Size H x W x D 154 mm x 66 mm x 41 mm (including 1500 mAh NiMH battery) Typical weight 535 g (including 1500 mAh NiMH battery) Battery voltage 7.5 V nominal Receive sensitivity better than -117 dBm Audio power >0.5 W into 16 Ohms Antenna connector... - Page 84 Maintaining Your Radio...
-
Page 85: Function Key Options
Function Key Options Note: Some functions are not permitted in some countries. The features below can be assigned to the function keys when the radio is programmed. If you do not know which features have been programmed for your radio, see you system administrator. - Page 86 Function Description Low Power Transmit Changes the transmit power from medium or high to low. Pressing the key again returns the transmit power to the programmed level. Channels can also be programmed for low power. Night Use Turns night operation mode on and off. Nuisance Delete Temporarily deletes the current channel from the scanning regime.
- Page 87 Custom Settings Function Key Settings Short Press Long Press Ext1: Ext2: Handset Mode Volume Keys Volume Up: Volume Down: Selcall Settings Selcall ID: Commonly Used Channels/Groups...
- Page 88 Radio LED: Sound: Indicators steady pitch: high medium flashing duration: short long ... repeating Display messages are shown in ALLCAPS, e.g. CALL Display Sound Meaning + message You have just turned on the radio. The power-up sequence is complete. flashing The radio is transmitting.
Need help?
Do you have a question about the orca 5000 Series and is the answer not in the manual?
Questions and answers