Table of Contents
Advertisement
Available languages
Available languages
Quick Links
BVMC-EM6701 Series
MODELS
Serie BVMC-EM6701
MODELO
Instruction Manual
ONE-TOUCH COFFEEHOUSE
PLEASE READ ALL INSTRUCTIONS BEFORE USING THIS APPLIANCE
Manual de Instrucciones
ONE-TOUCH COFFEEHOUSE
LEA TODAS LAS INSTRUCCIONES ANTES DE USAR ESTE APARATO
P.N. 193989
w w w. mr c o ff e e . co m
BVMC-EM6701 Series_17ESM1.indd 1
12/7/17 9:58 AM
Advertisement
Table of Contents

Related Manuals for Mr. Coffee BVMC-EM6701 Series


Summary of Contents for Mr. Coffee BVMC-EM6701 Series
- Page 1 BVMC-EM6701 Series MODELS Serie BVMC-EM6701 MODELO Instruction Manual ONE-TOUCH COFFEEHOUSE PLEASE READ ALL INSTRUCTIONS BEFORE USING THIS APPLIANCE Manual de Instrucciones ONE-TOUCH COFFEEHOUSE LEA TODAS LAS INSTRUCCIONES ANTES DE USAR ESTE APARATO P.N. 193989 w w w. mr c o ff e e . co m BVMC-EM6701 Series_17ESM1.indd 1...
-
Page 2: Important Safeguards
5. DO NOT operate any appliance with a damaged cord or plug or after the appliance malfunctions or has been damaged in any manner. 6. The use of accessory attachments not recommended for Mr. Coffee products may ®... -
Page 3: Polarized Plug
POLARIZED PLUG This appliance has a polarized plug (one blade wider than the other). As a safety feature to reduce the risk of electrical shock, this plug is intended to fit in a polarized outlet only one way. If the plug does not fit fully in the outlet, reverse the plug. -
Page 4: Description Of The Appliance
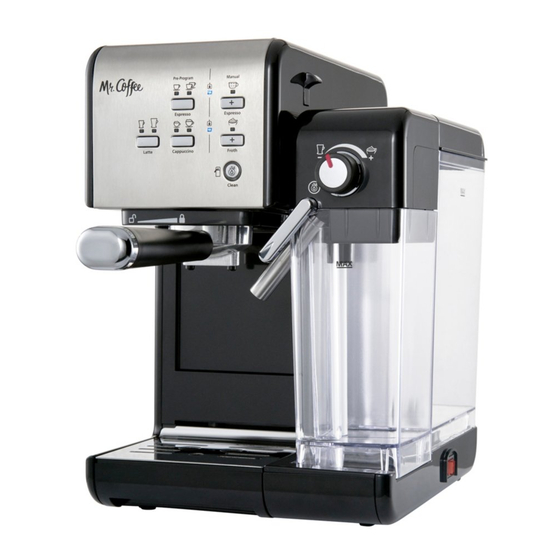
DESCRIPTION OF THE APPLIANCE Brew Head Indicator Lights d. Small and Large Latte Button with Porta-Filter: Indicator Lights a. Porta-Filter for Ground Coffee and e. Manual Milk Frothing Button with E.S.E. pods (45mm) Indicator Light Height Adjusting Slot for Small Cups f. - Page 5 I N TR ODU CT I ON Congratulations! You have selected the new and innovative Mr. Coffee One-Touch ® CoffeeHouse. This unique appliance has been designed to help you prepare delicious espressos, cappuccinos and lattes quickly, conveniently, and automatically with the touch of a button.
- Page 6 BE FO RE US IN G YOU R AP PLIAN CE FO R THE FI RS T T IME CLEANING THE UNIT PRIOR TO FIRST USE Please refer to the “Description of the Appliance” section to familiarize yourself with the product and identify all parts. Please make sure the unit is off “O”...
-
Page 7: S Ele Ct In G Th E R Ig Ht C Off Ee
HOW TO SELECT THE RIGHT CUP Please make sure to select your cup according to the following chart: SUGGESTED BEVERAGE Single ( Espresso 1.25 oz Double ( 2.5 oz Small ( Cappuccino 7.5 oz Large ( 15.5 oz Small ( ) Latte 13.5 oz Large (... -
Page 8: Filling The Water Reservoir
OP E RATING INST RU CT IO NS FILLING THE WATER RESERVOIR Fill the water reservoir with water (see figure 1). You may use either a pitcher to fill it up or remove it from the unit Figure 1 and then fill it up under the tap. Fill the reservoir with the desired amount of water below the “MAX”... - Page 9 PLACING THE FILTER ON THE PORTA-FILTER Figure 4 Insert the filter into the porta-filter, making sure to align the filter dimple to the porta-filter notch (see figure 4). Turn the filter to the left or right to lock it in place (see figure 5). NOTE: To remove the filter for cleaning, turn the filter to the left or right to align the filter dimple to the porta-filter notch and proceed to remove.
-
Page 10: Turning The Unit On
PLACING THE PORTA-FILTER Position porta-filter underneath the brew head. Position handle so that the handle lines up with the open lock icon “ ” on the unit and fits into the groove. Then, slowly turn it to the right until the handle is aligned with the closed lock symbol “... -
Page 11: Select The Function
SELECT THE FUNCTION PREPARING ESPRESSO Press the Espresso Button “ ” once to brew a single shot. The indicator light for a single shot of espresso will turn on. It will start blinking; indicating that a single shot of espresso is brewing. Press the Espresso Button “... -
Page 12: Preparing Latte
The unit will start brewing cappuccino according to your selection. The unit will stop automatically after the brewing process and the light will become solid, indicating that the cycle has been completed. Your delicious cappuccino is now ready to be enjoyed! PREPARING LATTE Prior to preparing your latte, adjust the level of frothed milk according to your preference by turning the Froth Control Knob to the right for more foam (cappuccino) and to the left... - Page 13 PREPARING FROTHED MILK The Mr. Coffee One-Touch CoffeeHouse also allows you to prepare frothed milk ® alone. Press the Manual Foam “Froth” Button “ ” if you wish to add more foam to your beverage or to prepare frothed milk for any other beverage, e.g. macchiato, hot chocolate, chai latte, etc.
-
Page 14: Cleaning The Filters
CLEANING YOUR AUTOMATIC ESPRESSO, CAPPUCCINO, AND LATTE MAKER CLEANING THE MILK RESERVOIR AND FROTHING TUBE Although you can store the milk reservoir with leftover milk in the refrigerator, it is important to clean the reservoir and frothing tube regularly to avoid clogging and residue build-up. In order to clean the milk reservoir, please follow the instructions listed below: Remove the milk reservoir from the unit by lifting up the milk reservoir release button and simultaneously sliding the milk reservoir out. -
Page 15: Cleaning The Water Reservoir
FROTH MILK DISPENSING TUBE CLEANING - WITHOUT AFFECTING MILK IN RESORVOIR Ensure the milk reservoir and lid are properly inserted in the unit. Place a large empty mug under the froth dispensing tube. Turn the Froth Control Knob counter clockwise to the clean position “ ”... -
Page 16: Cleaning Procedure
TO DELIME WATER RESERVOIR: Fill the reservoir with fresh, undiluted white household vinegar. Allow appliance to sit overnight with the vinegar solution in the water reservoir. Discard vinegar by removing the reservoir and turning it upside down over the sink. Rinse the water reservoir thoroughly with tap water by filling the tank half full with water and then pouring the water back out into the sink, repeating this step twice. -
Page 17: Maintenance
Press the manual Espresso button “ ” and let the cycle run until completed. Rotate the milk tank knob to the clean position and press the clean button to run the normal clean mode. Press the espresso button and then the steam function to flush the system out. MAINTENANCE This appliance has no user serviceable parts. -
Page 18: Year Limited Warranty
1- YEA R L IMI TED WA R R A NT Y Sunbeam Products, Inc. warrants that for a period of one year from the date of purchase, this product will be free from defects in material and workmanship. Sunbeam, at its option, will repair or replace this product or any component of the product found to be defective during the warranty period. -
Page 19: Medidas De Seguridad Importantes
Permita que se enfríe antes de colocar o retirar las piezas y antes de limpiarla. 5. NO opere ningún artefecto con un cable o enchufe dañado, después de un mal funcionamiento, o si está dañado de alguna manera. 6. El uso de accesorios no recomendados para productos de Mr. Coffee puede ®... -
Page 20: Enchufe Polarizado
G UARDE ES TA S INS TR UC C I ON E S ESTA UNIDAD ES SÓLO PARA USO DOMÉSTICO. ENCHUFE POLARIZADO Este electrodoméstico tiene un enchufe polarizado (un contacto es más ancho que el otro). Para reducir el riesgo de descargas eléctricas, como una función de seguridad, este enchufe está... -
Page 21: D E Sc R Ip C Ió N Del A Rtefa Cto
D E SC R IP C IÓ N DEL A RTEFA CTO Cabeza de preparación c. Botón para porción pequeña y grande de capuchino con luces indicadoras Portafiltro: d. Botón para porción pequeña y grande a. Portafiltro para café molido y bolsitas E.S.E. de latte con luces indicadoras (45mm) e. - Page 22 Cuando esta unidad es utilizada, algunas piezas y accesorios se calientan y necesitan tiempo para enfriarse. El cuidado y mantenimiento debido prolongarán la vida útil de su Máquina de Cafetería de un Toque Mr. Coffee y su funcionamiento sin problemas.
- Page 23 ANTE S D E UTIL IZ A R S U ART E FACTO P OR PR I ME RA V EZ LIMPIEZA DE LA UNIDAD ANTES DEL PRIMER USO Por favor consulte la sección “DESCRIPCIÓN DEL ARTEFACTO” para familiarizarse con el producto e identificar todas las piezas. Asegúrese de que la unidad esté...
- Page 24 CÓMO SELECCIONAR LA TAZA CORRECTA Por favor asegúrese de seleccionar su taza de acuerdo a la siguiente tabla. BEBIDA TAZA SUGERIDA Simple ( Espresso 1.25 oz Doble ( 2.5 oz Pequeña( Capuchino 7.5 oz Grande ( 15.5 oz Pequeña ( ) Latte 13.5 oz Grande(...
-
Page 25: Instrucciones De Uso
IN STRUCC ION E S DE U S O LLENADO DEL TANQUE DE AGUA a. Llene el tanque de agua con agua (ver figura 1). Puede utilizar una jarra para llenar o retirarlo de la unidad y Figure 1 después llenarlo debajo de la pila. Llene el tanque con la cantidad de agua deseada, por debajo del nivel que indica “MAX”. - Page 26 CÓMO COLOCAR EL FILTRO EN EL PORTAFILTRO Figure 4 Inserte el filtro en el portafiltro, asegurándose de alinear la bolita saliente del filtro con la abertura del portafiltro (ver figura 4). Gire el filtro hacia a izquierda o derecha para asegurarlo en posición (ver figura 5).
- Page 27 CÓMO COLOCAR EL PORTAFILTRO Coloque el portafiltro debajo de la cabeza de preparación. Posicione el mango del portafiltro de manera que quede alineado con el símbolo de candado abierto “ “ en la unidad y encaje en la muesca. Después, gírelo lentamente hasta que el mango esté alineado con el símbolo de candado cerrado “...
- Page 28 SELECCIONE LA FUNCIÓN PARA PREPARAR ESPRESSO Presione el botón Espresso “ “ una vez para preparar espresso sencillo. La luz indicadora para espresso sencillo se iluminará. Ésta comenzará a parpadear, indicando que una porción sencilla de espresso se está colando. Presione el botón Espresso “...
- Page 29 La unidad comenzará a colar el capuchino de acuerdo a su selección. La unidad se detendrá automáticamente después del proceso de preparación y la luz cambiará a sólida, indicando que el ciclo ha terminado. Su delicioso capuchino ya está listo para ser ¡disfrutado! PARA PREPARAR LATTE Antes de preparar su latte, ajuste el nivel de leche espumada según su preferencia,...
- Page 30 PARA PREPARAR LECHE ESPUMADA La Máquina de Cafetería de Un Toque Mr. Coffee también le permite preparar leche ® espumada solamente. Presione el botón Manual Froth “ “ si desea añadir más espuma a su bebida o para preparar leche espumada para cualquier otra bebida, por ejemplo, macchiato, chocolate caliente, latte chai, etc.
-
Page 31: Limpieza De Los Filtros
No coloque la tapa del tanque de leche en la máquina lavaplatos. Llene el tanque de leche con agua, sin sobrepasar la línea de llenado “MAX”. Coloque el tanque de leche de nuevo en la unidad, subiendo la palanca de liberación del tanque y a la misma vez deslizando el tanque en la unidad, sujetándolo por la tapa. -
Page 32: Limpieza De La Unidad
LIMPIEZA DE LA CABEZA DE PREPARACIÓN, EL PORTAFILTRO Y LOS FILTROS Presione el interruptor de encendido/apagado “I/O”, situado en el lado derecho de la unidad, a la posición “O” y desenchufe el cable de alimentación del tomacorriente. Algunas de las piezas metálicas pueden aún estar calientes. No las toque con sus manos hasta que se hayan enfriado. -
Page 33: Mantenimiento
PARA DESCALCIFICAR LAS PARTES INTERNAS: Asegúrese de primero descalcificar el interior del tanque de agua, siguiendo los pasos de “Descalcificación” anteriores. Cerciórese de presionar el interruptor de encendido/apagado a la posición de apagado “O” y que el cable de alimentación esté desenchufado del tomacorriente. Llene el tanque con vinagre blanco doméstico, no diluido. -
Page 34: Pro B Lem As, C Ausas Y S Ol U Ci On Es
PRO B LEM AS, C AUSAS Y S OL U CI ON ES PROBLEMA CAUSA SOLUCIONES No sale café. No hay agua en el tanque. Añada agua. • • Se ha molido demasiado fino Utilice un tipo de molido • •... -
Page 35: Ga Ra Nt Ía Li Mita D A D E 1 A Ñ O
GA RA NT ÍA LI MITA D A D E 1 A Ñ O Sunbeam Products, Inc. garantiza que por un período de un año a partir de la fecha de compra, este producto estará libre de defectos de materiales y mano de obra. Sunbeam, a su elección, reparará... - Page 36 Sunbeam Products, Inc. Boca Raton, Florida 33431. Sunbeam Products, Inc. Products, Inc. es una subsidiaria de Newell Brands Inc. (NYSE: NWL) U.S. 1-800-Mr. Coffee (1-800-672-6333) Canada 1-800-667-8623 Visit us at www.mrcoffee.com / Visítenos en www.mrcoffee.com Printed in China/Impreso en China P.N.
Need help?
Do you have a question about the BVMC-EM6701 Series and is the answer not in the manual?
Questions and answers
The coffee is not dripping. I have tried running white vinegar in the machine several times. Still not drip on any setting
If the Mr. Coffee BVMC-EM6701 Series coffee maker is not dripping despite cleaning with white vinegar, check if the ground coffee is too coarse or if there is not enough coffee in the filter. Adjust grind size and coffee amount as needed.
This answer is automatically generated
Coffee will not come out. Tried with no coffee, still will not come out