Moxa Technologies NPort 5250AI-M12 Quick Installation Manual
Hide thumbs
Also See for NPort 5250AI-M12:
- User manual (194 pages) ,
- Quick installation manual (2 pages)

Related Manuals for Moxa Technologies NPort 5250AI-M12


Summary of Contents for Moxa Technologies NPort 5250AI-M12
- Page 1 NPort 5000AI-M12 Series Quick Installation Guide Version 3.2, January 2021 Technical Support Contact Information www.moxa.com/support 2021 Moxa Inc. All rights reserved. P/N: 1802051503012 *1802051503012*...
-
Page 2: Package Checklist
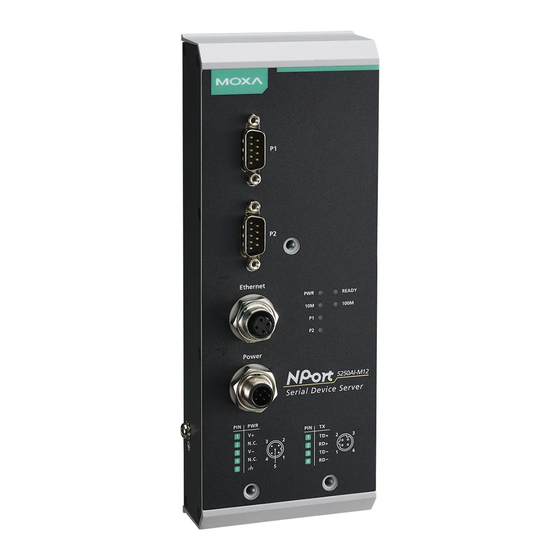
Hardware Introduction The NPort 5150AI-M12 series has a 3-in-1 (RS-232/422/485) DB9 serial port for serial data communication, the NPort 5250AI-M12 series has two 3-in-1 (RS-232/422/485) DB9 serial ports for serial data communication, and the NPort 5450AI-M12 has four 3-in-1 (RS-232/422/485) DB9 serial ports for serial data communication. - Page 3 NPort 5150AI-M12 Appearance NPort 5250AI-M12 Appearance - 3 -...
- Page 4 NPort 5450AI-M12 Appearance The Reset to Default Button—Press the reset button to default button for five seconds continuously to load the factory default settings. Use a pointed object, such as a straightened paper clip or toothpick, to press the reset button to default button. This will cause the Ready LED to blink on and off.
-
Page 5: Hardware Installation Procedure
Hardware Installation Procedure Panel/Wall Mounting Mounting the NPort 5000AI-M12 on the wall requires three screws. Please use the three screws provided in the product package. STEP 1: Use the device to mark the positions of the three screw holes on the wall, as shown in the mounting dimensions diagram. - Page 6 STEP 2: Position the NPort 5000AI-M12 on the DIN rail and tilt it to hook the clamps over the top edge of the rail. STEP 3: Swing the device server down onto the DIN rail until both clamps latch on completely. - 6 -...
-
Page 7: Software Installation Information
Software Installation Information For the NPort’s configuration, the default IP address of the NPort is: LAN: Static IP = 192.168.127.254; netmask = 255.255.255.0 You may log in with the password moxa to change any settings to meet your network topology (e.g., IP address) or serial device (e.g., serial parameters). -
Page 8: Specifications
Power Consumption NPort 5150AI-M12: 310 mA @12V NPort 5150AI-M12-CT: 310 mA @12V NPort 5150AI-M12-T: 310 mA @12V NPort 5250AI-M12: 360 mA @12V NPort 5250AI-M12-CT: 360 mA @12V NPort 5250AI-M12-T: 360 mA @12V NPort 5450AI-M12: 440 mA @12V NPort 5450AI-M12-CT: 440 mA @12V... - Page 9 Automatic Reboot Built-in WDT (watchdog timer) Trigger MTBF (mean time NPort 5150AI-M12: 789,341 hrs. between failures) NPort 5250AI-M12: 639,622 hrs. NPort 5450AI-M12: 467,777 hrs. Warranty Warranty Period 5 years Details See www.moxa.com/warranty For railway rolling stock applications, the device must use a galvanically isolated power supply that is compliant with the EN 50155 standard.
Need help?
Do you have a question about the NPort 5250AI-M12 and is the answer not in the manual?
Questions and answers