Table of Contents
Advertisement
Quick Links
Advertisement
Table of Contents

Related Manuals for Vello LW-500-U


Summary of Contents for Vello LW-500-U
- Page 1 EXTENDÁ USER MANUAL...
- Page 2 Thank you for choosing Vello The Extendá is a Wi-Fi DSLR remote which provides wireless camera control from your smartphone, tablet, PC, or Mac. You can take a photograph, start and stop video, or alter most camera settings using your portable device.
-
Page 3: Table Of Contents
Table of Contents LW-100 Overview ......... 4 Focus Stack ..........21 LW-500 Overview ......... 5 Advanced Bracketing ......22 App Screen Overview ........6 Auto View ..........23 Charging the Extendá ........7 Browse ............24 Charging Other Devices ......7 Settings .............25 Replacing the LW-500’s Battery ....7 Third-Party Tethering (LW-500 only) ..26 Extendá... -
Page 4: Lw-100 Overview
LW-100 Overview Remote Also Included 1. Status LEDs • Micro-B USB cable 2. Battery charging port • Mini-B USB cable 3. Reset button • Hot-shoe to 1/4˝-20 male post adapter 4. Lanyard port • Lanyard 5. 1/4˝-20 tripod mount 6. Power switch 7. -
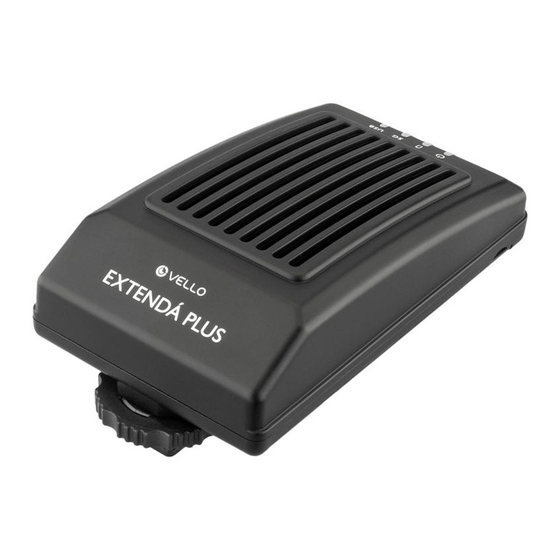
Page 5: Lw-500 Overview
LW-500 Overview Remote Also Included 1. Status LEDs • Mini-B USB cable 2. Reset button • Micro-B USB cable 3. Battery charging port • USB 3.0 cable 4. Power switch • Rechargeable lithium-ion battery 5. Standard-A USB port 6. Battery compartment 7. -
Page 6: App Screen Overview
App Screen Overview Remote 1. Camera Settings 4. App Settings 2. Camera 5. Auto Foucus (Sony Only) 3. Camera Battery Status 6. Shutter Button... -
Page 7: Charging The Extendá
Charging the Extendá Use the Micro-B USB cable to connect the Extendá to a power source, such as a USB power adapter or powered USB port. LW-100 LW-500 • Battery status: • Battery status: Turns orange when the battery power Flashes red when battery power is low. -
Page 8: Extendá Setup
Extendá Setup Install the Extendá app 2. Use a compatible USB cable to You will need to install the Extendá connect the Extendá’s USB port to app onto your mobile device (iOS your camera’s USB/AV port. ® or Android 4.0 and above) or Mac or ™... -
Page 9: Connect To Wi-Fi Hotspot
Connect to the Extendá Wi-Fi hotspot System status indicator: 2. Connect to the Extendá Wi-Fi hotspot LW-100: Flashing green when the [Extendá-XXXX] in your device Extendá is creating a Wi-Fi hotspot. Solid settings. green when the hotspot is established. LW-500: 5G flashes blue when the Launch the Extendá... -
Page 10: Remote Capture
Remote Capture The essential feature of the 2. Select the shutter release button to Extendá is wirelessly capturing take a picture. photos from your own device. 1. Set up your shot with your camera, and make sure everything is in focus. -
Page 11: Camera Settings
Camera Settings You can alter your camera’s shooting Note: Exposure step 0.5 is not supported modes and exposure settings, such with Sony cameras. as aperture, ISO, shutter speed, and exposure compensation. Some cameras have the ability to change shooting modes. -
Page 12: Live View
Live View Live view shows what the camera is Note: Select Canon cameras will exit shooting in real time on the screen Live View after each shot. To work of your device. Your device’s screen continuously in Live View, disable image is usually larger than the one on preview from your camera’s menu. - Page 13 Touch Focus Touch focus makes it easy to choose a Note: If you are using a Canon camera, be focus point for the camera by touching sure to enable Live View Shooting from the an area on the screen of your device. camera’s menu.
- Page 14 Pinch to Zoom Manual Focus Pinch to zoom allows you to use The manual focus feature allows you two fingers on your screen, and to adjust the focal plane forward or zoom in and out while previewing backward. The depth of the focal images.
-
Page 15: Grid
Grid Displays a rule-of-thirds grid over the main picture view. -
Page 16: White Balance
White Balance White balance is used to match 1. Select White Balance to open the you cameras, color profile to the menu. utilized light source. The goal is to render more realistic (natural) 2. Choose your setting while viewing the colors in your photo or video. -
Page 17: Quality
Quality Choose either JPEG or RAW image 1. Select Quality from the settings area. files with highest image quality (largest file size) to lowest image 2. Choose a quality setting. quality (smallest file size). -
Page 18: Metering Mode
Metering Mode Metering allows the camera to 1. Select Metering from the settings area. evaluate exposure by prioritizing parts of the image. 2. Choose the metering mode. Note: This is not available on select Canon cameras while in Live View. -
Page 19: Video
Video Start and stop video while viewing the it may be necessary to physically footage in real time on your mobile switch your camera into video mode. device or computer. On select cameras, (Not available for Sony cameras.) -
Page 20: Time Lapse
Time Lapse • Shooting interval: Amount of time between each exposure. Using the Time Laps mode allows you to delay the camera’s shutter by either • Shooting count: Number of 5 or 10 seconds. This is ideal for selfies, exposures in the sequence. group shots, and other photos when you •... -
Page 21: Focus Stack
Focus Stack Focus stacking allows you to take a • Forward / Backward count: Set the series of photos to combine later in number of images that will be shot in post-processing and create an image front of and behind your starting point with an expanded depth of field. -
Page 22: Advanced Bracketing
Advanced Bracketing (Bracket Exposure in Android) Advanced bracketing can be used • Start From: This will be the starting to generate a series of photos of value for the bracketed exposures. varying exposures. You can set • Step Size: Determine which values bracketing for shutter speed, aperture, and ISO. -
Page 23: Auto View
Auto View message, email, or social media. • Info : Display exif data such Take a picture with your camera, and display the image on your device after as exposure settings, date/ it’s taken. Use this to stream the photos time, and histogram. -
Page 24: Browse
Browse photos in your library. Browsing allows you to view and select After you have selected your photos, the photos that are on your camera choose from the following options: so you can save, delete, or share your • Save/Share: Save the selected photos, and use pinch-to-zoom to image(s) to your devices internal make sure everything is in focus. -
Page 25: Settings
Wi-Fi. Select LAN if your • Help: Displays address of the manual. computer has a wired Ethernet connection. (Not available with the • About: Information about software, LW-500) firmware and manual versions, and Vello information. -
Page 26: Third-Party Tethering (Lw-500 Only)
Wireless Third-Party Tethering allows you to remotely send images directly to your third-party editing software, such as Lightroom, Capture One, or your camera’s native software. The Vello Tether Application supports cameras from Canon, Nikon, Sony, Fujifilm and Pentax that offer USB tethering. - Page 27 Using the Tethering Application 1. Mount the Extenda Plus to your camera’s hot shoe. 2. Connect your camera to the Extendá Plus, using a compatible USB cable. 3. Turn on the Extendá Plus, and connect to its ad-hoc Wi-Fi network from your computer.
- Page 28 Appendix A: Sony Camera Setup You can wirelessly tether your Sony 3. Connect the Micro USB cable to your camera to Capture One. Extendá camera’s port and the Extendá. supports PC Remote and MTP modes on your Sony camera. PC Remote Photos will save to your device, but will mode allows you to use Live View and not be saved on the camera’s memory...
- Page 29 Appendix B: Sony Camera JPEG/RAW File Transfer Instructions 1. Press the camera’s menu button. 4. Set Still Img. Save Dest. to PC+Camera, and RAW+J PC Save Img 2. Set the quality to RAW & JPEG. to JPEG Only. 3. Select the PC Remote Settings. This will save the RAW file in camera, and the JPEG on your device.
- Page 30 Appendix C: Fujifilm Third-Party Tethering You can wirelessly tether your Fujifilm camera to either Capture One or Adobe Lightroom. 1. Go to https://www.vellogear.com, and download and install the Vello Tethering Application for Windows or Mac. If you’re using Adobe Lightroom, you’ll need the FujiFilm plug-in.
- Page 31 Appendix D: Pentax Third-Party Tethering You can use select Pentax cameras and wirelessly tether with Adobe’s Lightroom. Make sure your Lightroom software version is 10.14.0 or higher. 1. Check your camera’s firmware version is above 1.30. If not visit, http://www.ricoh-imaging.co.jp/english/support/download_digital.html for the latest firmware.
- Page 32 4. Open Lightroom and confirm the plug-in has been installed in the plug-in manager. 5. Turn on the Extenda Plus and connect to its Wi-Fi network. 6. Connect your camera to the Extenda Plus VIA a compatible USB cord and turn it on. 7.
-
Page 33: Precautions
Precautions • Keep this product away from water and any flammable gases or liquids. • Do not expose this product to humidity or extreme heat or cold. • Make sure this product is powered off when plugging it into a power source. •... -
Page 34: Firmware Updates
Firmware Updates The Extendá mobile app automatically For Mac/PC users, check checks for firmware updates. If new vellogear.com for firmware updates. firmware is available, the Extendá mobile app will start the update wizard. Follow the instructions provided by the wizard to update the firmware. Troubleshooting Problem Solution... -
Page 35: Specifications
Specifications LW-500 LW-100 Wi-Fi Ad-hoc network with 802.11AC support Range 164 ft. (50 m) 196.9 ft. (60 m) Signal bandwidth 2.4 GHz 5.8 GHz Live view, Photo capture, Movie recording (with Controls focusing), Intervalometer, Bulb, Shutter speed, Aperture, ISO, Metering mode, Drive/shooting mode (Nikon only), White balance, Image format, Exposure compensation, Exposure bracketing, Focus stacking, Touch focus, Touch zoom... -
Page 36: One-Year Limited Warranty
To obtain warranty coverage, contact the Vello Customer Service Department to obtain a return merchandise authorization (“RMA”) number, and return the defective product to Vello along with the RMA number and proof of purchase. Shipment of the defective product is at the purchaser’s own risk and expense.
Need help?
Do you have a question about the LW-500-U and is the answer not in the manual?
Questions and answers