Table of Contents
Advertisement
Quick Links
Advertisement
Table of Contents

Subscribe to Our Youtube Channel
Related Manuals for Vello BG-N7-2


Summary of Contents for Vello BG-N7-2
- Page 1 BG-N7-2 BATTERY GRIP Designed for the Nikon D810, D800/D800E DSLR Cameras...
- Page 2 Thank you for choosing Vello The Vello BG-N7-2 battery grip offers extended shooting time and comfort when shooting in a vertical (portrait) orientation. The grip is compatible with the Nikon D810 and D800/D800E DSLR cameras and accepts one Nikon EN-EL15 type rechargeable battery, providing you with an extra battery option together with the one in your camera.
- Page 3 Precautions The BG-N7-2 should be used only with the compatible Remove batteries from the grip when not in use. devices specified in this manual. Do not attempt to disassemble. Use only with the batteries and battery holders Avoid exposing this product to water or extreme recommended in this manual.
- Page 4 Overview...
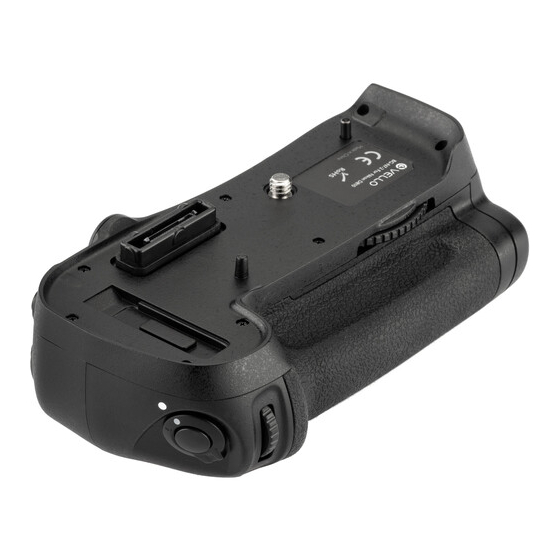
- Page 5 Shutter release button Battery tray Contact cap Control lock Thumbwheel lock Mounting screw Sub-command dial Multi-selector Battery release Nonslip grip Main command dial Battery slot Tripod socket AF-ON button Battery contacts Battery compartment Power contacts Power supply socket Battery tray lock Camera contact cap holder 8-bay AA battery tray...
- Page 6 Attaching the Battery Grip Turn off the camera. Re m ove t h e c a m e r a’s Remove the grip’s power contact cap, and store it contact cap. in the grip’s contact cap holder.
- Page 7 Line up the battery grip’s power contacts and Rotate the thumbwheel counterclockwise until camera mount, and attach the grip to the camera. the grip is secured.
-
Page 8: Inserting The Battery
Inserting the Battery Turn off the camera, and Twist the battery tray lock Nikon EN - EL15: Inser t make sure the grip’s control counterclock w ise , a nd the battery into the slot as lock is in the L position. remove the battery tray shown, and push down to from the grip. - Page 9 AA Batteries: Place eight Insert and lock the battery Turn on the camera, and identical AA batteries into tray inside the battery grip. switch the grip’s control lock the A A bat tery tray as to the • position. indicated. Note: When removing the grip, turn off the camera’s power and switch the control lock to the L...
-
Page 10: Removing The Battery
Removing the Battery Turn off the camera, and Twist the battery tray lock Push down on the battery make sure the grip’s control counterclock w ise , a nd release tab, and slide the lock is in the L position. remove the battery tray battery out of the slot. -
Page 11: Battery Info
Battery Info The camera displays the following battery levels . Nikon EN-EL15 Battery: AA Batteries: Control Panel Viewfinder Description Control Panel Viewfinder Description Battery fully Battery fully charged. charged. Low battery. Prepare spare Battery partially batteries. discharged. Battery exhausted. Shutter release is (blinking) Low battery. - Page 12 BG-N7-2 batteries are used via the Custom Settings menu (Group d). When the camera is drawing power from the BG-N7-2, a icon is displayed in the control panel. Note: The menu screens on this page are from the D800.
-
Page 13: Specifications
Specifications Power source Nikon EN-EL15 type rechargeable Li-ion battery 8 × AA batteries (LR6 Alkaline, HR6 NiMH, or FR6 Lithium) Nikon BL-5 Battery Chamber Cover with EN-EL18b rechargeable Li-ion battery Nikon EP-5B Power Supply Connector Operating temperature 32°F to 104°F (0°C to 40°C) Dimensions (H ×... -
Page 14: One-Year Limited Warranty
One-Year Limited Warranty This VELLO product is warranted to the original purchaser This warranty does not cover damage or defect to be free from defects in materials and workmanship caused by misuse, neglect, accident, alteration, abuse, under normal consumer use for a period of one (1) improper installation or maintenance. - Page 15 (“RMA”) number, and return the defective VELLO is a registered trademark of the Gradus Group. product to Vello along with the RMA number and proof © 2021 Gradus Group LLC. All Rights Reserved. of purchase. Shipment of the defective product is at the purchaser’s own risk and expense.
- Page 16 www.vellogear.com...
Need help?
Do you have a question about the BG-N7-2 and is the answer not in the manual?
Questions and answers