Table of Contents
Advertisement
Quick Links
User instructions
Transmitted light laboratory microscope
KERN
OBE-1
Version 1.1
05/2016
OBE-1-BA-e-1611
KERN & Sohn GmbH
Ziegelei 1
D-72336 Balingen
E-Mail: info@kern-sohn.com
OBE 101, OBE 102, OBE 103
OBE 107, OBE 108, OBE 109
OBE 111, OBE 112, OBE 113
OBE 104, OBE 110, OBE 114
Tel: +49-[0]7433- 9933-0
Fax: +49-[0]7433-9933-149
Internet: www.kern-sohn.com
Advertisement
Table of Contents

Related Manuals for KERN OBE-1


Summary of Contents for KERN OBE-1
- Page 1 KERN & Sohn GmbH Ziegelei 1 Tel: +49-[0]7433- 9933-0 D-72336 Balingen Fax: +49-[0]7433-9933-149 E-Mail: info@kern-sohn.com Internet: www.kern-sohn.com User instructions Transmitted light laboratory microscope KERN OBE-1 OBE 101, OBE 102, OBE 103 OBE 107, OBE 108, OBE 109 OBE 111, OBE 112, OBE 113 OBE 104, OBE 110, OBE 114 Version 1.1...
-
Page 3: Table Of Contents
KERN OBE-1 Version 1.1 05/2016 User instructions Transmitted light microscope Table of contents Before use ..................3 General notes ..........................3 Notes on the electrical system ....................3 Storage ............................4 Maintenance and cleaning ....................... 5 Nomenclature ................6 Technical data / Features ............8 Assembly .................. -
Page 4: Before Use
When carrying out any procedures whereby you come into contact with the electrical system of the device, such as, for example, changing the bulb or fuse, only carry out these procedures when the power is disconnected. The rechargeable batteries must be replaced by qualified electricians only. OBE-1-BA-e-1611... -
Page 5: Storage
The best way to store accessories which consist of optical elements, such as, for example, eyepieces and objectives, is in a dry box with desiccant. OBE-1-BA-e-1611... -
Page 6: Maintenance And Cleaning
Special cleaner for optical lenses Special optical cleaning cloths Bellows Brush When handled correctly and checked regularly, the microscope should give many years of efficient service. Should repairs still be necessary, please contact your KERN dealer or our Technical Department. OBE-1-BA-e-1611... -
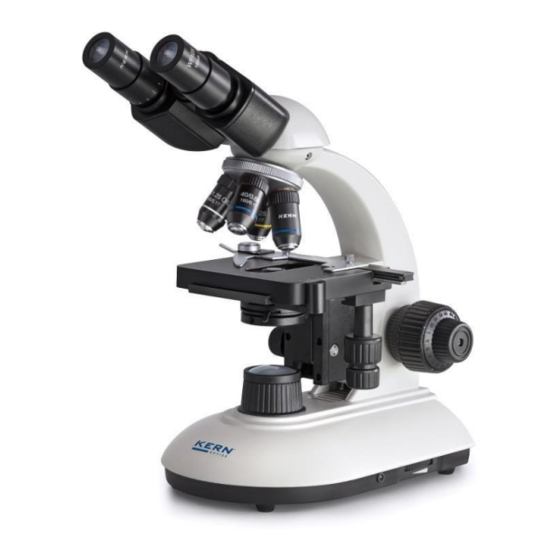
Page 7: Nomenclature
2 Nomenclature OBE-1-BA-e-1611... - Page 8 Rear view OBE-1-BA-e-1611...
-
Page 9: Technical Data / Features
Trinocular WF 10x / Ø 18 mm 3W LED (Transmitted) 4x/10x/40x/100x Product dimensions: 320x180x365 mm Packaging dimensions: 425x340x245 mm Net weight: 5 kg Gross weight: 6 kg Input voltage: AC 100-240V, 50-60Hz Output voltage: DC 1,2-6V Fuse: 2A 5x20mm OBE-1-BA-e-1611... - Page 10 OBE-1-BA-e-1611...
- Page 11 OBE-1-BA-e-1611...
-
Page 12: Assembly
If the microscope has no focus dial for the condenser, the height adjustment is done by turning the condenser on its vertical axis. You should avoid touching the optical lenses with bare fingers. OBE-1-BA-e-1611... -
Page 13: Operation
(see illustration on the left). To move the sample into the beam path, you must use the adjustment wheels on the right of the angle table (see illustration on the right). You can position only one object holder. OBE-1-BA-e-1611... -
Page 14: Pre-) Focussing
Important: In order to avoid damaging to the focussing system, the left and right adjustment wheels for the coarse and fine adjustment knob must never be rotated at the same time in opposite directions. OBE-1-BA-e-1611... -
Page 15: Adjusting The Interpupillary Distance
2. Then look through the left eyepiece with the left eye and use the dioptre adjustment ring to focus the image. To do this, you just need to turn the ring in both directions (see illustration), to find out where the image is at its most focussed. OBE-1-BA-e-1611... -
Page 16: Adjusting The Magnification
If you have focussed the object to be observed for a specific magnification, then if you select the objective with the next greatest magnification, then the object will be slightly out of focus. Use the fine adjustment knob to make a slight adjustment and restore the focus. OBE-1-BA-e-1611... -
Page 17: Adjusting The Illumination
If the eyepiece should be removed, for checking, then please make sure that no dirt or dust falls into the tube. 3. The brightness is always controlled by the bulb brightness (using the dimmer) and not by the aperture diaphragm. OBE-1-BA-e-1611... -
Page 18: Using Rechargeable Batteries
5.7 Using rechargeable batteries For OBE 103, OBE 109, OBE 113 There are three models of the series OBE-1, which enable a wireless usage. Therefore three rechargeable batteries are integrated in the power supply of these microscopes. Specification of the batteries:... -
Page 19: Using Eye Cups
In order to maintain hygiene, we would therefore recommend that you clean the eye cups regularly (e.g. with a damp cloth). Eye cups High Eye Point eyepiece (identified by the glasses symbol) OBE-1-BA-e-1611... -
Page 20: Using Oil Immersion Objectives
5.9 Using oil immersion objectives The 100x objectives of the OBE-1 series are objectives which can be used with oil immersion (they are always marked with the word “OIL”). Using these generates a particularly high resolution for microscopic images. To use oil immersion correctly, please follow these steps. -
Page 21: Changing The Bulb
When doing this, it is helpful to use a screwdriver or similar tool. The defective fuse can be removed from its housing and be replaced with a new one. After that, you just need to insert the fuse housing back into the insertion point below the mains power supply socket. OBE-1-BA-e-1611... -
Page 22: Using Optional Accessories
There is the following way to carry out dark field applications. 1. A dark field attachment with an integrated black disk can be screwed into the standard condenser of the microscope from below (see right illustration). Please take note of the instruction delivered with the dark field attachment. OBE-1-BA-e-1611... -
Page 23: Camera Connection
In order to be able to bring both images into focus, the focus can be adjusted by those adapters. OBE-1-BA-e-1611... -
Page 24: Trouble Shooting
Dioptre setting has not been carried out correctly The field of view of one eye does not Different eyepieces are used for the match that of the other eye righthand and lefthand side The eyes are not used to using a microscope OBE-1-BA-e-1611... - Page 25 The stage moves down on its own The rotational resistance brake is not tight The fine adjustment knob moves on its enough When you move the table, the image The stage was not correctly fitted becomes blurred OBE-1-BA-e-1611...
-
Page 26: Service
The device may only be opened by trained service engineers who have been authorised by KERN. 11 Disposal The packaging is made of environmentally-friendly materials, which you can dispose of at your local recycling centre.
Need help?
Do you have a question about the OBE-1 and is the answer not in the manual?
Questions and answers