Table of Contents
Advertisement
Available languages
Available languages
Quick Links
Advertisement
Table of Contents

Subscribe to Our Youtube Channel
Related Manuals for Hyundai SP9700


Summary of Contents for Hyundai SP9700
- Page 1 ΟΔΗΓΙΕΣ ΧΡΗΣΗΣ SP9700...
- Page 2 ΟΔΗΓΙΕΣ ΧΡΗΣΗΣ ΑΝΤΛΙΑΣ ΒΕΝΖΙΝΟΚΙΝΗΤΗΣ ΑΣΦΑΛΕΙΑ ΓΕΝΙΚΕΣ ΟΔΗΓΙΕΣ ΑΣΦΑΛΕΙΑΣ Ο χρήστης του συγκεκριμένου εργαλείου είναι υπεύθυνος για την ασφαλή χρήση και σύμφωνα με τις οδηγίες λειτουργία του συγκεκριμένου μηχανήματος. Κρατήστε το παρών εγχειρίδιο σε ασφαλές μέρος και δώστε το αν πουλήσετε η δανείσετε το παρών μηχάνημα στον...
- Page 3 Τα συμπτώματα από δηλητηρίαση με μονοξείδιο του άνθρακα, χωρίς να είναι τα • μοναδικά, είναι τα εξής: Πονοκέφαλος, ζαλάδες, ναυτία, δυσκολία αναπνοής, λιποθυμία και απώλεια συνείδησης. • Τα συμπτώματα της δηλητηρίασης είναι συχνά τα ιδιά με της κοινής γρίπης, της υπερκόπωσης...
- Page 4 Οδηγίες ασφάλειας για το συγκεκριμένο μηχάνημα Διαβάστε αναλυτικά τις οδηγίες χρήσης για να καταλάβετε την λειτουργία του συγκεκριμένου μηχανήματος. Η αντλία χρειάζεται πρώτα γέμισμα με νερό πριν λειτουργήσει για πρώτη φορά. Ελέγξτε την αντλία πριν την χρήση της. Αν βρεθεί κάποιο πρόβλημα αντιμετωπίστε το, επικοινωνώντας...
- Page 5 Συναρμολόγηση Αντλίας Σωλήνας αναρρόφησης. Τοποθετήστε την ροδέλα στεγανοποίησης (1) στην υποδοχή αναρρόφησης. (2) Τοποθετήστε τον σύνδεσμο (3) πάνω στην ροδέλα στεγανοποίησης (2) και μετά τοποθετήστε τον σφιγκτήρα (4) όπως φαίνεται και στην φωτογραφία. Σφίξτε δεξιόστροφα. Περαστέ στο λάστιχο σας έναν κολιέ για σωλήνες (5) και τοποθετήστε το λάστιχο με τέτοιο...
- Page 6 ΠΡΟΣΟΧΗ Όλα τα καύσιμα είναι εύφλεκτα και χεριάζετε ιδιαίτερη προσοχή κατά την μεταχείριση τους. Η αντλία σας είναι εξοπλισμένη με έναν τετράχρονο κινητήρα που χρησιμοποίει αμόλυβδη βενζίνη για να λειτουργήσει. Μην χρησιμοποιήσετε κάποιο άλλο μείγμα μιας και αυτό μπορεί να εκθέσει τον κινητήρα σας σε κίνδυνο καταστροφής. Για...
- Page 7 Εκκίνηση κινητήρα Ανοίξτε την βάνα καύσιμου επιτρέποντας καύσιμο να φτάσει στον εξαερωτήρα (καρμπυρατέρ) σπρώχνοντας τον μοχλό. Αφήστε λίγο χρόνο 20-30 δεύτερα για να γεμίσει το καρμπυρατέρ με καύσιμο. Στην συνέχεια σπρώξτε τον μοχλό του τσοκ προς τα δεξιά ώστε να μπορέσει να εκκινήσει...
- Page 8 ΣΥΜΒΟΥΛΗ: Αφήστε 1-2 λεπτά τον κινητήρα σε χαμηλές-μεσαίες στροφές ΧΩΡΙΣ ΦΟΡΤΙΟ ώστε να φτάσει στην θερμοκρασία λειτουργίας του, έπειτα αυξήστε τις στροφές. Όταν ο κινητήρας έχει εκκινήσει και έχει έρθει σε θερμοκρασία λειτουργίας μπορείτε να αυξήσετε τις στροφές (γκάζι) από τον χειρομοχλό γκαζιού. Για...
- Page 9 ΠΛΑΝΟ SERVICE Πριν Στις πρώτες 20 hrs Κάθε 3μηνο ή Κάθε 6 μηνες ή Κάθε χρόνο ή κάθε ή στον πρώτο κάθε 50 hrs κάθε 100 hrs κάθε 300 hrs χρήση μήνα λειτουργίας Λαδί Έλεγχος μηχανής Αλλαγή Φίλτρο Έλεγχος αέρα Αλλαγή...
- Page 10 Αφαιρέστε την βίδα που συγκρατεί τα λαδιά και αφήστε όλο το λαδί να στραγγίξει καλά μέσα στο δοχείο. Αφού στραγγίξει καλά όλο το λαδί από τον κινητήρα, επανατοποθετήστε την βίδα. Αντικαταστήστε το λαδί με καινούργιο λαδί κινητήρα SAE 10W – 30 για τετράχρονο κινητήρα.
- Page 11 Σημείωση: Τα χάρτινα στοιχεία του φίλτρου πρέπει να τα φυσήξετε με χαμηλής πίεσης αέρα ώστε να μην καταστραφούν. Αντικαταστήστε τα κατεστραμμένα φίλτρα. Καθαρίστε όλη την διαδρομή που κάνει ο αέρας μέχρι την εισαγωγή, από ξένα στοιχεία. Είναι πολύ σημαντικό να αποφύγετε την σκόνη στο καρμπυρατέρ. Service στο...
- Page 12 Αποθήκευση και συντήρηση για μακροχρόνια αποθήκευση. ΠΡΟΣΟΧΗ Η εξάτμιση θερμαίνετε πολύ κατά την διάρκεια της λειτουργίας και παραμένει ζεστή για αρκετό χρονικό διάστημα μετρά την παύση λειτουργίας της μηχανής σας. Αφήστε τον κινητήρα να κρυώσει πριν προχωρήσετε σε αποθήκευση του μηχανήματος σας. ΠΡΟΣΟΧΗ...
- Page 13 Αδειάζοντας το σύστημα καυσίμου και ετοιμάζοντας το μηχάνημα μας για μακροχρόνια αποθήκευση. ΠΡΟΣΟΧΗ Όλα τα καύσιμα είναι εύφλεκτα και πρέπει να αντιμετωπίζονται με αυτόν τον τρόπο . Αποθηκεύστε τυχών υπολείμματα βενζίνης σε ασφαλές δοχείο. Όταν εργάζεστε με καύσιμα, προσέξτε να είναι καλά αεριζόμενος ο χώρος εργασίας και αποφύγετε...
- Page 14 Προβλήματα και αντιμετώπιση τους. ΠΡΟΣΟΧΗ Πριν προχωρήσετε σε οποιαδήποτε εργασία επισκευής, συντήρησης ή επιθεώρησης, σιγουρευτείτε ότι ο κινητήρας έχει κρυώσει και ότι έχει κρυώσει αρκετά. Αποσυνδέστε το μπουζί ώστε να μην γίνει κάποια καταλάθος έναρξη του κινητήρα. Κινητήρας. Σύμπτωμα Αιτία Λύση...
- Page 15 Αντλία Δεν έχω έξοδο νερού από Ο θάλαμος εκκίνησης δεν Αφήστε να κρυώσει μερικά την αντλία μου ή έχω έξοδο είναι γεμάτος με νερό λεπτά η αντλία και γεμιστέ με χαμηλότερη παροχή από τον με νερό την σύνηθες Ο σωλήνας αναρρόφησης Αντικαταστήστε...
-
Page 16: Προστασια Του Περιβαλλοντοσ
ΠΡΟΣΤΑΣΙΑ ΤΟΥ ΠΕΡΙΒΑΛΛΟΝΤΟΣ Πληροφορίες σχετικά με την περιβαλλοντικά σωστή απόρριψη οικιακών συσκευών ηλεκτρικών και ηλεκτρονικών (WEEE).Αυτό το σύμβολο στα προϊόντα και στα συνοδευτικά έγγραφα του υποδεικνύει ότι ηλεκτρικές ή ηλεκτρονικές συσκευές τέλους κύκλου ζωής ή μεταχειρισμένες δεν πρέπει να απορρίπτονται με τα οικιακά απορρίμματα .Για την σωστή διαχείριση τους... - Page 17 1. SAFETY General Safety Notes. The operator of the machine is responsible for, and has a duty of care in making sure that the machine is operated safely and in accordance with the instructions in this user manual. Keep the manual safe and pass it on if the machine is loaned or sold to another user.
- Page 18 1.10 Carbon Monoxide (where applicable). 1.11 Carbon monoxide is a colourless and odourless gas. Inhaling this gas can cause death as well as serious long term health problems such as brain damage. 1.12 The symptoms of carbon monoxide poisoning can include but are not limited to the following;...
- Page 19 1.30 Fueling/De-fueling (where applicable). CAUTION ALL FUELS ARE FLAMABLE 1.31 ALWAYS fuel and defuel in a well ventilated area outside of buildings. 1.32 ALWAYS wear correct, suitable and fit for purpose Personal Protective Equipment (PPE), suggested items are but not limited to safety gloves, overalls. 1.33 When fueling/de-fueling ALWAYS avoid inhaling fumes.
- Page 20 1.50 Batteries (where present). 1.51 Batteries present a risk if they become damaged by the possible leaking of electrolyte. This electrolyte is an acid and can cause serious burn injuries. Care should be taken when working on or near them. NOTE the electrolyte may be in a liquid or gel form.
-
Page 21: Machine Specific Safety
1.70 Noise (where applicable). 1.71 The operating noise of the machine can damage your hearing. Wear hearing protection such as earplugs or ear defenders to protect your hearing. Long-term and regular users are advised to have hearing checked regularly. Be especially vigilant and cautious when hearing ear protection because your ability to hear alarm warnings will be reduced. - Page 22 NOTE Ensure that the assembly of the air filter is correct. Never run the water pump without the air filter or with a damaged air filter. 1.94 A dirty air filter will restrict air flow to the carburetor, reduce engine performance and thereby reduce the water pump performance.
- Page 23 1.99.1 Fuel level check. NOTE Do not add fuel over the fuel strainer shoulder (maximum level (2). Fuel can damage paint and plastic. Be careful not to spill fuel when filling your fuel tank. 1.99.2 Before each operation of the water pump, check the fuel level with the water pump placed on a level ground.
-
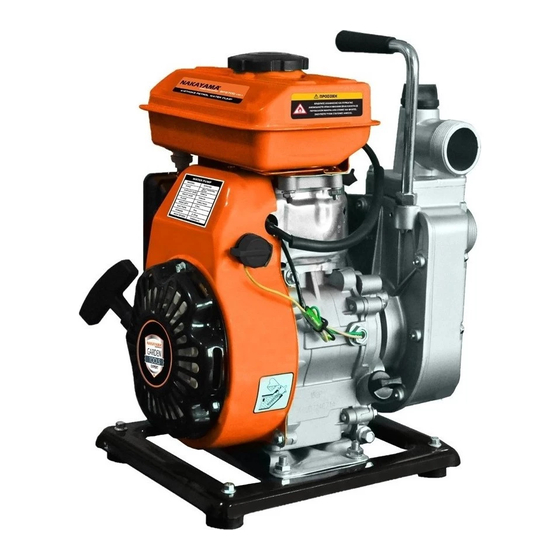
Page 24: Part Locations
2. PART LOCATIONS 3. ASSEMBLY Suction Hose Place the sealing washer (2) over the suction port (1). Offer the hose connector (3) to the sealing washer (2) then put the hose clamp ring (4) over the hose connector and tighten in a clockwise direction. Take the hose clamp ring (5) over the end of the suction hose (6) then push the suction hose over the end of the connector. - Page 25 Attach the hose strainer to the other end of the suction hose and secure it with the hose clamp. The strainer will prevent the pump from becoming clogged or damaged by any debris. NOTE This machine is shipped dry of oil. Prior to starting the motor you must ensure the crank case is filled with a quality SAE 10W-30 4 stroke oil.
-
Page 26: Starting Procedure
4. STARTING PROCEDURE CAUTION The self-priming pump chamber MUST be completely filled before operation. Failure to do this may result in seal failure and the pump not operating. If the unit has been operated dry, stop the machine and allow to cool before adding priming water. -
Page 27: Stopping Procedure
Move the throttle lever downwards to just past the idle position. Pull the recoil starter grip lightly until resistance is felt, then pull swiftly until the engine fires. NOTE Do not allow the recoil starter to snap back against the engine. Return it slowly to avoid and possible damage to the starter. -
Page 28: Maintenance
6. MAINTENANCE WARNING Shut off the engine before performing any maintenance. Always carry out maintenance in a clean and well ventilated are and follow all safety precautions when handling fuels or oil. Always wear the appropriate Personal Protective Equipment. NOTE Use only genuine parts or their equivalent for maintenance or repair. - Page 29 Changing Oil NOTE Drain the engine oil while the engine is still warm to assist with rapid and complete draining. Oil capacity 0.4l. Remove the oil filler cap/dipstick. Place a suitable container beneath the oil drain plug to catch waste oil. Remove the oil drain plug and allow all the oil to drain.
- Page 30 NOTE Never run the engine without an air filter. Rapid engine wear will result from contaminants such as dust and dirt being drawn in to the engine. Unscrew the wing nut and remove the air filter cover. Remove the foam air filter element from the housing. 4.10 Wash the element in a solution of household detergent and warm water or a non- flammable or high flashpoint solvent until clean, then rinse thoroughly and allow to...
- Page 31 4.13 Spark Plug Service WARNING The exhaust becomes very hot during operation and remains hot for a while after use. Allow the exhaust to cool before carrying out any maintenance. NOTE Recommended spark plug model number: F7TC. An incorrect spark plug may cause engine damage. 4.14 Remove the spark plug HT wire.
- Page 32 7. STORAGE WARNING The exhaust becomes very hot during operation and remains hot for a while after use. Allow the exhaust to cool before transporting or storing the water pump. WARNING If transporting the water pump, turn the engine switch and fuel valve to OFF. Keep the water pump level to prevent fuel spillage.
- Page 33 With the fuel valve OFF, remove the carburetor drain screw. Drain the fuel from the carburetor into a suitable container. If the fuel in the fuel tank is to be drained, turn the fuel valve ON and drain the 5.10 fuel from the fuel tank in to a suitable container.
-
Page 34: Troubleshooting
8. TROUBLE SHOOTING WARNING Before cleaning, inspecting or repairing your unit, you MUST make sure that the engine has stopped and allowed to cool. You MUST disconnect the spark plug lead to prevent any accidental starting. Engine Engine will not start Cause Corrective measure Fuel valve OFF... -
Page 35: Specification
Relocate pump and hose to Excessive head discharge head reduce head See engine trouble shooting Check engine Engine lacks power above 9. SPECIFICATION SP9700 Model Engine type 152F Engine size - cc Fuel type Unleaded petrol Oil capacity - l Noise Level – dB... - Page 36 10. PARTS LISTING ENGINE PARTS LIST Engine parts list Specifications Model Unit part name Crankcase combination 154F Pieces Valve compartment diaphragm assembly Pieces 154F Inlet (double head) bolts Pieces M5×118 Exhaust (double head) bolts Pieces M6×52 Crankshaft oil seal and lid oil seal Pieces (17×30×6)...
- Page 37 Lower windshield bolts bolt M6×14 Pieces Oil filter cover bolts M5 × 10 GB5789-86 Bottom plate bolts M8 × 18 Pieces GB5789-86 Locating pins Pieces φ8×14 Crankcase gasket 154F Oil drain bolts Pieces M10×15×1.25 Put the rubber stopper washer Pieces Φ10×15×2 Crankcase cover 154F...
- Page 38 bolt Pieces M6X25 Tubing clip Φ5 Air filter gasket Pieces 154F Air filter assembly Pieces 154F Exhaust gasket Pieces 154F silencer Pieces 154F Handle Pieces 154F Starter assembly 154F Ignition Switch Pieces Starter bolt Pieces M6×14/GB/T5787-1986 Speed control arm Speed control rod Adjustable arm fastening bolts Pieces M6×21(T type)...
-
Page 39: Pump Parts List
PUMP PARTS LIST Item Part Name Quantity Connecting flange Water pump cover Handle Plain Washer Bolt Mechanical seal Pump sealing ring Impeller Diffuser O-ring Pump body O-ring Outlet flange O-ring Whorl plug Check valve Inlet flange Bolt Sealing washer Pipe Spanner Clamp Bolt...
Need help?
Do you have a question about the SP9700 and is the answer not in the manual?
Questions and answers