Chapters
Table of Contents

Related Manuals for AEG S53630CSW2


Summary of Contents for AEG S53630CSW2
- Page 1 Gebruiksaanwijzing S53630CSW2 Koel-vriescombinatie User Manual Fridge Freezer Notice d'utilisation Réfrigérateur/congélateur Benutzerinformation Kühl - Gefrierschrank...
-
Page 2: Table Of Contents
10. TECHNISCHE INFORMATIE................19 VOOR PERFECTE RESULTATEN Bedankt dat u voor dit AEG-product heeft gekozen. Dit apparaat is ontworpen om vele jaren uitstekend te presteren, met innovatieve technologieën die het leven gemakkelijker helpen maken met functies die gewone apparaten wellicht niet hebben. -
Page 3: Veiligheidsinformatie
NEDERLANDS VEILIGHEIDSINFORMATIE Lees zorgvuldig de meegeleverde instructies voor installatie en gebruik van het apparaat. De fabrikant is niet verantwoordelijk voor letsel en schade veroorzaakt door een foutieve installatie. Bewaar de instructies van het apparaat voor toekomstig gebruik. 1.1 Veiligheid van kinderen en kwetsbare mensen Dit apparaat kan worden gebruikt door kinderen van 8 •... -
Page 4: Veiligheidsvoorschriften
Gebruik geen waterstralen of stoom om het apparaat • te reinigen. Maak het apparaat schoon met een vochtige, zachte • doek. Gebruik alleen neutrale schoonmaakmiddelen. Gebruik geen schuurmiddelen, schuursponsjes, oplosmiddelen of metalen voorwerpen. Bewaar geen explosieve substanties zoals spuitbussen •... - Page 5 NEDERLANDS • Trek niet aan het netsnoer om het verlichting van huishoudelijke apparaat los te koppelen. Trek altijd ruimten. aan de stekker. 2.5 Onderhoud en reiniging 2.3 Gebruik WAARSCHUWING! WAARSCHUWING! Gevaar voor letsel of schade Gevaar op letsel, aan het apparaat. brandwonden of elektrische •...
-
Page 6: Beschrijving Van Het Product
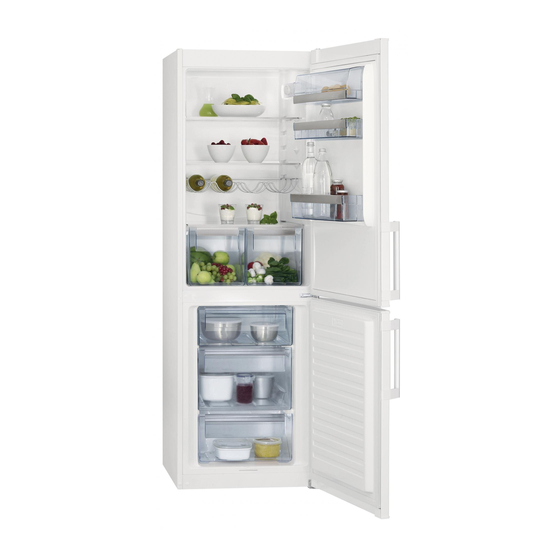
3. BESCHRIJVING VAN HET PRODUCT 3.1 Productoverzicht Groentelades Flessenrek Kastplateaus Vriezermanden Flessenrek Typeplaatje Bedieningspaneel Deurplateaus 4. BEDIENING 4.1 Inschakelen 4.3 Temperatuurregeling Steek de stekker in het stopcontact. De temperatuur wordt automatisch geregeld. Draai de thermostaatknop op een gemiddelde stand... -
Page 7: Dagelijks Gebruik
NEDERLANDS Een gemiddelde instelling is Als de over het algemeen het omgevingstemperatuur meest geschikt. hoog is of als het apparaat volledig gevuld is en de De exacte instelling moet echter worden thermostaatknop op de gekozen rekening houdend met het feit koudste instelling staat, kan dat de temperatuur in het apparaat het apparaat continu werken... - Page 8 5.3 Ontdooien Verwijder de glasplaat boven de groentelade niet Diepgevroren of ingevroren voedsel kunt om een goede u, voordat het gebruikt wordt, in het luchtcirculatie te koelvak of op kamertemperatuur laten garanderen. ontdooien, afhankelijk van de hoeveelheid tijd die hiervoor nodig is.
-
Page 9: Aanwijzingen En Tips
NEDERLANDS 5.8 Vriesmandjes uit de vriezer Bij het terugzetten tilt u de voorkant van de korf een beetje op en schuift u hem verwijderen gekanteld in de vriezer. Zodra het mandje over de eindpunten heen is, kunt De vriesmandjes hebben een limietstop u hem terug op zijn plaats schuiven. -
Page 10: Onderhoud En Reiniging
• Gekookt voedsel, koude schotels, • Wikkel het voedsel in aluminiumfolie enz: deze moeten afgedekt worden of plastic en zorg ervoor dat de pakjes en mogen op willekeurig welk schap luchtdicht zijn gezet worden. • leg vers, nog niet ingevroren voedsel •... - Page 11 NEDERLANDS 7.2 Eerste inschakeling Het apparaat moet regelmatig worden schoongemaakt: LET OP! 1. Maak de binnenkant en de Laat, voordat u de stekker in accessoires schoon met lauw water het stopcontact steekt en de en wat neutrale zeep. koelkast voor de eerste keer 2.
- Page 12 7.6 De vriezer ontdooien onder om het dooiwater op te vangen. LET OP! Gebruik nooit scherpe metalen hulpmiddelen om de rijp van de verdamper te krabben, deze zou beschadigd kunnen raken. Gebruik geen mechanische of andere middelen om het...
-
Page 13: Probleemoplossing
NEDERLANDS 8. PROBLEEMOPLOSSING WAARSCHUWING! Raadpleeg de hoofdstukken Veiligheid. 8.1 Problemen oplossen Probleem Mogelijke oorzaak Oplossing Het apparaat werkt niet. Het apparaat is uitgescha- Zet het apparaat aan. keld. De stekker zit niet goed in Steek de stekker goed in het het stopcontact. - Page 14 Probleem Mogelijke oorzaak Oplossing Er loopt water in de koel- De waterafvoer is verstopt. Reinig de waterafvoer. kast. Producten verhinderen dat Zorg ervoor dat de producten het water in de waterop- de achterwand niet raken. vangbak loopt. Er ligt water op de vloer.
-
Page 15: Montage
NEDERLANDS vermogen en vorm dat specifiek bedoeld is voor huishoudelijke apparaten. (het maximale vermogen wordt getoond op de afdekking van het lampje). 3. Plaats de afdekking van het lampje terug. 4. Steek de stekker in het stopcontact. 5. Open de deur. Controleer of het lampje gaat branden. - Page 16 9.4 Nivellering apparaat echter beter niet onder een wandkast zetten. De afstelbare voetjes Zorg ervoor dat het apparaat waterpas aan de onderkant van het apparaat staat wanneer u het plaatst. Deze stand garanderen een nauwkeurig horizontale kan bereikt worden met de twee uitlijning.
- Page 17 NEDERLANDS 3. Verwijder de deur van de draaipen 9. Schroef de schroeven van het van het middelste scharnier (2). onderste scharnier los en verwijder 4. Plaats de deksel van het bovenste het scharnier (8). 10. Schroef de onderste afdekpluggen scharnier in de gaten aan de tegenoverliggende zijde.
- Page 18 Voer een eindcontrole uit en verzeker u ervan dat: • Alle schroeven zijn aangedraaid. • De magnetische afdichtstrip vast zit aan de kast. • De deur goed open en dicht gaat. Als de omgevingstemperatuur laag is (bijv. in de winter), kan het zijn dat het deurrubber niet precies op de kast past.
-
Page 19: Technische Informatie
NEDERLANDS 10. TECHNISCHE INFORMATIE 10.1 Technische gegevens Hoogte 1845 Breedte Diepte Maximale bewaartijd bij stroomuitval Spanning Volt 230 - 240 Frequentie De technische gegevens staan op het typeplaatje aan de bonne- of buitenkant van het apparaat en op het energielabel. 11. - Page 20 10. TECHNICAL INFORMATION................35 FOR PERFECT RESULTS Thank you for choosing this AEG product. We have created it to give you impeccable performance for many years, with innovative technologies that help make life simpler features you might not find on ordinary appliances. Please spend a few minutes reading to get the very best from it.
-
Page 21: Safety Information
ENGLISH SAFETY INFORMATION Before the installation and use of the appliance, carefully read the supplied instructions. The manufacturer is not responsible if an incorrect installation and use causes injuries and damages. Always keep the instructions with the appliance for future reference. -
Page 22: Safety Instructions
Do not use water spray and steam to clean the • appliance. Clean the appliance with a moist soft cloth. Only use • neutral detergents. Do not use abrasive products, abrasive cleaning pads, solvents or metal objects. Do not store explosive substances such as aerosol •... - Page 23 ENGLISH 2.3 Use 2.5 Care and cleaning WARNING! WARNING! Risk of injury, burns, Risk of injury or damage to electrical shock or fire. the appliance. • Do not change the specification of • Before maintenance, deactivate the this appliance. appliance and disconnect the mains •...
-
Page 24: Product Description
3. PRODUCT DESCRIPTION 3.1 Product overview Vegetable drawers Bottle shelf Cabinet shelves Freezer baskets Bottle rack Rating plate Control panel Door shelves 4. OPERATION 4.1 Switching on 4.3 Temperature regulation Insert the electrical plug into a wall The temperature is automatically socket. -
Page 25: Daily Use
ENGLISH A medium setting is If the ambient temperature generally the most suitable. is high or the appliance is fully loaded, and the However, the exact setting should be appliance is set to the lowest chosen keeping in mind that the temperature, it may run temperature inside the appliance continuously causing frost to... - Page 26 To make these adjustments proceed as follows: 1. Gradually pull the shelf in the direction of the arrows until it comes free 2. Reposition the shelf as required. 5.7 Cold accumulators 5.5 Movable shelves The freezer contains at least one cold...
-
Page 27: Hints And Tips
ENGLISH 6. HINTS AND TIPS 6.1 Normal operating sounds • For safety, store in this way only one or two days at the most. The following sounds are normal during • Cooked foods, cold dishes, etc..: operation: these should be covered and may be placed on any shelf. -
Page 28: Care And Cleaning
• it is advisable to show the freezing in • be sure that frozen foodstuffs are date on each individual pack to transferred from the foodstore to the enable you to keep tab of the storage freezer in the shortest possible time;... - Page 29 ENGLISH 7.6 Defrosting the freezer The equipment has to be cleaned regularly: CAUTION! 1. Clean the inside and accessories with Never use sharp metal tools lukewarm water and some neutral to scrape off frost from the soap. evaporator as you could 2.
-
Page 30: Troubleshooting
7.7 Periods of non-operation defrost water. When the appliance is not in use for long periods, take the following precautions: 1. Disconnect the appliance from electricity supply. 2. Remove all food. 3. Defrost (if necessary) and clean the appliance and all accessories. - Page 31 ENGLISH Problem Possible cause Solution Many food products were Wait some hours and then put in at the same time. check the temperature again. The room temperature is Refer to climate class chart on too high. the rating plate. Food products placed in Allow food products to cool to the appliance were too room temperature before stor-...
-
Page 32: Installation
Problem Possible cause Solution There is no cold air circula- Make sure that there is cold air tion in the appliance. circulation in the appliance. cover and unhook it in the direction If the advice does not lead of the arrows. - Page 33 ENGLISH 9.2 Location • The appliance must be earthed. The power supply cable plug is provided It must be possible to with a contact for this purpose. If the disconnect the appliance domestic power supply socket is not from the mains power earthed, connect the appliance to a supply;...
- Page 34 3. Remove the door from the middle 9. Screw off the screws of the lower hinge pivot (2). hinge and remove the hinge (8). 4. Place the cover of the upper hinge 10. Screw off the lower cover plugs and into the holes on the opposite side.
-
Page 35: Technical Information
ENGLISH 15. Place the upper door on the middle Do a final check to make hinge pivot (12). sure that: 16. Fix the door with upper hinge and fix • All screws are tightened. it with screws of it (13). •... - Page 36 The technical information are situated in internal side of the appliance and in the the rating plate, on the external or energy label. 11. ENVIRONMENTAL CONCERNS Recycle the materials with the symbol Put the packaging in applicable containers to recycle it. Help protect the...
- Page 37 10. CARACTÉRISTIQUES TECHNIQUES..............54 POUR DES RÉSULTATS PARFAITS Merci d'avoir choisi ce produit AEG. Nous l'avons conçu pour qu'il vous offre des performances irréprochables pour longtemps, en intégrant des technologies innovantes qui vous simplifient la vie grâce à des caractéristiques que vous ne trouverez pas forcément sur des appareils ordinaires.
-
Page 38: Consignes De Sécurité
CONSIGNES DE SÉCURITÉ Avant d'installer et d'utiliser cet appareil, lisez soigneusement les instructions fournies. Le fabricant ne peut être tenu pour responsable des dommages et blessures liés à une mauvaise installation ou utilisation. Conservez toujours cette notice avec votre appareil pour vous y référer ultérieurement. -
Page 39: Instructions De Sécurité
FRANÇAIS N'endommagez pas le circuit frigorifique. • N'utilisez pas d'appareils électriques à l'intérieur des • compartiments de conservation des aliments de l'appareil, sauf s'ils sont du type recommandé par le fabricant. Ne pulvérisez pas d'eau ni de vapeur pour nettoyer •... - Page 40 Si ce n'est pas le cas, • Ne placez pas de produits contactez un électricien. inflammables ou d'éléments imbibés • Utilisez toujours une prise antichoc de produits inflammables à l'intérieur correctement installée. ou à proximité de l'appareil, ni sur •...
-
Page 41: Description De L'appareil
FRANÇAIS • Retirez la porte pour empêcher les municipal pour obtenir des enfants et les animaux de s'enfermer informations sur la marche à suivre dans l'appareil. pour mettre l'appareil au rebut. • Le circuit frigorifique et les matériaux • N'endommagez pas la partie du d'isolation de cet appareil préservent circuit de réfrigération située à... -
Page 42: Fonctionnement
4. FONCTIONNEMENT 4.1 Mise en marche Toutefois, on obtiendra le réglage exact en tenant compte du fait que la Insérez la fiche dans la prise murale. température à l'intérieur de l'appareil dépend de plusieurs facteurs : Tournez le thermostat vers la droite sur •... - Page 43 FRANÇAIS Les tiroirs de congélation vous permettent de trouver facilement et rapidement les aliments dont vous avez besoin. Si vous devez stocker une grande quantité d'aliments, retirez tous les tiroirs et le bac à glaçons, sauf le bac inférieur qui doit être en place afin de permettre une circulation d'air optimale.
-
Page 44: Conseils
5.8 Retrait des bacs de congélation du congélateur Les bacs de congélation sont équipés d'une butée afin d'empêcher leur retrait accidentel ou leur chute. Pour retirer le bac du congélateur, tirez-le vers vous et, lorsque vous atteignez la butée, retirez-le en inclinant la partie avant vers le haut. - Page 45 FRANÇAIS 6.3 Conseils pour la congeler par 24 heures figurant sur la plaque signalétique ; réfrigération des aliments frais • Le processus de congélation dure 24 heures. N'ajoutez pas d'autres Pour obtenir les meilleurs résultats : aliments à congeler pendant cette •...
-
Page 46: Entretien Et Nettoyage
• ne dépassez pas la durée de conservation indiquée par le fabricant. 7. ENTRETIEN ET NETTOYAGE AVERTISSEMENT! ATTENTION! Reportez-vous aux chapitres N'utilisez jamais de produits concernant la sécurité. abrasifs ou caustiques car ils pourraient endommager le revêtement. 7.1 Avertissements généraux 7.4 Nettoyage périodique... - Page 47 FRANÇAIS l'évaporateur du compartiment Une certaine quantité de givre se forme réfrigérateur à chaque fois que le toujours sur les clayettes du congélateur compresseur s'arrête. L'eau de et autour du compartiment supérieur. dégivrage est collectée dans un récipient Dégivrez le congélateur lorsque spécial situé...
-
Page 48: Cas D'anomalie De Fonctionnement
7.7 En cas de non-utilisation AVERTISSEMENT! prolongée Si, toutefois, vous n'avez pas la possibilité de débrancher Si l'appareil n'est pas utilisé pendant de et de vider l'appareil, faites longues périodes, prenez les précautions vérifier régulièrement le bon suivantes : de fonctionnement de celui- 1. - Page 49 FRANÇAIS Problème Cause probable Solution Trop de produits ont été Attendez quelques heures et introduits simultanément. vérifiez de nouveau la tempér- ature. La température ambiante Reportez-vous au tableau des est trop élevée. classes climatiques de la pla- que signalétique. Les aliments introduits Laissez refroidir les aliments à...
-
Page 50: Installation
Problème Cause probable Solution Trop de produits ont été Introduisez moins de produits introduits simultanément. en même temps. L'épaisseur de givre est su- Dégivrez l'appareil. périeure à 4 - 5 mm. La porte a été ouverte trop N'ouvrez la porte qu'en cas de souvent. - Page 51 FRANÇAIS Classe Température ambiante clima- tique +10 °C à +32 °C +16 °C à +32 °C +16 °C à +38 °C +16 °C à +43 °C Des problèmes fonctionnels peuvent se produire sur certains types de modèles fonctionnant hors de cette plage de températures.
- Page 52 9.5 Réversibilité de la porte AVERTISSEMENT! Avant toute opération, 3. Dégagez la porte du gond de la débranchez la fiche de la charnière centrale (2). prise électrique. 4. Placez le cache de la charnière supérieure dans les orifices du côté...
- Page 53 FRANÇAIS 9. Dévissez les vis de la charnière 15. Placez la porte supérieure sur le inférieure et retirez la charnière (8). gond de la charnière centrale (12). 10. Dévissez les caches inférieurs et 16. Fixez la porte à la charnière vissez-les dans les orifices du côté...
-
Page 54: Caractéristiques Techniques
Faites une dernière vérification pour vous assurer que : • Toutes les vis sont bien serrées. • Le joint magnétique adhère bien à l'appareil. • La porte s'ouvre et se ferme correctement. Si la température ambiante est basse (par exemple, en hiver), il se peut que le joint n'adhère pas parfaitement. - Page 55 FRANÇAIS ménagères. Apportez ce produit à votre centre de recyclage local ou contactez votre administration municipale.
- Page 56 9. MONTAGE.......................70 10. TECHNISCHE DATEN..................74 FÜR PERFEKTE ERGEBNISSE Danke, dass Sie sich für dieses AEG-Produkt entschieden haben. Wir haben es geschaffen, damit Sie viele Jahre von seiner ausgezeichneten Leistung und den innovativen Technologien, die Ihnen das Leben erleichtern, profitieren können.
-
Page 57: Sicherheitsinformationen
DEUTSCH SICHERHEITSINFORMATIONEN Lesen Sie vor der Montage und dem Gebrauch des Geräts zuerst die Gebrauchsanleitung. Der Hersteller übernimmt keine Verantwortung für Verletzungen und Beschädigungen durch unsachgemäße Montage. Bewahren Sie die Gebrauchsanleitung griffbereit auf. 1.1 Sicherheit von Kindern und schutzbedürftigen Personen Das Gerät kann von Kindern ab 8 Jahren und •... -
Page 58: Sicherheitsanweisungen
Betreiben Sie in den Lebensmittelfächern des Geräts • keine anderen als die vom Hersteller empfohlenen Elektrogeräte. Reinigen Sie das Gerät nicht mit einem Wasser- oder • Dampfstrahl. Reinigen Sie das Gerät mit einem weichen, feuchten • Tuch. Verwenden Sie ausschließlich Neutralreiniger. - Page 59 DEUTSCH Wenden Sie sich andernfalls an eine • Legen Sie Erfrischungsgetränke nicht Elektrofachkraft. in das Gefrierfach. Dadurch entsteht • Schließen Sie das Gerät nur an eine Druck auf den Getränkebehälter. ordnungsgemäß installierte • Bewahren Sie keine entzündbaren Schutzkontaktsteckdose an. Gase und Flüssigkeiten im Gerät auf. •...
-
Page 60: Gerätebeschreibung
• Trennen Sie das Gerät von der • Die Isolierung enthält entzündliches Stromversorgung. Gas. Für Informationen zur korrekten • Schneiden Sie das Netzkabel ab, und Entsorgung des Gerätes wenden Sie entsorgen Sie es. sich an Ihre kommunale Behörde. • Entfernen Sie die Tür, um zu •... -
Page 61: Betrieb
DEUTSCH 4. BETRIEB 4.1 Einschalten des Geräts Allerdings muss für eine exakte Einstellung berücksichtigt werden, dass Stecken Sie den Stecker in die die Temperatur im Inneren des Geräts Netzsteckdose. von verschiedenen Faktoren abhängt: • Raumtemperatur Drehen Sie den Temperaturregler im •... - Page 62 5.4 Positionierung der keine weiteren einzufrierenden Lebensmittel in das Gerät. Türablagen 5.2 Lagern von gefrorenen Die Türablagen können in verschiedener Höhe positioniert werden; damit Lebensmitteln ermöglichen sie das Lagern verschieden Lassen Sie das Gerät bei der ersten großer Lebensmittelpackungen.
-
Page 63: Tipps Und Hinweise
DEUTSCH 5.6 Flaschenhalter 5.8 Entnehmen von Gefrierkörben aus dem Im voreingestellten Flaschenhalter Gefriergerät können Flaschen (mit der Öffnung nach vorn) gelagert werden. Die Gefrierkörbe sind mit einem Legen Sie nur geschlossene Anschlag ausgestattet, der ein Flaschen hinein. versehentliches Herausziehen oder ein Herausfallen verhindert. - Page 64 6.5 Hinweise zum Einfrieren Abtauen und damit auch einen niedrigeren Energieverbrauch Im Folgenden finden Sie einige wertvolle ermöglicht. Tipps für einen optimalen • Nehmen Sie die Kälteakkus (falls Gefriervorgang: vorhanden) nicht aus dem Gefrierkorb. • Die maximale Menge an Lebensmitteln, die in 24 Stunden 6.3 Hinweise für die Kühlung...
-
Page 65: Reinigung Und Pflege
DEUTSCH • Achten Sie unbedingt darauf, die • Aufgetaute Lebensmittel verderben eingekauften gefrorenen sehr schnell und eignen sich nicht für Lebensmittel in der kürzest möglichen ein erneutes Einfrieren. Zeit zum Gefriergerät zu bringen. • Das Haltbarkeitsdatum auf der • Öffnen Sie die Tür nicht zu häufig, Tiefkühlkostverpackung darf nicht und lassen Sie die Tür nicht länger überschritten werden. - Page 66 7.6 Abtauen des Gefriergeräts Abständen, um zu gewährleisten, dass diese sauber und frei von Fremdkörpern sind. ACHTUNG! 3. Spülen und trocknen Sie diese Entfernen Sie Reif und Eis sorgfältig ab. vom Verdampfer niemals mit 4. Reinigen Sie den Kondensator und...
-
Page 67: Fehlersuche
DEUTSCH darunter. Innenraum und das gesamte Zubehör. 4. Reinigen Sie das Gerät und alle Zubehörteile. 5. Lassen Sie die Tür(en) offen, um das Entstehen unangenehmer Gerüche zu vermeiden. WARNUNG! Möchten Sie bei einer längeren Abwesenheit das Gerät weiterlaufen lassen, bitten Sie jemanden, gelegentlich die Temperatur Stellen Sie eine Schale mit warmem zu prüfen, damit das Kühlgut... - Page 68 Problem Mögliche Ursache Lösung Der Hauptstecker steckt Hauptstecker korrekt in die nicht korrekt in der Netz- Netzdose stecken. dose. Es liegt keine Spannung an Schließen Sie ein anderes der Steckdose an. Elektrogerät an die Netzdose an. Wenden Sie sich an einen Fachelektriker.
- Page 69 DEUTSCH Problem Mögliche Ursache Lösung Wasser läuft auf den Boden. Der Schmelzwasserablauf Schmelzwasserablauf mit Tau- ist nicht mit der Tauwas- wasserschale verbinden. serschale über dem Kom- pressor verbunden. Tür falsch ausgerichtet oder Das Gerät ist nicht ausger- Siehe "Ausrichtung". kollidiert mit dem Belüf- ichtet.
-
Page 70: Montage
Leistung und Form, die speziell für Haushaltsgeräte vorgesehen ist. (Die maximal erlaubte Leistung finden Sie auf der Lampenabdeckung.) 3. Bringen Sie die Lampenabdeckung wieder an. 4. Stecken Sie den Netzstecker in die Steckdose. 5. Öffnen Sie die Tür. Prüfen Sie, ob die Lampe brennt. - Page 71 DEUTSCH Gehäuses und dem Hängeschrank • Der Hersteller übernimmt keinerlei mindestens 100 mm betragen, wenn das Haftung bei Missachtung der Gerät unter einem Hängeschrank vorstehenden Sicherheitshinweise. aufgestellt wird. Allerdings sollte die • Das Gerät entspricht den EWG- Aufstellung des Geräts unter einem Richtlinien.
- Page 72 3. Entfernen Sie die Tür aus dem Stift 9. Lösen Sie die Schrauben des unteren des mittleren Scharniers (2). Türscharniers und entfernen Sie das 4. Setzen Sie die Abdeckung des Scharnier (8). 10. Schrauben Sie die unteren oberen Scharniers in die Löcher auf der gegenüberliegenden Seite.
- Page 73 DEUTSCH Führen Sie eine Endkontrolle durch, um sicherzustellen, dass: • Alle Schrauben fest angezogen sind. • Die Magnetdichtung am Gerät anliegt. • Die Tür ordnungsgemäß öffnet und schließt. Bei niedrigen Umgebungstemperaturen (z. B. im Winter) kann es vorkommen, dass die Türdichtung nicht richtig am Gerät anliegt.
-
Page 74: Technische Daten
10. TECHNISCHE DATEN 10.1 Technische Daten Höhe 1845 Breite Tiefe Lagerzeit bei Störung Stunden Spannung Volt 230 - 240 Frequenz Die technischen Daten befinden sich auf Innenseite des Geräts sowie auf der dem Typenschild auf der Außen- oder Energieplakette. - Page 75 DEUTSCH...
- Page 76 www.aeg.com/shop...
Need help?
Do you have a question about the S53630CSW2 and is the answer not in the manual?
Questions and answers