Table of Contents
Advertisement
Quick Links
Advertisement
Table of Contents

Related Manuals for SOUNDMASTER Highline DISC180


Summary of Contents for SOUNDMASTER Highline DISC180
- Page 1 DEUTSCH ENGLISH FRANÇAIS NEDERLANDS ESPAÑOL DISC180...
-
Page 2: Table Of Contents
Table of Contents Safety Information ..........3 Playing MP3 & WMA CDs .......24 IMPORTANT SAFETY INSTRUCTIONS ..3 MP3/WMA CD Repeat Playback ....24 Precautions for the Unit .........5 Federal Communications Commission Memory Card Operation.........26 Interference Statement ........5 FCC Radiation Exposure Statement ....5 USB Operation ..........27 Introduction.............6 Radio Operation ..........28... -
Page 3: Safety Information
Safety Information IMPORTANT SAFETY INSTRUCTIONS TO PREVENT FIRE OR SHOCK HAZARD, DO NOT USE THIS PLUG WITH AN EXTENSION CORD, RECEPTACLE OR OTHER OUTLET UNLESS THE BLADE SCAN BE FULLY INSERTED TO PREVENT BLADE EXPOSURE. TO PREVENT FIRE OR SHOCK HAZARD, DO NOT EXPOSE THIS APPLIANCE TO RAIN OR MOISTURE. -
Page 4: Precautions For The Unit
Safety Information following the operating instructions. Adjust only grounding of the mast and supporting structure, those controls that are covered by the operating grounding of the lead-in wire to an antenna instructions as an improving adjustment of other discharge unit, size of grounding conductors, controls may result in damage and will often require location of antenna-discharge unit, connection to extensive work by a qualifi... -
Page 5: Federal Communications Commission Interference Statement
Safety Information Precautions for the Unit This equipment generates, uses and can radiate radio frequency energy and, if not SECURITY • Before operation, check if the voltage of the installed and used in accordance with the unit is in line with the local voltage. instructions, may cause harmful interference •... -
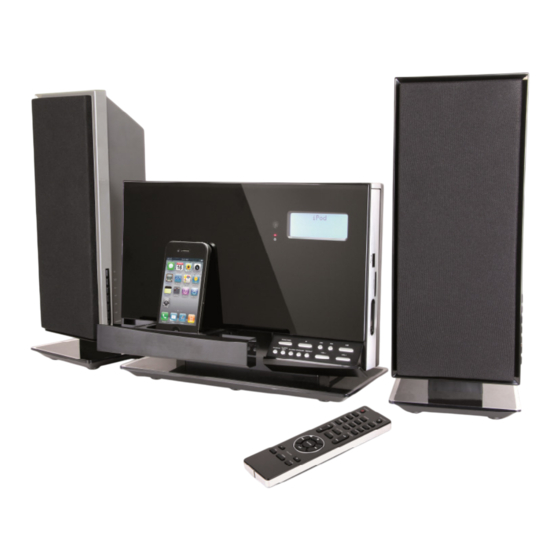
Page 6: Unpacking The Unit
Unpacking the Unit iPod adapter (x4) Carefully remove the unit from the carton and • remove all packing material from the unit. Check that all the following items are in the box: Wireless main unit • If any item is missing, consult your dealer immediately. -
Page 7: Basic System Setup
Basic System Setup Choosing a Location for your • The wireless audio system will automatically seek a clear channel if any of these other System devices interfere with its communication. Setting up a wireless audio system allows you When this happens the “Link” indicator much more fl... - Page 8 Basic System Setup Follow these 5 steps to complete basic system setup. 1. Choose a suitable location for the system components. • Remember, the wireless main unit and each speaker will need a power outlet for operation. 2. Connect the wireless main unit and both speakers to AC power. •...
- Page 9 Basic System Setup 4. Select the Correct iPod Dock Adapter When connecting an iPod to this iPod Dock, please ensure that the correct adapter plate is used. FAILURE TO DO SO MAY RESULT IN DAMAGE TO THE iPod. This iPod Dock comes with 8 removable dock adapters. Using the connect adapter ensure the proper fi...
-
Page 10: Location Of Controls
Location of Controls Wireless Main Unit 15 16 FUNCTION CLOCK PAIRING ALARM SNOOZE REPEAT VOL - VOL + ADJ. 1. EJECT button 13. FUNCTION button 2. Remote sensor 14. STOP 15. SKIP BACKWARD 3. LCD display 4. STANDBY button 16. SKIP FORWARD 5. -
Page 11: Speaker
Location of Controls Speaker 1. STANDBY button 6. PLAY/PAUSE 2. VOL + button 7. PAIRING button 3. VOL – button 8. POWER LED 4. SKIP FORWARD 9. MUTE LED 5. SKIP BACKWARD 10. LINK LED Speaker LED Indication Illuminated Non-illuminated Flashing Link LED (Dual color Green –... -
Page 12: Remote Control
Location of Controls 1. STANDBY button Remote Control 2. PROGRAM button 3. DIMMER button 4. RANDOM button 5. REPEAT button 6. SNOOZE button 7. ALARM 1 button 8. STEREO/MONO button 9. CLOCK/ADJ. button 10. UP SCROLL button 11. FUNCTION button 12. -
Page 13: Operating Instructions
Operating Instructions • Make sure that you have fully extended the Volume Controls To increase or decrease the system volume press FM antenna wire. the VOL + or VOL – keys located on: • Make sure that you have installed batteries •... -
Page 14: Eq (Electronic Preset Equalizer, On Remote Control Only)
Operating Instructions EQ (Electronic Preset Equalizer, on DBBS (Dynamic Bass Boost, remote remote control only) control only) The preset equalizer allows you to adjust the • Press the DBBS button on the remote control sound characteristic for the most popular types to increase the bass response. -
Page 15: Compatible Storage Devices
Compatible Storage Devices IMPORTANT: • This player can play normal (pre-recorded) This system supports playback of music from CD discs plus CD Recordable and CD CD discs as well as USB and fl ash memory card Rewritable discs. The ability of this unit to devices. - Page 16 Compatible Audio Formats • The unit supports playback of songs in CD- fi le system. The system can read media audio (pre-recorded CDs), mp3 and Windows containing up to 16 levels of directories, 99 Media formatted Audio (WMA). This unit total directories and up to 999 total fi...
- Page 17 Inserting and Removing Flash Devices Flash devices are inserted into compatible openings on the right side panel of the unit. Inserting and removing Flash Cards Insert the card into the slot by gently pressing • into position until it locks in place. Cards can only be inserted one way.
-
Page 18: Ipod Operation
iPod Operation Using the iPod Dock you can play music from the iPod through the unit’s speakers and operate with the remote control. The unit comes with eight removable dock adapters to ensure the proper fi t for your iPod and to help reduce stress on the connector when operating the iPod. When connecting an iPod to this iPod Dock, please ensure that the correct adapter plate is used. - Page 19 iPod Operation Universal dock adapter number: iPod description Capacity 12 13 14 16 17 18 19 4GB, iPod mini iPod with color 20GB, display 30GB 30GB, 60GB, iPod with video 80GB 120GB, iPod classic 160GB iPod nano 1st 1GB, 2GB, generation iPod nano 2nd 2GB, 4GB,...
-
Page 20: Cd Operation
CD Operation Normal Playback To pause temporarily during CD playback: • Press the PLAY/PAUSE button. • The sound stops and the elapsed time To start CD playback: shows on the display, but the disc continues 1. Press the FUNCTION button to select “CD” spinning. -
Page 21: Repeat Playback
CD Operation Random Playback Repeat Playback The Repeat function in this system allows you to The Random playback feature allows you play all continuously repeat a single track, or the entire the tracks on the disc in random order. You can disc. -
Page 22: Programmed Playback
CD Operation Programmed Playback • The player will play all the tracks that you The programmed playback feature allows you to programmed in the desired sequence. After the last programmed track has played the program a total of 20 tracks in any desired order. player stops, but the programmed sequence You may program the same track to play several remains in the memory. -
Page 23: Playing Mp3 & Wma Cds
Playing MP3 & WMA CDs 2. Press the FOLDER UP / DN button Most of the normal CD operations described repeatedly to select album “03”. The track will in this manual also apply to MP3/WMA CDs. show “001”. However there are a few differences in MP3 WMA CD playback functions, and these are described on the following pages. - Page 24 Playing MP3 & WMA CDs To repeat all the tracks in a single directory • In this example the MP3/WMA CD contains (or Album): a total of 09 Directories (Albums) and 193 1. Begin playback as usual. Tracks (Files). 2. Press the REPEAT button 3 times. •...
-
Page 25: Memory Card Operation
Memory Card Operation To play MP3/WMA audio files stored on SD/ NOTE: MMC Memory Cards: The memory card slot on this system enables 1. Press the FUNCTION button repeatedly until playback of songs only in MP3 and WMA formats the main display shows “CARD”. (without DRM). -
Page 26: Usb Operation
USB Operation To play MP3/WMA audio files stored on USB NOTE: storage devices: The USB port on this system enables playback 1. Press the FUNCTION button repeatedly until of songs only in MP3 and WMA formats (without the main display shows “USB”. DRM). -
Page 27: Radio Operation
Radio Operation To select the radio mode: To preset stations in the tuner memory: • Press the FUNCTION button repeatedly until You can store up to 20 of your favorite stations in the main display shows “FM”. FM frequency the tuner memory for easy recall at any time. will appear on the display. -
Page 28: Other Functions
Other Functions Setting Alarm 1 or Alarm 2 Setting the Clock The dual alarms are set in the following When the AC power is connected, “12:00” will sequence: appear on the display. The clock can only be set • Set Alarm Set time Set mode while the unit is off. -
Page 29: Sleep Timer (Remote Control Only)
Other Functions To set the alarm mode: 7. Press the ENTER button when you see “Set mode”. 8. Press the button to select the alarm wake up mode (FM, CD, USB, Card, iPod or Buzzer) and then press the ENTER button. To set the alarm day (frequency): 9. -
Page 30: Speaker Pairing And Adding Additional Speakers
Speaker Pairing and Adding Additional Speakers Your DISC-180 comes from the factory • If the right speaker the PAIRING button is already paired and ready to communicate with pressed: the two wireless speakers included in the box. Additional speakers are available for purchase from selected retailers and online. - Page 31 Speaker Pairing and Adding Additional Speakers 4. At this stage you may choose to set this • Powering ON or OFF any speaker works in pair of speakers as Master Group speakers two ways: or Slave Group speakers. The system can - Short press –...
-
Page 32: Connecting External Devices
Connecting External Devices Auxiliary Input Jack IMPORTANT: This system includes an AUX IN Jack to allow To prevent hearing damage always set • you to connect external audio equipment and the volume control to a low level before listen to the sound from the external equipment you connect the headphones. -
Page 33: Wall Mounting
Wall Mounting The DISC-180 wireless main unit and To mount the wireless speakers: speakers can be wall mounted using commonly • Remove the stand from the unit by fi rmly available wall mounts (not included). You may depressing the locking tongue on top rear of purchase these mounting accessories from the stand’s leg and pulling fi... -
Page 34: Troubleshooting
Troubleshooting Audio interference is heard or audio stops General No power • The wireless main unit or wireless speakers • AC connection is not complete. Check all are too close to interfering devices. Follow cords and cables. guidelines on page 8 to improve performance System does not respond to key presses Red “Link”... -
Page 35: Technical Specications
Technical Specications 1. General • Electrical supply: 100-240 V ~ 50/60Hz • Power requirements of wireless main unit: 9V 1.5A • Power requirements of wireless speaker unit: 15V 2A • Dimensions of wireless main unit: 321(L) x 100(W) x 223(H) •... -
Page 36: Care And Maintenance
Care and Maintenance Compact Disc Care To remove a disc from its storage case, press down on the center of the case and lift the disc out, holding it carefully by the edges. Finger prints and dust should be carefully wiped off the disc’s recorded surface with a soft cloth.
Need help?
Do you have a question about the Highline DISC180 and is the answer not in the manual?
Questions and answers