Table of Contents
Advertisement
Quick Links
RocketLink™-G Model 3088/I
G.SHDSL NTU
Quick Start Guide
Important
intended nor approved for use in an industrial or residential environment.
Document Number: 03332U7-001 Rev. C
Part Number: 07M3088I-QS
Revised: October 15, 2008
—This is a Class A device and is intended for use in a light industrial environment. It is not
Sales Office: +1 (301) 975-1000
Technical Support: +1 (301) 975-1007
E-mail: support@patton.com
WWW: www.patton.com
Advertisement
Table of Contents

Related Manuals for Patton electronics RocketLink-G 3008/I


Summary of Contents for Patton electronics RocketLink-G 3008/I
- Page 1 RocketLink™-G Model 3088/I G.SHDSL NTU Quick Start Guide Important —This is a Class A device and is intended for use in a light industrial environment. It is not intended nor approved for use in an industrial or residential environment. Document Number: 03332U7-001 Rev. C Sales Office: +1 (301) 975-1000 Part Number: 07M3088I-QS Technical Support: +1 (301) 975-1007...
-
Page 2: Power Up The Ntu
• This device contains no user serviceable parts. The equipment shall be returned to Patton Electronics for repairs, or repaired by qualified service personnel. WARNING • The external power adapter shall be a listed Limited Power Source. The mains outlet that is utilized to power the devise shall be within 10 feet (3 meters) of the device, shall be easily accessible, and protected by a circuit breaker. -
Page 3: Power-Up Indication
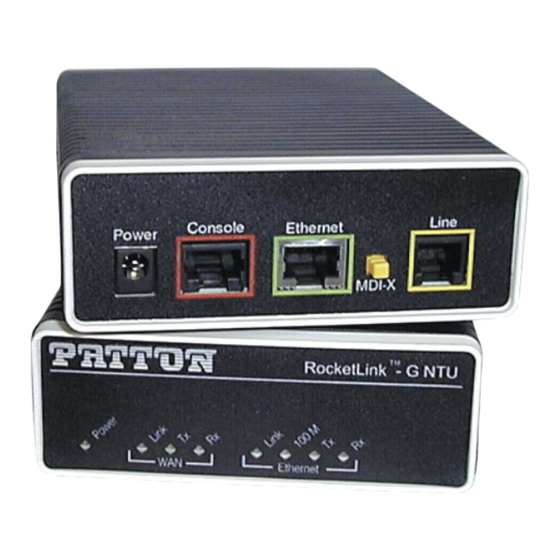
To Power To -48VDC Supply Jack Source -Vin Black lead (-V) Red lead (+V) +Vin Barrel power connector DC Power Supply Figure 1. 1.3 Power-up indication The Power and 100M Ethernet LEDs are lit while the RocketLink-G is powering up. 2.0 Configure the IP address The RocketLink-G NTU is shipped with a factory-configured IP address assigned to the Ethernet LAN port (green outline). -
Page 4: Modify The Ip Address
Start a HyperTerminal session on the PC using the settings: 9600 bps, 8 data bits, no parity, 1 stop bit, no flow control Log in to the RocketLink-G NTU using the factory-default login (superuser) and password (superuser): Login: superuser Password: ********* Login successful 2.2 Modify the IP address Display current IP interface settings for the RocketLink-G Ethernet LAN port. - Page 5 3.0 Connect to the local IP network Now you can connect the RocketLink-G NTU to your local IP network and complete the remaining configuration from your PC using a standard web browser. Connect the RocketLink-G NTU’s Ethernet port (green) to the same Ethernet segment as your PC (see figure The front-panel Ethernet Link LED should turn on.
- Page 6 4.0 Log onto the web management interface You will now access the web management graphical user interface (GUI) to configure the RocketLink-G using a standard web browser (such as Netscape browser or Internet Explorer). At your PC, open a web browser and enter the IP address you assigned to the RocketLink-G’s Ethernet LAN port in step 2 of section 2.2 “Modify the IP address”...
-
Page 7: Connect The G.shdsl Port
5.0 Connect the G.SHDSL Port Obtain single-twisted-pair cable with an RJ-11 plug connector at each end. Plug one end of the cable into the (yellow) RJ-11 socket (labelled Line) on the RocketLink-G NTU. Plug the other end of the cable into the RJ-11 wall socket that provides your G.SHDSL service. Go to G.SHDSL >... -
Page 8: Compliance Information
B.0 Compliance Information B.1 Compliance EMC: FCC Part 15, Class A • EN55022, Class A • EN55024 • Safety: UL 60950-1/CSA C22.2 N0. 60950-1 • IEC/EN60950-1 • AS/NZS 60950-1 • PSTN Regulatory: FCC Part 68 • CS-03 • AS/ACIF S043:2003 •... -
Page 9: Industry Canada Notice
2.3 Industry Canada Notice This equipment meets the applicable Industry Canada Terminal Equipment Technical Specifications. This is con- firmed by the registration number. The abbreviation, IC, before the registration number signifies that registra- tion was performed based on a Declaration of Conformity indicating that Industry Canada technical specifications were met. -
Page 10: Authorized European Representative
B.6 Authorized European Representative D R M Green European Compliance Services Limited. Avalon House, Marcham Road Abingdon, Oxon OX14 1UD, UK Model 3088/I Quick Start Guide... -
Page 11: Copyright Statement
Trademarks statement The term RocketLink-G is a trademark of Patton Electronics Company. All other trademarks presented in this doc- ument are the property of their respective owners. Warranty, Trademark, & Compliance Information For warranty, trademark and compliance information, refer to the Models 3088 RocketLink-G User Manual located on the CD-ROM that came with your NTU or available online at www.patton.com. - Page 12 Model 3088/I Quick Start Guide...
Need help?
Do you have a question about the RocketLink-G 3008/I and is the answer not in the manual?
Questions and answers