
Related Manuals for Motorola MBP944CONNECT


Summary of Contents for Motorola MBP944CONNECT
- Page 1 User’s Guide Motorola Halo+ Over-the-Crib Wi-Fi® monitor and sleep companion Model: MBP944CONNECT The features described in this User’s Guide are subject to modifications without prior notice.
- Page 2 Welcome... to your new Motorola Halo+! Thank you for purchasing Motorola Halo+. Now you can see and hear your baby sleeping in another room or you can monitor your older children in their play room. Please keep your original dated sales receipt for your records.
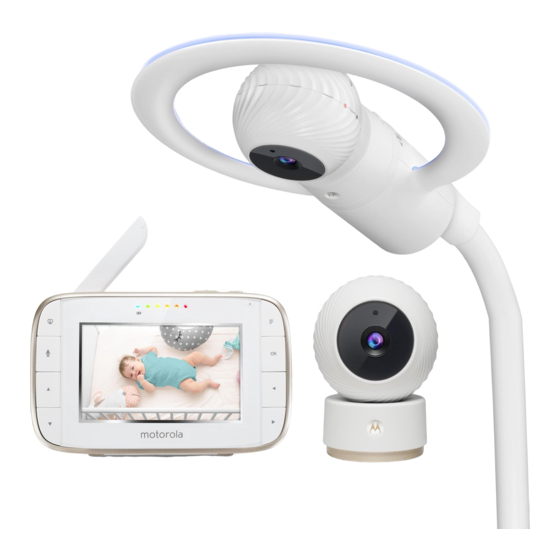
- Page 3 Overview of Crib Mounting Kit and Baby Unit Crib Mounting Kit Night Light Ring Baby Unit Baby Unit Release Button Lightshow Projector ON/OFF/ Pair Night Light Switch Light Show Projector window Top Pole Release Button Securing Knob Telescopic Leg Mounting Knob Adjustive Plate Power Port Baby Unit...
- Page 4 Overview of the Parent Unit 13 14 15 Display (LCD screen) Parent Unit ON/OFF LED Sleep Activity button (Green) TALK button Audio Level LEDs (Green, Press and hold to speak to Amber, Red, Red) your baby. Volume buttons RESET button (recessed - Press -/+ to decrease/ use small pin) increase...
- Page 5 Parent Unit menu icons Signal Level Indication (4 Levels) Night Vision Mode (Video also changes to Black/White) Talk Mode On Indicates the screen off timer is set Volume Level Control (8 Levels) No Baby Unit detected Sleep activity monitoring. Battery Level Indication (4 Levels) Night Light is ON Night Light Brightness Control with 3 levels of selection Night Light Colour Control with 7 colour options...
-
Page 6: Table Of Contents
Setting up the Baby Unit with Crib Mount Kit ......11 Setting Up Baby Unit at Desk Mode ...........14 Parent Unit Power Supply ..............15 Registration (Pairing) ...............16 3. Using the Motorola Halo+ ..............17 Set Night Light ..................17 Set Lightshow Projector ..............17 Night Vision Mode ................17 Talk Mode ....................17... - Page 7 ................. 29 5.3.3 Add the Camera to your account ......30 User Account and Camera Setup on iPhone®/iPad® ... 34 5.4.1 Download Hubble for Motorola Monitors App ..34 5.4.2 Create a new Hubble for Motorola Monitors account ..................35 5.4.3 Add the Camera to your account ......
-
Page 8: Safety Instructions
1. Safety Instructions WARNING Strangulation Hazard: Children have STRANGLED in cords. Keep this cord out of the reach of children (more than 1m (3ft) away). Never use extension cords with AC Adapters. Only use the AC Adapters provided. Stop using the crib mount when baby begins to push up on hands and knees. - Page 9 WARNING This digital video Baby Monitor is compliant with all relevant standards regarding electromagnetic fields and is, when handled as described in the User's Guide, safe to use. Therefore, always read the instructions in this User's Guide carefully before using the device.
- Page 10 CAUTION The Parent Unit includes a built-in, lithium-ion rechargeable battery pack, which is not a user-accessible item. If you think the battery needs replacing, please contact the helpline. Do not try to replace it yourself. Risk of explosion if battery is replaced by an unapproved battery type.
-
Page 11: Getting Started
2. Getting Started Setting up the Baby Unit with Crib Mount Kit Step 1: Fasten the round adaptive plate on the screw thread of the Crib Mount Stand (see note). Step 2: Place the mount stand against the crib with the screw thread going through the crib bars. - Page 12 Step 4: Keep the stand parallel and tighten the mounting knob so that the crib mount stand is secured to the crib bars. Note: Only use the adaptive plate if the top rail of your crib is too thick for the bracket.
- Page 13 Step 7: Insert the Top Pole (with night light ring) into the crib mount stand. It will lock into place with a 'click'. Step 8: Dock the baby unit into the top pole (with night light ring) as shown in the picture below. Note: Before removing the camera from the top pole.
-
Page 14: Setting Up Baby Unit At Desk Mode
Please mount the camera on the long side of the crib for optimal view. Setting Up Baby Unit For Desk Mode When your child is older, the baby unit (camera) can be removed and used without the crib mounting kit. This is 'Desk Mode'. -
Page 15: Parent Unit Power Supply
Parent Unit Power Supply Connect the DC plug of the power adapter (5V DC / 1500mA) to the Parent Unit and the other end to a suitable electrical outlet. Press and hold the POWER button the top of the Parent Unit to turn it ON. NOTE A rechargeable battery (Lithium ion battery 2000mAh) inside the Parent Unit allows you to move it without losing the link and... -
Page 16: Registration (Pairing)
Registration (Pairing) The Baby Monitor is pre-registered to your Parent Unit. You do not need to register it again unless the Baby Unit loses its link with the Parent Unit. To re-register your Baby Unit, or register a new Baby Unit, follow the procedures below: Press the M button of the Parent Unit and the menu bar will pop up. -
Page 17: Using The Motorola Halo
3. Using the Motorola Halo+ Please read these instructions carefully and be aware that this product is only intended as an aid. It is not a substitute for responsible, correct parental supervision. Set Night Light The nightlight feature provides a soft glow to help soothe your baby to sleep and help keep them calm throughout the night. -
Page 18: Sleep Activity Monitor
29°C / 84°F or below 14°C / 57°F. The reading will change to HH °C / °F if the temperature goes above 36°C / 97°F. The reading will change to LL °C / °F if the temperature goes below 1°C / 34°F. Using the Motorola Halo+... -
Page 19: Parent Unit Menu Options
4. Parent Unit Menu Options Set Night Light Press the M button and the menu bar will pop up. 2. Tap on M button then Scroll Left/Right to select option at the menu bar. 3. Press + UP button or - DOWN button to select ON and OFF status then confirm with O button. -
Page 20: Lcd Display Brightness
LCD Display Brightness Press the M button and the menu bar will pop up. 2. Press the < LEFT button or > RIGHT button until highlighted. 3. Press the + UP button or - DOWN button to select the desired brightness from level 1 ~ 8. (The default brightness is level 4.) Audio Playlist You can playback audio content - Lullabies, Soothing Sounds and... -
Page 21: Stop Playback
4.4.3 Stop Playback • Tap on M button then Scroll Left/Right to select option at the menu bar. then confirm with O • Scroll Up or Down to select button. • Press + UP button or - DOWN button until "Press OK to stop playing"... -
Page 22: Camera Control
Camera Control 4.6.1 Add (pair) a camera Press the M button and the menu bar will pop up. 2. Press the < LEFT button or > RIGHT button until highlighted, and the del/ add/ view/ scan menu will pop up. 3. -
Page 23: View A Camera
4.6.2 View a camera Press the M button and the menu bar will pop up. 2. Press the < LEFT button or > RIGHT button until highlighted, and the del/ add/ view/ scan menu will pop up. 3. Press the + UP button or - DOWN button to select view, and press the O button to confirm. -
Page 24: Scan Cameras
4.6.4 Scan cameras This function is only available when you have more than 1 Baby Unit (Camera). Press the M button and the menu bar will pop up. 2. Press the < LEFT button or > RIGHT button until highlighted, and the del/ add/ view/... -
Page 25: View Multiple Cameras On Screen
View multiple cameras on screen This function is only available when you have more than 1 Baby Unit (Camera). When the Split Screen function is On, you can view multiple cameras on the screen, although only hear audio from one screen at a time. Press the M button and the menu bar will pop up. -
Page 26: Wi-Fi Internet Viewing
® 5. Wi-Fi Internet Viewing Minimum System Requirements Web Portal ® • Windows ® • Mac OS 10.7 • Chrome™ 24 ® • Internet Explorer ® • Safari • Java™ 7 ® • Firefox 18.0 ® ® • Adobe Flash Player 15.0 Android™... -
Page 27: Getting Started - Connecting Devices
Getting Started - Connecting Devices How does it work? Access your Wi-Fi Router MBP944CONNECT Camera View your Camera from Camera any compatible device remotely. Hubble Service 5.2.1 Setup • Power on the Baby Unit (Camera). ® • The Camera Unit must be within range of the Wi-Fi router with which you want to connect. -
Page 28: User Account And Camera Setup On Android™ Devices
• Device with Android™ system version 4.2 and above 5.3.1 Download Hubble for Motorola Monitors App • Go to Google Play™ Store to search for "Hubble for Motorola Monitors" or scan the QR code to download Hubble for Motorola Monitors App from Google Play™ Store. -
Page 29: Create A New Hubble For Motorola Monitors
® • Ensure that your Android™ device is connected to your Wi-Fi Router. • Run the "Hubble for Motorola Monitors" App on your Android™ device, tap SIGNUP to create new Hubble account (Picture A1). • Enter user’s information, read through the Terms and Conditions, by signing up you agree to our Terms and Conditions (Pictures A2). -
Page 30: Add The Camera To Your Account
5.3.3 Add the Camera to your account • Sign in to your Hubble account by entering User Name and Password (Picture A3). • Tap on Add button at the bottom of the screen to add Camera (Picture A4). • Tap Halo Camera to add the Camera (Picture A5). •... - Page 31 on the Crib Mounting Kit for • Locate the PAIR button Dock mode, press and hold the PAIR button until you hear “Ready for Pairing” voice prompt (Picture A7). • Or locate the PAIR button at the bottom of Camera for Desk mode, press and hold the PAIR button until you hear “Ready for Pairing”...
- Page 32 • Tap Continue on the screen, your Android™ device will detect the Camera, this might take a minute, the Camera SSID will appear on your Android™ device (Picture A9). • Confirm by tapping the SSID and the Camera is detected successfully (Picture A10) •...
- Page 33 • It will take a few minutes for the device to connect to the Wi- Fi® network, the device is successfully registered to your Hubble for Motorola Monitors account (Picture A13) • The Camera can be used for Baby, Pet or Home monitoring, select one of purpose and name your Camera as reference (Picture A14).
-
Page 34: User Account And Camera Setup On Iphone /Ipad
/ iPad with iOS version 7.0 and above 5.4.1 Download Hubble for Motorola Monitors App • Go to App Store to search for "Hubble for Motorola Monitors". • Download "Hubble for Motorola Monitors" App and install it on your iPhone®/iPad®. -
Page 35: Create A New Hubble For Motorola Monitors
• Ensure that your iOS® device is connected to your Wi-Fi® Router. • Run the "Hubble for Motorola Monitors" App on iPhone®/iPad®, tap SIGNUP to create new Hubble account (Picture i1). • Enter user’s information, read through the Terms and Conditions, by signing up you agree to our Terms and Conditions (Pictures i2). -
Page 36: Add The Camera To Your Account
5.4.3 Add the Camera to your account • Sign in to your Hubble account by entering User Name and Password (Picture i3). • Tap on Add button at the bottom of the screen to add Camera (Picture i4) • Tap Halo Camera to add the Camera (Picture i5). •... - Page 37 on the Crib Mounting Kit for • Locate the PAIR button Dock mode, press and hold the PAIR button until you hear “Ready for Pairing” voice prompt (Picture i7). • Or locate the PAIR button at the bottom of Camera for Desk mode, press and hold the PAIR button until you hear “Ready for Pairing”...
- Page 38 • Tap Continue on the screen, your iOS®device is detecting the Camera, this might take a minute, the Camera SSID will appear on your iOS® device (Picture i9). • Confirm by tapping the SSID and the Camera is detected successfully (Picture i10) •...
- Page 39 • It will take a few minutes for the device to connect to the Wi-Fi® network, the device is successfully registered to your Hubble for Motorola Monitors account (Picture i13) • The Camera can be used for Baby, Pet or Home monitoring,...
-
Page 40: Procedure For Resetting The Camera
Procedure for Resetting the Camera Note: If your Camera is moved from one router (e.g. home) to another (e.g. office) or you have Camera setup issues, then the Camera must be reset. Please reset the Camera with the following procedures: Slide the ON/OFF switch to OFF. -
Page 41: Disposal Of The Device (Environment)
6. Disposal of the Device (Environment) At the end of the product life cycle, you should not dispose of this product with normal household waste. Take this product to a collection point for the recycling of electrical and electronic equipment. The symbol on the product, user's guide and/or box indicates this. -
Page 42: Cleaning
7. Cleaning Clean your Digital Video Baby Monitor with a slightly damp cloth or with an anti-static cloth. Never use cleaning agents or abrasive solvents. Cleaning and care • Do not clean any part of the Digital Video Baby Monitor with thinners or other solvents and chemicals - this may cause permanent damage to the product which is not covered by the warranty. -
Page 43: Help
8. Help Display No display • Try recharging or replacing the battery pack. • Reset the Units. Disconnect the battery pack of the Parent Unit and unplug both the Units' electrical power, then plug them back in. • Is the Unit switched on? Press and hold the ON/OFF button 0 on the Parent Unit to switch it ON. - Page 44 • Make sure there is at least 3ft to 6ft between the 2 Units to avoid audio feedback. • lf the Baby Unit is too far away, it may be out of range. Move the Baby Unit closer to the Parent Unit. •...
- Page 45 ® Troubleshooting for Wi-Fi Internet Viewing Category Problem Solution Description / Error Account I am unable to login Please check your user name and even after password. registration. Account I receive an error Please ensure that you have message saying: registered with us.
- Page 46 Viewing When I am in When you are accessing your Camera "remote mode", the Camera via a network different video stops after 5 from your home network (over minutes. How do I the internet) your video times view for longer? out after 5 minutes.
- Page 47 General What is the A flashing LED indicates the significance of LED following status: flashing? Slow flashing: 1. Your Camera is in setup mode. You can add the Camera to your account in this mode. Out of the box, the Camera is in Setup mode.
- Page 48 Connectivity Even though I am Please check your wireless Issues accessing my router settings. For example, for Camera from the Buffalo brand routers there is an ® same Wi-Fi option called Wireless Isolation. network, I still find Please disable this option. my Camera is shown as remote.
- Page 49 App for - Open the Google Play Store Android™ and iOS on your Android™ device. devices? - Select Search - Type in "Hubble for Motorola Monitors" - The results will show the Hubble App - Select to install it iOS Device:...
- Page 50 Features How many users can If you are accessing in Local access the Camera Mode, two users are supported, at one time? after two users all streaming will go through the remote server. This allows for unlimited user access to a single Camera at one time.
-
Page 51: General Information
If you think you need a battery replacement, please contact customer service. Consumer Products and Accessories Limited Warranty ("Warranty") Thank you for purchasing this Motorola branded product manufactured under license by Binatone Electronics International LTD ("BINATONE") What Does this Warranty Cover? Subject to the exclusions contained below, BINATONE warrants that this Motorola branded product ("Product") or certified accessory... - Page 52 WARRANTY IS THE EXCLUSIVE REMEDY OF THE CONSUMER, AND IS PROVIDED IN LIEU OF ALL OTHER WARRANTIES, EXPRESS OR IMPLIED. IN NO EVENT SHALL MOTOROLA OR BINATONE BE LIABLE, WHETHER IN CONTRACT OR TORT (INCLUDING NEGLIGENCE) FOR DAMAGES IN EXCESS OF THE PURCHASE...
- Page 53 (c) use of the Products or Accessories for commercial purposes or subjecting the Product or Accessory to abnormal usage or conditions; or (d) other acts which are not the fault of MOTOROLA or BINATONE, are excluded from coverage.
- Page 54 (b) broken seals or that show evidence of tampering; (c) mismatched board serial numbers; or (d) nonconforming or non-Motorola branded housings, or parts, are excluded from coverage. Communication Services. Defects, damages, or the failure of...
- Page 55 FCC and IC regulations FCC Part l5 NOTE: This equipment has been tested and found to comply with the limits for a Class B digital device, pursuant to Part 15 of the Federal Communications Commission (FCC) rules. These limits are designed to provide reasonable protection against harmful interference in a residential installation.
- Page 56 WARNING Changes or modifications, to this equipment not expressively approved by the party responsible for compliance could void the user’s authority to operate the equipment. Industry Canada This device complies with Industry Canada licence-exempt RSS standard(s): Operation is subject to the following Two conditions:(1) this device may not cause interference, and (2) this device must accept any interference, including interference that may cause undesired operation of the device.
-
Page 57: Technical Specifications
10. Technical Specifications BABY UNIT Frequency WiFi 802.11b/g/n (2.4 GHz) FHSS GFSK 2.4 GHz - 2.4835 GHz C - 45 Operating Temperature Power Adapter Ten Pao International Ltd. S012BEU0500150 Input: 100-240V AC, 50/60Hz, 500mA; Output: 5.0V DC, 1500mA WARNING Use only with supplied power supply. Battery (built-in) MTOGL66 3.8V, 1255mAh Lithium-Ion Polymer,... - Page 58 PARENT UNIT Frequency 2.4 GHz to 2.4835 GHz Display 4.3" diagonal TFT LCD C - 45 Operating Temperature Brightness Control 8 steps Volume Control 8 steps + Off Power Adapter Ten Pao International Ltd. S012BEU0500150 Input: 100-240V AC, 50/60Hz, 500mA; Output: 5.0V DC, 1500mA WARNING Use only with provided power supply.
- Page 59 International LTD., official licensee for this product. MOTOROLA and the Stylized M logo are trademarks or registered trademarks of Motorola Trademark Holdings, LLC. and are used under license. Apple logo is trademark of Apple Inc., registered in the U.S. and other countries. App Store is a service mark of Apple Inc.
Need help?
Do you have a question about the MBP944CONNECT and is the answer not in the manual?
Questions and answers