Table of Contents
Advertisement
Quick Links
Advertisement
Table of Contents

Related Manuals for Unitech MT380-A9WE0G


Summary of Contents for Unitech MT380-A9WE0G
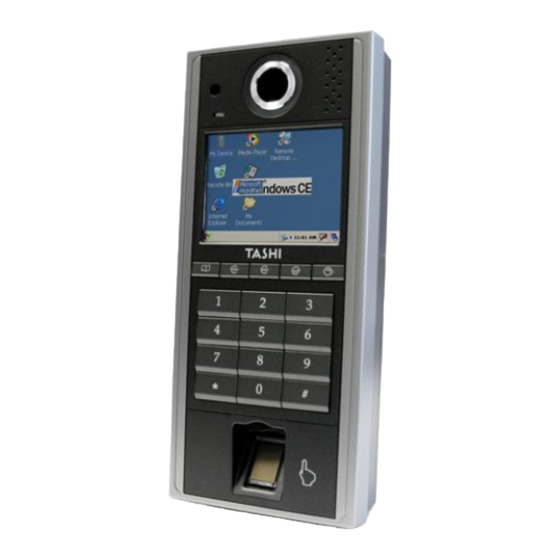
- Page 1 A Versatile Multi-Function Terminal MT380-A9WE0G User Manual 400628G Version 2.0...
-
Page 3: Preface
This includes elec- tronic or mechanical means, such as photocopying, recording, or information storage and retrieval systems. The material in this manual is subject to change without notice. © Copyright 2009 Unitech Electronics Co., Ltd. All rights reserved. Unitech TASHI Website: http:\\www.unitech-sbd.com Unitech Global Website: http:\\www.unitech-adc.com... -
Page 4: Canadian Compliance Statement
Canadian Compliance Statement This Class B Digital apparatus meets all requirements of the Canadian Interference-Causing Equipment Regulations. Cet appareil numérique de la classe B respecte les exigences du Règlement sur le matériel broilleur du Canada. European Conformity Statement Declaration of Conformity with Regard to the R&TTE 1999/5/EC and EMC 89/336/ EEC direc- tives. -
Page 5: Battery Charge Notice
70°C, however they may be depleted more rapidly at the higher temperature ranges. It is rec- ommended to store batteries within normal room temperature ranges. Warranty The following items are covered under Unitech Limited Warranty: • MT380 Versatile Multi-Function Terminal – 1-year limited warranty. -
Page 7: Table Of Contents
Table of Contents Preface About This Manual ..................i Regulatory Compliance Statements ..............i FCC Warning Statement ................. i Canadian Compliance Statement..............ii European Conformity Statement ..............ii RoHS Statement..................... ii Taiwan NCC Warning Statement ..............ii Notices....................... iii Battery Charge Notice ................... iii Storage and Safety Notice................ - Page 8 Using ActiveSync....................19 Additional Capabilities ................19 Requirements ................... 19 Installing Microsoft ActiveSync ..............19 Connecting the Device to Your Computer ............ 20 Setting up the Wireless Local Area Network Card ........22 Obtaining an IP Address via DHCP Server ..........22 Specifying an IP Address .................
-
Page 9: Getting Started
wChapter 1 Getting Started Introducing MT380 MT380 is a compact terminal device integrating intercom, security and home automation features, and communicates with central host security and T&A systems through standard Ethernet or WLAN net- works. The built-in CMOS digital camera, microphone, and audio speaker provides complete area security with a small footprint. -
Page 10: Setting Up Mt380
Before using MT380 for the first time, you need to charge it for about 12 hours. The battery begins charging as soon as you connect the power cable. Copyright 2009 Unitech Electronics Co., Ltd. All rights reserved. Unitech is a registered trademark of Unitech Electronics Co., Ltd. -
Page 11: Turning Mt380 On For The First Time
Chapter 1 Getting Started Turning MT380 on for the First Time After you have initially charged your device for about 12 hours, the device is ready to be used. You can now start up your device where you’ll calibrate the display, and set up the system time zone, date and time. -
Page 12: Utilizing Software
If you find necessary to get MTTool, please contact regional sales representatives or technical support. For more details, please refer to MTTool User Manual and JanitorLite User Manual respectively. Copyright 2009 Unitech Electronics Co., Ltd. All rights reserved. Unitech is a registered trademark of Unitech Electronics Co., Ltd. -
Page 13: Chapter 2 Using The Hardware
Chapter 2 Using the Hardware Using the Keypad MT380 contains five function keys and twelve numeric keys. The following table describes the function keys. Main Function Menu [F1]: Function Key Clock-in [F2]: Function Key Clock-out [F3]: Function Key Break-in [F4]: Function Key, or [ESC]: Performs the same function as tapping the button on the touch screen. -
Page 14: Entering Characters
Tap the title bar and drag the keyboard to the desired location. Closing the Keyboard Tap the keyboard icon and tap Hide Input Panel to close Windows CE keyboard. Copyright 2009 Unitech Electronics Co., Ltd. All rights reserved. Unitech is a registered trademark of Unitech Electronics Co., Ltd. -
Page 15: Using The Stylus
Chapter 2 Using the Hardware Using the Stylus CAUTION! Never use anything other than MT380 stylus on the screen. Using an object other than the stylus could cause permanent damage. Hold the stylus as you would hold a pencil. To make a choice from a menu, lightly tap the tip of the stylus on that choice. Double-tap to open programs. - Page 16 Double-tap the Flash Storage. Double-tap MT380 Test AP. Double-tap the RFID test folder. Double-tap the PDA_10 to open the demo program. Copyright 2009 Unitech Electronics Co., Ltd. All rights reserved. Unitech is a registered trademark of Unitech Electronics Co., Ltd.
- Page 17 Chapter 2 Using the Hardware Set the COM Port=2. Tap Connect. Tap a card type to activate the demo pro- gram you want to test. Tap Auto and bring the proximity card close to the sensor. The code will be read and displayed on the field below.
-
Page 18: Using The Finger Print Reader
MT380 has a built-in BIO ID Manager programs that enable users to test finger print verification. Double-tap the My Device icon on the Windows CE desktop. Double-tap the Flash Storage. Copyright 2009 Unitech Electronics Co., Ltd. All rights reserved. Unitech is a registered trademark of Unitech Electronics Co., Ltd. - Page 19 Chapter 2 Using the Hardware Double-tap MT380 Test AP folder. Double-tap the Fingerprint folder to open the demo program. Double-tap the BioIDMgr to open the demo program. Tap Open to activate the program.
- Page 20 10. Select a finger print id and tap Verify to start verifying the finger print. A pop-up window appears “Verify live fin- ger with slot 0 id ’123’?”. Tap Yes. Copyright 2009 Unitech Electronics Co., Ltd. All rights reserved. Unitech is a registered trademark of Unitech Electronics Co., Ltd.
- Page 21 Chapter 2 Using the Hardware 11. Put finger on the sensor according to the message shown on screen. A pop-up window appears with verification results: “Match” or “No match”. Tap OK. 12. Tap Identify to find finger print id info. Put finger on the sensor according to the message shown on screen.
-
Page 22: Using The Camera
MT380 has a built-in CameraDemo program that enable users to test the camera efficiency. Double-tap the My Device icon on the Windows CE desktop. Double-tap the Windows folder. Double-tap the Windows folder. Copyright 2009 Unitech Electronics Co., Ltd. All rights reserved. Unitech is a registered trademark of Unitech Electronics Co., Ltd. -
Page 23: Audio Demo Program
Chapter 2 Using the Hardware Double-tap CameraDemo to open the demo program. Tap Preview Start. A continuous image is displayed enabling users to capture image/audio/vedio. Tap Capture. Audio Demo Program The audio demo program enables you to test audio input (recording) and output (playback). Double-tap the My Device icon on the Windows CE desktop. - Page 24 – Tap Rec to record the voice – Tap Stop to finish recording – Tap Play to listen to the recording Copyright 2009 Unitech Electronics Co., Ltd. All rights reserved. Unitech is a registered trademark of Unitech Electronics Co., Ltd.
-
Page 25: Chapter 3 Data Communication
Chapter 3 Data Communication MT380 enables users to link to a host computer via RS232/485 cable or Ethernet cable for data com- munication. Ethernet Port Mini USB Port (Host) RS232/485 Port Establishing USB Connection Connect the provided mini USB cable to the terminal’s USB host port, and connect the other end to a USB peripheral, such as keyboard, mouse, memory card, and HID compliant device. -
Page 26: Establishing Wifi Connection
Select Open from the Authentication drop-down menu. Uncheck The key is provided automati- cally, and input the 10-digit Network key. Tap OK. Copyright 2009 Unitech Electronics Co., Ltd. All rights reserved. Unitech is a registered trademark of Unitech Electronics Co., Ltd. -
Page 27: Using Activesync
Chapter 3 Data Communication The new network is automatically con- nected. If not, tap Connect to connect the new network (UTE for example). Using ActiveSync Using Microsoft ActiveSync, you can synchronize and transfer information between your desktop com- puter and terminal. Additional Capabilities With ActiveSync, you can also: •... -
Page 28: Connecting The Device To Your Computer
Connect the provided full RS232 converter cable to the terminal’s full-duplex RS232 port, and then connect the other end to PC. Power on MT380. Copyright 2009 Unitech Electronics Co., Ltd. All rights reserved. Unitech is a registered trademark of Unitech Electronics Co., Ltd. - Page 29 Chapter 3 Data Communication ActiveSync starts automatically and configure the communication port to work with MT380. The New Partnership setup wizard automatically starts. NOTE: If ActiveSync doesn’t start automatically, click Pro- grams Microsoft Active- Sync. If a message appears indicat- ing that it is unable to detect a connection, click the Cancel button and manually configure...
-
Page 30: Setting Up The Wireless Local Area Network Card
To obtain the IP address via DHCP server, make sure a DHCP server is available in your LAN environ- ment. Settings Control Panel Network and Dial-up Connections. Copyright 2009 Unitech Electronics Co., Ltd. All rights reserved. Unitech is a registered trademark of Unitech Electronics Co., Ltd. -
Page 31: Specifying An Ip Address
Chapter 3 Data Communication Tap DM9ISA1. Tap the radio button next to Obtain an IP address via DHCP and then tap the OK. Specifying an IP Address If there is no DHCP server available/if you want to specify an IP address, assign IP address to each MT380 as follows: Settings Control Panel and... - Page 32 Primary WINS, and Secondary WINS. To avoid conflict with your LAN environ- ment, consult with your MIS department for the correct TCP/IP setting. Copyright 2009 Unitech Electronics Co., Ltd. All rights reserved. Unitech is a registered trademark of Unitech Electronics Co., Ltd.
-
Page 33: Chapter 4 Power System
Chapter 4 Power System Charging the Backup Battery for the First Time MT380 is equipped with a Lithium-Ion battery pack. After long storage periods, the unit may not power- on without an external power adapter due to battery discharge. In this case, connect MT380 to the power adapter and recharge the unit for about 12 hours to fully charge the battery. -
Page 34: Extending Battery Life
5, 10 and 30 minutes. Reducing CPU Speed Follow these instructions to reduce the CPU speed. Settings Control Panel double-tap CPU Speed. Copyright 2009 Unitech Electronics Co., Ltd. All rights reserved. Unitech is a registered trademark of Unitech Electronics Co., Ltd. -
Page 35: Adjusting The Backlight
The following section describes how to conserve power by adjusting the backlight screen settings. NOTE: MT380 screen contrast has been preset by Unitech for optimum performance. The color display’s backlight can be customized. There are two tabs: Battery Power and External Power. -
Page 36: Performing A Hardware Reset
Utilities Boot- Mode. Tap Warm Boot. Method 2: From Hardware Locate the function keys on MT380. Press F2 and F4 simultaneously. Copyright 2009 Unitech Electronics Co., Ltd. All rights reserved. Unitech is a registered trademark of Unitech Electronics Co., Ltd. -
Page 37: Performing A Cold Start
Chapter 4 Power System Performing a Cold Start A Cold Start will erase all added data and programs, but it will restore the device to the default factory settings. However, data and application programs stored in the Flash Storage will not delete. Always perform a Warm Start before attempting to use a Cold Start to correct a problem. -
Page 38: Appendix A System Specification
Appendix A System Specification Processing/Memory 520MHz Intel PXA270 Bulverde Memory SDRAM: 128 MB Flash ROM: 64 MB Microsoft Windows CE 5.0 Keypad 17-key (numeric and function keys) Display 3.5” QVGA (240 x 320) Pixels Backlight Touch-screen, TFT-LCD Communication Full RS232 support (Optional Housing 9pin to D-Sub 9pin cable) Half RS232 support (Optional RJ45 to D-Sub 9pin cable)/ Half RS485 support (Optional RS485+, RS485-) *RS232/RS485 either one by S2 switch selection... -
Page 39: Appendix B Worldwide Support
Worldwide Support Unitech’s professional support team is available to quickly answer questions or technical-related issues. Should an equipment problem occur, please contact the nearest Unitech regional service repre- sentative. For complete contact information please visit the Web sites listed below:...
Need help?
Do you have a question about the MT380-A9WE0G and is the answer not in the manual?
Questions and answers