Table of Contents
Advertisement
Quick Links
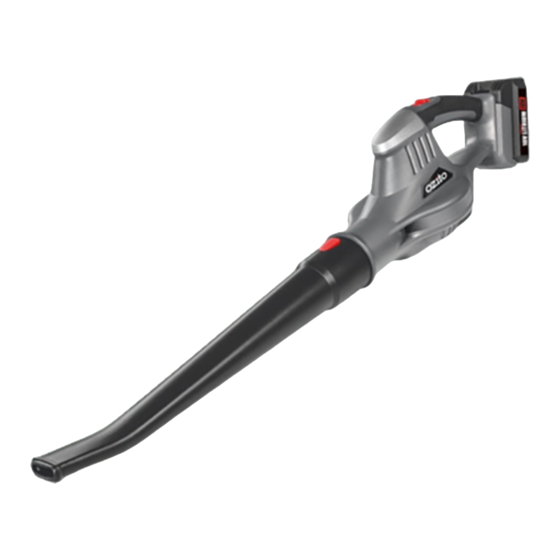
CorDless
Blower
18V lithium Ion
INsTrUCTIoN MANUAl
sPeCIFICATIoNs
Voltage:
18V
Battery:
1.5Ah Li-Ion
Charge Time:
3-5 Hours
No Load Speed:
12,000/min
Max. Air Speed:
190km/hour
Weight:
2.8kg
ozito.com.au
IN ORDER TO MAKE A CLAIM UNDER THIS
WARRANTY YOU MUST RETURN THE PRODUCT
TO YOUR NEAREST BUNNINGS WAREHOUSE WITH
YOUR BUNNINGS REGISTER RECEIPT. PRIOR TO
RETURNING YOUR PRODUCT FOR WARRANTY
PLEASE TELEPHONE OUR CUSTOMER SERVICE
HELPLINE:
Australia 1800 069 486
New Zealand 0508 069 486
TO ENSURE A SPEEDY RESPONSE PLEASE
HAVE THE MODEL NUMBER AND DATE OF
PURCHASE AVAILABLE. A CUSTOMER SERVICE
REPRESENTATIVE WILL TAKE YOUR CALL
AND ANSWER ANY QUESTIONS YOU MAY
HAVE RELATING TO THE WARRANTY POLICY
OR PROCEDURE.
OZITO
Australia/New Zealand (Head Office) 1-23 Letcon Drive, Bangholme, Victoria, Australia 3175.
WARRANTY
The benefits provided under this warranty are in addition
to other rights and remedies which are available to you at law.
Our goods come with guarantees that cannot be excluded
at law. You are entitled to a replacement or refund for a major
failure and for compensation for any other reasonably foreseeable
loss or damage. You are also entitled to have the goods repaired
or replaced if the goods fail to be of acceptable quality and the
failure does not amount to a major failure.
Generally you will be responsible for all costs associated with
a claim under this warranty, however, where you have suffered
any additional direct loss as a result of a defective product you
may be able to claim such expenses by contacting our customer
service helpline above.
3 YEAR REPLACEMENT WARRANTY
Your product is guaranteed for a period of 36 months from
the original date of purchase and is intended for DIY (Do It
Yourself) use only. If a product is defective it will
be replaced in accordance with the terms of this warranty. Lithium
Ion batteries are covered by a 12 month warranty. Warranty
excludes consumable parts, for example: blower tube.
WARNING
The following actions will result in the warranty being void.
• If the tool has been operated on a supply voltage other
than that specified on the tool.
• If the tool shows signs of damage or defects caused
by or resulting from abuse, accidents or alterations.
• Failure to perform maintenance as set out within the
instruction manual.
• If the tool is disassembled or tampered with in any way.
• Professional, industrial or high frequency use.
wHAT's IN THe BoX
Cordless Blower
Cordless Line Trimmer
Cordless Hedge Trimmer
Battery
Battery
Charger
Pack
OBLTHTC-018
0317
Advertisement
Table of Contents

Subscribe to Our Youtube Channel
Related Manuals for Ozito OBLTHTC-018


Summary of Contents for Ozito OBLTHTC-018
- Page 1 Battery Battery Charger Pack OBLTHTC-018 WARRANTY The benefits provided under this warranty are in addition IN ORDER TO MAKE A CLAIM UNDER THIS to other rights and remedies which are available to you at law. WARRANTY YOU MUST RETURN THE PRODUCT...
-
Page 2: Know Your Product
KNow YoUr ProDUCT seTUP & PrePArATIoN CORdLESS BLOWER 1. ASSEMBLY 1. Blower tube 4. Sure grip handle 2. Blower tube release 5. Air intake vent Connecting the blow tube 3. On/off switch WARNING! ALWAYS ENSURE ThE BLOWER IS dISCONNECTEd fROM ThE BATTERY dURING ASSEMBLY ANd/OR MAINTENANCE. -
Page 3: Battery Charging
2. BATTERY CHARGING Charging the lithium ion battery Battery Charge Indicator The purchased battery is Allow at least 3 hours of charge time before initial use of the blower. equipped with a battery Charge the battery pack only with the charger provided. indicator to show the state of The battery should be charged in a cool dry place. -
Page 4: Operation
NOTE. Avoid collisions with hard objects which could damage your machine. WARNING! dO NOT SWITCh ThE MAChINE ON IN ENCLOSEd OR POORLY vENTILATEd SPACES OR IN ThE PRESENCE Of fLAMMABLE ANd/OR ExPLOSIvE LIqUIdS, GASES ANd POWdERS. OBLTHTC-018... -
Page 5: Description Of Symbols
No lubrication is necessary as the motor is equipped with lifetime- lubricated bearings. Note: Ozito Industries will not be responsible for any damage or injuries caused by the repair of the tool by an unauthorised person or by mishandling of the tool. -
Page 6: Electrical Safety
Replace the extension lead if damaged or defective. Note: The supply of 230V and 240V on Ozito tools are interchangeable for Australia and New Zealand. When using an extension lead on a reel, always unwind the lead completely. Use of an extension lead not suitable for the power input of the tool or which is damaged or defective may result in a risk of fire and electric shock. - Page 7 3-5 Hours Cordless Hedge Trimmer No Load Speed: 8,500/min Max. Width of Cut: 250mm Weight: 2.4kg ozito.com.au Battery Battery Charger Pack OBLTHTC- 018 WARRANTY IN ORDER TO MAKE A CLAIM UNDER THIS The benefits provided under this warranty are in addition to other rights and remedies which are available to you at law.
- Page 8 KNOW YOUR PRODUCT SETUP & PREPARATION CORDLESS GRASS TRIMMER 1. Tree/Flower Guard 8. Battery 1. ASSEMBLY 2. Cutting Head 9. Blade 3. Telescopic Shaft 10. Blade Holder 4. Shaft Adjustment Lock 11. Safety Guard CAUTION! ENSURE THE TOOL IS OFF & THE BATTERY REMOVED BEFORE PERFORMING ANY OF THE 5.
-
Page 9: Battery And Charging
2. BATTERY & CHARGING Adjustable handle Charging the lithium ion battery Allow at least 3 hours of charge time before initial use of the grass 1. Fit the Adjustable Handle trimmer. Charge the battery pack only with the charger provided. onto the shaft of the grass The battery should be charged in a cool dry place. -
Page 10: Controls And Operation
OPERATION 3. CONTROLS & OPERATION Fitting the battery into the grass trimmer. Battery Charge Indicator 1. Align the ribs of the battery with The purchased battery is the recess behind the handle. equipped with a battery indicator to show the state of 2. - Page 11 4. TRIMMING & EDGING Trimming Adjusting the height 1. Before inserting the battery, extend The Telescopic Shaft can be adjusted the edging guide to prevent the to suit different user heights. cutting head from getting too close to an object such as a tree trunk or 1.
-
Page 12: Trobleshooting
MAINTENANCE 5. MAINTENANCE 6. TROBLESHOOTING WARNING! ALWAYS ENSURE THE TOOL HAS Problem Cause Remedy COMPLETELY STOPPED AND THE BATTERY IS REMOVED Trimmer is Possible clogging Clean the cutter head of any grass. PRIOR TO ANY MAINTENANCE. not starting Battery is low in Charge battery Attaching a Blade charge... - Page 13 Spare parts can be ordered from the Special Orders Desk at your local Bunnings Warehouse. For further information, or any parts not listed here, visit www.ozito.com.au or contact Ozito Customer Service: Australia 1800 069 486 New Zealand 0508 069 486 E-mail: enquiries@ozito.com.au...
- Page 14 The electric motor has been designed for 230V and 240V only. Always check that the power supply corresponds to the voltage on the rating plate. Note: The supply of 230V and 240V on Ozito tools are interchangeable for Australia and New Zealand. This tools charger is double insulated in accordance with AS/NZS 60745-1;...
- Page 15 Battery Battery Charger Pack OBLTHTC-018 WARRANTY IN ORDER TO MAKE A CLAIM UNDER THIS The benefits provided under this warranty are in addition to other rights and remedies which are available to you at law. WARRANTY YOU MUST RETURN THE PRODUCT...
- Page 16 KNOW YOUR PRODUCT SETUP & PREPARATION CORDLESS HEDGE TRIMMER 1. ASSEMBLY 1. Impact Guard 5. Front Handle 2. Dual Action Cutting Blades 6. Lock-off Switch CAUTION! ENSURE THE TOOL IS OFF & THE BATTERY 3. Safety Guard 7. Sure Grip Handle REMOVED BEFORE PERFORMING ANY OF THE 4.
- Page 17 2. BATTERY CHARGING Battery Charge Indicator Charging the lithium ion battery The purchased battery is Allow at least 3 hours of charge time before initial use of the hedge equipped with a battery trimmer. Charge the battery pack only with the charger provided. indicator to show the state of The battery should be charged in a cool dry place.
- Page 18 OPERATION 4. STARTING/STOPPING 3. INSERTING AND REMOVING THE BATTERY Inserting the Battery into the hedge trimmer WARNING! ALWAYS KEEP BOTH HANDS ON THE HEDGE TRIMMER HANDLES. NEVER HOLD SHRUBS WITH ONE HAND AND OPERATE THE 1. Align the ribs of the battery with HEDGE TRIMMER WITH THE OTHER.
-
Page 19: General Maintenance
This may cause Note: Ozito Industries will not be responsible for any damage or injuries caused overload and will give unsatisfactory cutting results. by the repair of the trimmer by an unauthorised person or by mishandling of the trimmer. -
Page 20: Blade Maintenance
4. Remove the hedge trimmer from the vise and insert the battery pack. Note: Ozito Industries will not be responsible for any damage or injuries Restart it and stop it to expose the caused by repair of the tool by an unauthorised person or mishandling unsharpened edges of the blade or mistreatment of the tool. - Page 21 Spare parts can be ordered from the Special Orders Desk at your local Bunnings Warehouse. For further information, or any parts not listed here, visit www.ozito.com.au or contact Ozito Customer Service: Australia 1800 069 486 New Zealand 0508 069 486 E-mail: enquiries@ozito.com.au...
-
Page 22: Hedge Trimmer Safety Warnings
ELECTRICAL SAFETY WARNING! If the supply cord is damaged, it must be replaced by an electrician or a power tool repairer in order to avoid When using mains-powered tools, basic safety precautions, including the a hazard. following, should always be followed to reduce risk of fire, electric shock, personal injury and material damage. Note: Double insulation does not take the place of normal safety precautions when operating this tool.
Need help?
Do you have a question about the OBLTHTC-018 and is the answer not in the manual?
Questions and answers