
Related Manuals for SHOWTEC Net-2


Summary of Contents for SHOWTEC Net-2
- Page 1 MANUAL ENGLISH Net-2 Install Order code: 50816 Highlite International B.V. – Vestastraat 2 – 6468 EX – Kerkrade – the Netherlands...
-
Page 2: Table Of Contents
Installation ................................... 6 Setup and Operation ................................ 7 Setup ....................................7 Setup Net-2 Install with Laptop/PC ........................7 Setup Net-2 Install with Lighting Controller ......................8 Connecting to a Network ............................9 Art-Net Settings ................................9 sACN Settings ................................9 How to Make a Data Cable ............................ -
Page 3: Warning
Save the carton and all packing materials. In the event that a fixture must be returned to the factory, it is important that the fixture be returned in the original factory box and packing. Your shipment includes: ● Showtec Net-2 Install ● User manual Safety Instructions Every person involved with the installation, operation and maintenance of this device has to: ●... -
Page 4: Operating Determinations
For adult use only. Device must be installed out of the reach of children. Never leave the unit running unattended. ● The user is responsible for correct positioning and operating of the Net-2 Install. The manufacturer will not accept liability for damages caused by the misuse or incorrect installation of this device. ●... -
Page 5: Connection With The Mains
Net-2 Install Connection with the mains Connect the device to the mains with the supplied AC power adapter. Always pay attention, that the right color cable is connected to the right place. International EU Cable UK Cable US Cable BROWN... -
Page 6: Description Of The Device
DMX-512 and vice versa. It is suitable for fixed installations. It allows for the transmission of a maximum of 1024 DMX channels over a single Ethernet cable. The Net-2 Install can be configured remotely via a web interface and can be powered using the Phoenix terminals or PoE (Power-over-Ethernet) technology. It supports Backup, Normal, Single, HTP and LTP merging options. -
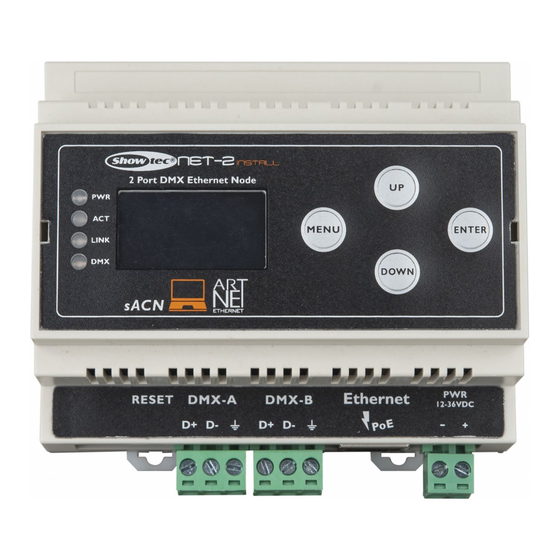
Page 7: Front
10) 12–36 V DC 2-pin Phoenix terminal power connector IN Installation Remove all packing materials from the Net-2 Install. Check that all foam and plastic padding is removed. Connect the Net-2 Install to a power outlet. Alternatively, the Net-2 Install can be powered from the Ethernet connection, using Power-over-Ethernet (PoE) technology. -
Page 8: Setup And Operation
PoE. Do not supply power before the whole system is set up and connected properly. 05) Set the IP address of the lighting controller. The default IP address of the Net-2 Install is 2.0.0.1. To change the IP address of the Net-2 Install, see 2. IP Mode on page 13. Refer to Connecting to a Network on page 9 for the correct network settings. -
Page 9: Setup Net-2 Install With Lighting Controller
PoE. Do not supply power before the whole system is set up and connected properly. 05) Set the IP address of the lighting controller. The default IP address of the Net-2 Install is 2.0.0.1. To change the IP address of the Net-2 Install, see 2. IP Mode on page 13. Refer to Connecting to a Network on page 9 for the correct network settings. -
Page 10: Connecting To A Network
Net-2 Install Connecting to a Network Art-Net Settings 01) Connect the device’s Ethernet connector to a network switch, using a CAT5/CAT6 cable. 02) Set the IP address of your computer/lighting controller to 2.x.x.x or 10.x.x.x, depending on the Art- Net settings. -
Page 11: Fixture Linking
Note: Use of 3-pin XLR audio cables for DMX data transmission might lead to signal degradation and unreliable operation of the DMX network. Operation The Net-2 Install can be configured to convert DMX signals into Art-Net or sACN and vice versa. The following configuration options are possible: ●... -
Page 12: Control Panel
Net-2 Install Control Panel A) OLED display MENU button C) UP button D) ENTER button DOWN button Fig. 06 ● Use the UP/DOWN buttons to navigate through the menus, to increase/decrease numeric values or to scroll through a set of characters. -
Page 13: Menu Overview
Net-2 Install Menu Overview Order code: 50816... -
Page 14: Main Menu Options
Net-2 Install Main Menu Options The Main Menu has the following options: Press the UP/DOWN buttons to navigate through the Main Menu. Press the ENTER button to open the submenu. Press the MENU button to return to the Main Menu. -
Page 15: Dhcp Ip
Net-2 Install 2.1. DHCP IP If you choose DHCP IP, the IP address of the device will be generated automatically by the network server. 2.2. Manual IP To configure the IP address of the device manually: 01) Press the UP/DOWN buttons to move the cursor respectively to the left or to the right on the display. -
Page 16: Set Dmx Port
DMX mode is set to HTP or LTP. 8. RESEND: The Net-2 Install can send the merged signal back onto the network as a new universe. This setting determines which universe to rebroadcast onto the network. This function is available when the network of the port is set between 0–127. -
Page 17: Set Display
Net-2 Install 5. Set Display In this menu you can set the orientation of the OLED display and the amount of time the backlight stays on after the last button is pressed on the control panel. 01) Press the UP/DOWN buttons to toggle between the 2 options: 1. -
Page 18: Settings Configuration Via Web Browser
Subnet 255.0.0.0). 03) Open your web browser and enter the IP address of the Net-2 Install in the address bar. For the current IP address of the device, check the Status Menu on the display of the device (see Status Menu on page 11). -
Page 19: Changing The Password
Do not lose your password. Once it is lost, it cannot be retrieved. Updating the Firmware The firmware of the Net-2 Install can be updated via the web interface. You can download the update from the product’s page on www.Showtec.info. -
Page 20: Troubleshooting
This troubleshooting guide is meant to help solve simple problems. If you are unable to determine the cause of the problem, do not open the unit, as this may damage the device and the warranty will be deemed void. Return the device to your Showtec dealer. Problem... -
Page 21: Product Specifications
Net-2 Install Product Specifications Model: Showtec Net-2 Install Power supply: 12–36 V DC, 500 mA or PoE (802.3af) Power consumption: Dimensions: 105 x 98 x 58 mm (LxWxH) Weight: 0,18 kg Operation and programming DMX: 2 universes (IN and/or OUT) -
Page 22: Dimensions
Net-2 Install Dimensions Order code: 50816... - Page 23 Net-2 Install Order code: 50816...
- Page 24 ©2020 Showtec...
Need help?
Do you have a question about the Net-2 and is the answer not in the manual?
Questions and answers