Advertisement
Quick Links
QUICK START GUIDE
For a full explanation of all features and instructions, please refer to the User's Guide.
(available for download from www.motorolastore.com).
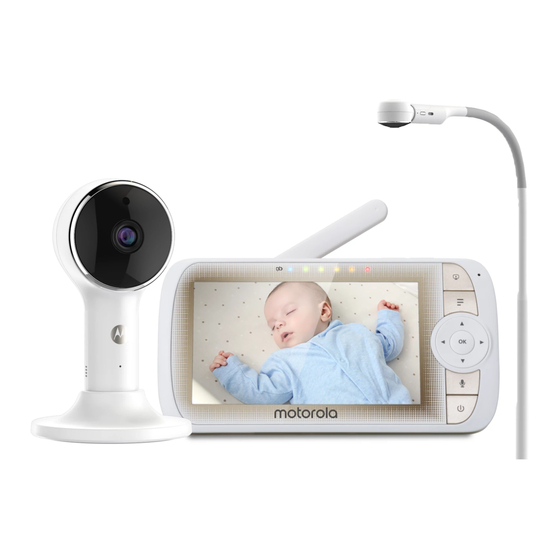
1. Contents Inside Box
MODELS:
LUX85CONNECT,
LUX85CONNECT-2,
LUX85CONNECT-3,
LUX85CONNECT-4
Strangulation hazard. Children have STRANGLED in cords. Keep this cord out
of the reach of children (more than 1 metre away). Do not remove the tags from
the AC Adapters. Only use the AC Adapters provided.
Baby Unit
Magnetic
(Camera)
Mount
Top Clamp
Bottom Clamp
WARNING:
Parent Unit
Power Adapters
Gooseneck
4-Poles with
stand base
UK EN
x 2
Quick Start
Guide
Advertisement

Related Manuals for Motorola LUX85CONNECT


Summary of Contents for Motorola LUX85CONNECT
- Page 1 QUICK START GUIDE UK EN For a full explanation of all features and instructions, please refer to the User’s Guide. (available for download from www.motorolastore.com). 1. Contents Inside Box MODELS: LUX85CONNECT, LUX85CONNECT-2, LUX85CONNECT-3, LUX85CONNECT-4 Baby Unit Magnetic Parent Unit Power Adapters...
-
Page 2: Setting Up Your Digital Video Baby Monitor
2. Setting up your Digital Video Baby Monitor A. Connecting the Power Supply for the Baby Unit • Insert the DC plug of the power adapter into the DC socket on the back of the Baby Unit. • Connect the other end of the power adapter to a suitable power socket. - Page 3 C. Connecting the Power Supply of the Parent Unit. • Connect the small plug of the power adapter to the parent unit and the other end to the power socket. Only use the enclosed adapter (5VDC/1000mA). • A rechargeable battery (Lithium ion battery 2000mAh) allows the parent unit to be used when not plugged into an power socket.
-
Page 4: Basic Operation Of The Keys
3. Basic operation of the keys Parent unit ON/OFF button Press and hold to switch the Parent Unit ON/OFF. Press to tilt the camera image upward or downward. UP/DOWN buttons Press to adjust menu setting when menu is active. LEFT/RIGHT Press to pan the camera image left or right. - Page 5 4. Setting up the Baby Unit for Wi-Fi® internet viewing A. Install Hubble Connected App. • Scan the QR code with your smart device and download Hubble Connected App from the App Store for iOS devices or from the Google Play™ Store for Android™ devices. •...
- Page 6 5. Installation of Cot mount A cot mount with cable management is included which mounts directly to most cots to allow better viewing. Assemble and install the cot mount using the following steps. • Join the 4 poles and the support base together as the diagram shown. (Fig. 1a , 1b) Fig.
- Page 7 • Unlock the knob then open the top clamp and bottom clamp, move the supporting pole into the clamps. (Fig. 3a) • Place then press the bottom clamp below against the lower rail, the stand base is spring loaded. Push the lower pole downward before closing the bottom clamp with knob. This is to allow the lower clamp to exerting clamping force on the lower rail (Fig.
- Page 8 • Install the flexible gooseneck extension into the top post. You will hear the click noise when all the sections are properly connected (Fig. 5a). • Insert the camera unit into the housing at the end of the flexible gooseneck extension, make sure the camera is magnetic mounted.
-
Page 9: General Information
(*Calls cost 7p per minute plus your telephone company's access charge) Consumer Products and Accessories Limited Warranty ("Warranty") Thank you for purchasing this Motorola branded product manufactured under license by Binatone Electronics International LTD ("BINATONE"). What Does this Warranty Cover? Subject to the exclusions contained below, BINATONE warrants that this Motorola branded product ("Product") or certified accessory ("Accessory") sold for use with this product that it... - Page 10 PROVIDED UNDER THIS EXPRESS LIMITED WARRANTY IS THE EXCLUSIVE REMEDY OF THE CONSUMER, AND IS PROVIDED IN LIEU OF ALL OTHER WARRANTIES, EXPRESS OR IMPLIED. IN NO EVENT SHALL MOTOROLA OR BINATONE BE LIABLE, WHETHER IN CONTRACT OR TORT (INCLUDING NEGLIGENCE) FOR DAMAGES IN EXCESS OF THE PURCHASE PRICE OF THE...
- Page 11 Product or Accessory to abnormal usage or conditions; or (d) other acts which are not the fault of MOTOROLA or BINATONE, are excluded from coverage. Use of Non-Motorola branded Products and Accessories. Defects or damage that result from the use of Non-Motorola branded or certified Products or Accessories or other peripheral equipment are excluded from coverage.
- Page 12 Download User Guide from website: www.motorolastore.com/support Manufactured, distributed or sold by Binatone Electronics International LTD., official licensee for this product. MOTOROLA and the Stylised M logo are trademarks or registered trademarks of Motorola Trademark Holdings, LLC. and are used under license. Apple logo is trademark of Apple Inc., registered in the U.S.
Need help?
Do you have a question about the LUX85CONNECT and is the answer not in the manual?
Questions and answers