Table of Contents
Advertisement
Available languages
Available languages
EN
FR
ETL LISTED
Conforms to
UL 60730-1
UL 60730-2-7
UL 60730-2-9
Certified to
CSA E60730-1
CSA E60730-2-7
CSA E60730-2-9
14122021 / Y05-0954
Harvia Xenio WiFi
CX004WIFI
Instructions for Installation and Use of Control Panel
Instructions d'installation et d'utilisation du
panneau de commande
CX004WIFI
Advertisement
Table of Contents

Related Manuals for Harvia Xenio CX004WIFI


Summary of Contents for Harvia Xenio CX004WIFI
- Page 1 Harvia Xenio WiFi CX004WIFI Instructions for Installation and Use of Control Panel Instructions d’installation et d’utilisation du panneau de commande CX004WIFI ETL LISTED Conforms to UL 60730-1 UL 60730-2-7 UL 60730-2-9 Certified to CSA E60730-1 CSA E60730-2-7 CSA E60730-2-9 14122021 / Y05-0954...
-
Page 2: Warning And Notes
Please read more instructions for installation, use and recycling from www.harvia.com. (Original user manual from manufacturer). READ THE WARNINGS AND MANUAL CAREFULLY BEFORE USING... - Page 3 • The device must be installed in such a way that the warning texts are easy to read after installation. • The device must not be installed in a wall recess, unless otherwise stated in the instructions. • Do not place the supply air vent so that the air flow cools the temperature sensor (see temperature sensor installation instructions!) •...
-
Page 4: Avertissements Et Remarques
à la personne en charge de son exploitation. Des instructions supplémentaires concernant l’installation, l’utilisation et le recyclage sont disponibles sur www.harvia.com. (Manuel d’utilisation d’origine du fabricant). LIRE ATTENTIVEMENT LES AVERTISSEMENTS ET LE MANUEL AVANT D’UTILISER LE PRODUIT ! - Page 5 • Ce produit ne doit pas être mis au rebut avec les déchets ménagers ordinaires. Pour recycler le produit, le déposer au centre de collecte local ou contacter le point de vente. • L’appareil doit être installé de sorte que les textes d’avertissement soient faciles à lire après installation.
-
Page 6: Table Of Contents
CONTENTS | TABLE DES MATIÉRS WARNING AND NOTES..............2 SYSTEM COMPONENTS..............7 TECHNICAL DATA................8 HARVIA XENIO WIFI..............9 1. Instructions for Installation..............9 2. Control Panel Indicator lights and buttons.......11 3. Instructions for Use................12 4. Remote Use....................17 5. MyHarvia Mobile Application............18 TROUBLESHOOTING...............20 GUARANTEE................36 AVERTISSEMENTS ET REMARQUES..........4 COMPOSANTS DU SYSTÈME............7... -
Page 7: System Components
SYSTEM COMPONENTS 1. Control panel 5. Door switch* 9. Heater / Combi-heater 13. Mobile device + MyHarvia 2. Data cabel 6. Temperature sensor 10. Heater and steamer 14. Main switch 3. Power unit 7. Humidity sensor 11. XE-heater 4. Remote switch* 8. -
Page 8: Technical Data
0-70°C / 32 - 158 °F Air humidity Max 99%, non-condensing Dimensions for flush mounting hole 67 x 96 mm / 2.6 x 3.8 inch Harvia Xenio WiFi CX004WIFI Remote Kit Compatibility Name: Xenio CX170 U1-15 Please check serial number from the Item No: product. -
Page 9: Harvia Xenio Wifi
The ability to control accessories depends on the connection options of the device being controlled. Xenio WiFi control panel can only be connected to compatible Harvia products. See the manual of controlled device for more device-specific information. - Page 10 INSTALLING THE CONTROL PANEL A) Surface mounting 1. Thread the data cable through the hole in the back cover. B) Flush mounting 2. Fasten the back cover to a wall with screws. 3. Push the data cable to the connector. 4.
-
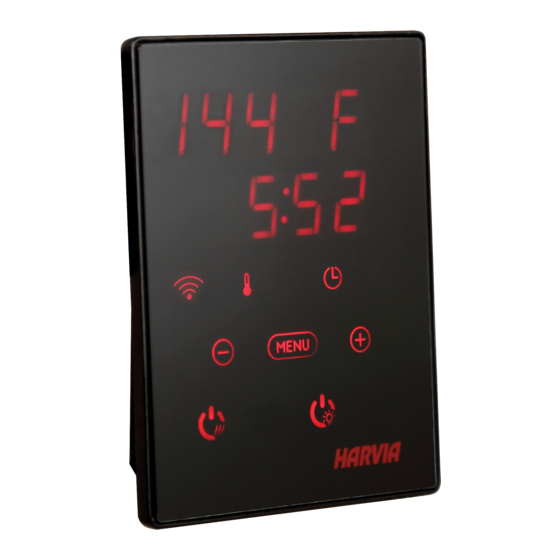
Page 11: Control Panel Indicator Lights And Buttons
2. CONTROL PANEL INDICATOR LIGHTS AND BUTTONS Display Indicator lights Menu and navigation Operating buttons buttons WiFi connection Temperature Humidity On-time Water level warning Value decrease* Mode change Value increase* * Press and hold to make the value change faster. Heater I/O Steamer I/O Lighting I/O... -
Page 12: Instructions For Use
When the device is connected to the power supply and the main switch ( further information » System components ) is switched on, the control unit is in standby mode and ready for use. I/O buttons’ background lights glow on the control panel. (Device = power unit / Harvia XE-heater) Heater and/or Steamer On: Heater and steamer are switched on and off independently. - Page 13 Start / stop the fan by pressing the control panel button. Safety switch Safety switch (e.g. Harvia SFE) refers to a device that is integrated or installed above the heater. It prevents the heater from heating up if, for example, a towel (or some other object that might cause a fire hazard) is placed on it.
- Page 14 BASIC SETTINGS Basic mode (heater and steamer on) The top row shows the sauna room temperature. The bottom row shows the humidity level (or remaining on time, if the steamer is not activated). Press the MENU button to open the settings menu. Sauna room temperature (shown if the heater is activated) The display shows the sauna room temperature setting.
- Page 15 ADDITIONAL SETTINGS Control unit standby I/O buttons’ background lights glow on the control panel. Open the settings menu by simultaneously pressing the buttons . Press for 5 seconds. Note! The buttons do not glow when the control unit is in standby mode. Setting the remote use The remote control setting can be changed with the buttons.
- Page 16 UL STD 875 CERTIFIED TO HL(S)11U3(Q) 10,5 kW CAN/CSA STD HARVIA OY, FINLAND 3159549 E60335-2-53-05 *Q = includes built-in contactor / contient le contacteur integré E1, E2, E3, E4, E5, E6 Press the MENU button to access the next setting.
-
Page 17: Remote Use
4. REMOTE USE Note! The sauna room and surroundings of the heater must always be checked before the heater is switched on again or it is switched on with the remote-control system. Remote use with the safety switch: The heater can be turned on remotely if the safety switch circuit is closed. -
Page 18: Myharvia Mobile Application
5. MYHARVIA MOBILE APPLICATION MyHarvia is a mobile application that allows you to remotely control the functions of Xenio WiFi control panel. With MyHarvia mobile app you can: • Turn the heater on and off. • Switch accessories on and off (lights, ventilation). •... - Page 19 3.2.3. MyHarvia main view 1. Device menu 2. Device settings 3. Timed start 4. Week clock 5. Adjusting sauna temperature 6. Current sauna temperature 7. Target temperature 8. Steamer ON / OFF 9. Adjusting the steamer 10. Functions ON / OFF 11.
-
Page 20: Troubleshooting
TROUBLESHOOTING STATUS MESSAGES SAFE Safety switch circuit is open Remove the object from atop the safety switch rESt Pause time active rc on Remote control activated Table 2a. Status messages If an error occurs, the heater and/or steamer power will cut off and the control panel will show an error message E(number), which helps troubleshooting the cause for the error. - Page 21 FACTORY RESET Control panel disfunction: In case no other means help, it is recommended to restore the factory settings. Instructions for restoring factory settings can also be found in the application.. When the control panel is in standby mode, press and hold the heater, lights, and fan buttons for 5 seconds.
-
Page 22: Données Techniques
Max 99 %, sans condensation Dimensions pour l’orifice 67 x 96 mm / 2.6 x 3.8 inch de montage affleurant Compatibilité de la télécommande Harvia Xenio WiFi CX004WIFI Name: Xenio CX170 U1-15 Veuillez vérifier le numéro de série du produit. Si le numéro de série du produit... -
Page 23: Harvia Xenio Wifi
HARVIA XENIO WIFI Le panneau de commande Harvia Xenio WiFi est conçu pour commander les appareils pour saunas Harvia : centre de contrôle, poêle électrique ou poêle combiné. Le panneau de commande permet également de commander des accessoires tels que l’éclairage et la ventilation du sauna. La possibilité... - Page 24 INSTALLATION DU PANNEAU DE COMMANDE A) Montage en saillie 1. Passer le câble de données à travers le trou de la plaque arrière. B) Montage affleurant 2. Fixer la plaque arrière à un mur avec des vis arrière. 3. Pousser le câble de données dans le connecteur 4.
-
Page 25: Témoins Lumineux Et Boutons Du Panneau De Commande
2. TÉMOINS LUMINEUX ET BOUTONS DU PANNEAU DE COMMANDE Écran Témoins Lumineux Menu Et Boutons De Boutons De Commande Navigation Connexion Wifi Température Humidité Durée De Avertissement De Fonctionnement Niveau D’eau Diminution De La Valeur* Changement De Mode Augmentation De La * Maintenir enfoncé... -
Page 26: Instructions D'utilisation
Composants du système) est activé, le centre de contrôle est en mode veille et prêt à l’emploi. Le rétroéclairage des boutons d’E/S s’allume sur le panneau de commande. (Appareil = bloc d’alimentation/ poêle Harvia XE) Démarrage du poêle et/ou de l’évaporateur : Il est possible de démarrer et d’éteindre le poêle et l’évaporateur de façon indépendante. - Page 27 Pour démarrer/arrêter le ventilateur, appuyer sur le bouton du panneau de commande. Commutateur de sécurité Un commutateur de sécurité (par ex. Harvia SFE) est un dispositif intégré dans le poêle ou installé au-dessus qui empêche le poêle de chauffer, par exemple si une serviette (ou tout autre objet pouvant déclencher un incendie) est posée dessus.
- Page 28 RÉGLAGES DE BASE Mode de base (poêle et évaporateur en marche) La ligne supérieure indique la température du sauna. La ligne inférieure indique le niveau d’humidité (ou la durée de fonctionnement restante si l’évaporateur n’est pas activé). Appuyer sur le bouton MENU pour ouvrir le menu de réglages. Température du sauna (indiquée si le poêle est activé) L’affichage indique le réglage de température du sauna.
- Page 29 RÉGLAGES SUPPLÉMENTAIRES Veille du centre de contrôle Le rétroéclairage des boutons d’E/S s’allume sur le panneau de commande. Ouvrir le menu de réglages en appuyant simultanément sur les boutons . Maintenir la pression pendant 5 secondes. Remarque ! Les boutons ne sont pas allumés lorsque le centre de contrôle se trouve en mode veille.
- Page 30 UL STD 875 C1, C2, C3, C4, C5 CERTIFIED TO HL(S)11U3(Q) 10,5 kW CAN/CSA STD HARVIA OY, FINLAND 3159549 E60335-2-53-05 *Q = includes built-in contactor / contient le contacteur integré D1, D2, D3, D4, D5 E1, E2, E3, E4, E5, E6 Appuyer sur le bouton MENU pour accéder au réglage suivant.
-
Page 31: Commande À Distance
4. COMMANDE À DISTANCE Toujours vérifier le sauna et les abords du poêle avant que l’appareil ne soit placé en mode veille par commande à distance ou programmation. Commande à distance avec le commutateur de sécurité: Le poêle peut être démarré à distance si le circuit du commutateur de sécurité... -
Page 32: Application Mobile Myharvia
5. APPLICATION MOBILE MYHARVIA MyHarvia est une application mobile qui permet de piloter à distance les fonctions du panneau de commande Xenio WiFi. Elle permet ainsi d’effectuer les opérations suivantes : • Démarrer et arrêter le poêle • Activer et désactiver les accessoires (éclairage, ventilation) •... - Page 33 3.2.3. Vue principale de MyHarvia 1. Menu de l’appareil 2. Réglages de l’appareil 3. Démarrage différé 4. Programmation hebdomadaire 5. Ajustement de la température du sauna 6. Température actuelle du sauna 7. Température cible 8. MARCHE/ARRÊT de l’évaporateur 9. Ajustement de l’évaporateur 10.
-
Page 34: Dépannage
DÉPANNAGE MESSAGES D’ÉTAT Le circuit du commutateur de SAFE Retirer l’objet placé sur le commutateur de sécurité sécurité est ouvert rESt Temps de pause actif rc on Commande à distance activée - Tableau 2a. Messages d’état. Si une erreur se produit, le poêle et/ou l’évaporateur est mis hors tension et le panneau de commande affiche un message d’erreur E (numéro), ce qui permet d’identifier la cause de cette erreur. - Page 35 RÉINITIALISATION AUX VALEURS D’USINE Dysfonctionnement du panneau de commande : Si rien d’autre ne permet de résoudre le problème, il est recommandé de rétablir les réglages d’usine. Les instructions de restauration des réglages d’usine sont également disponibles dans l’application. Quand le panneau de commande se trouve en mode veille, appuyer sur les boutons du poêle, de l’éclairage et du ventilateur pendant 5 secondes.
-
Page 36: Guarantee
• La garantie est annulée si le formulaire ci-dessous n’est pas rempli et renvoyé au fabricant ou à l’importateur dans les 15 jours suivant l’achat. La garantie s’applique uniquement à la première installation du produit et à l’acheteur d’origine. Harvia control unit model/ Modèle de centre de contrôle Harvia Model number/Numéro de modèle Date of purchase/Date d’achat Original purchaser/Acheteur d’origine...
Need help?
Do you have a question about the Xenio CX004WIFI and is the answer not in the manual?
Questions and answers