Table of Contents
Advertisement
Quick Links
Operating
instructions
Digital tank contents indicator
Version: 04.2021.0
ID: 900.000.0900
Copyright 2021 AFRISO-EURO-INDEX GmbH. All rights reserved.
DTA 20 E
Lindenstraße 20
74363 Güglingen
Telephone +49 7135 102-0
Service +49 7135 102-211
Telefax +49 7135 102-147
info@afriso.com
www.afriso.com
Advertisement
Table of Contents

Subscribe to Our Youtube Channel
Related Manuals for AFRISO DTA 20 E


Summary of Contents for AFRISO DTA 20 E
- Page 1 Operating instructions Digital tank contents indicator DTA 20 E Copyright 2021 AFRISO-EURO-INDEX GmbH. All rights reserved. Lindenstraße 20 74363 Güglingen Telephone +49 7135 102-0 Service +49 7135 102-211 Telefax +49 7135 102-147 info@afriso.com Version: 04.2021.0 www.afriso.com ID: 900.000.0900...
- Page 2 About these operating instructions About these operating instructions These operating instructions describe the digital tank contents indicator "DTA 20 E" (also referred to as "product" in these operating instructions). These operating instructions are part of the product. • You may only use the product if you have fully read and understood these operating instructions.
-
Page 3: Information On Safety
Take into account the consequences of installing or integrating the product into a system or a plant. DTA 20 E... - Page 4 Personal protective equipment Always wear the required personal protective equipment. When performing work on and with the product, take into account that hazards may be present at the installation site which do not directly result from the product itself. DTA 20 E...
-
Page 5: Transport And Storage
Use the original packaging when transporting the product. • Store the product in a clean and dry environment. • Verify that the product is protected against shocks and impact during trans- port and storage. Failure to follow these instructions can result in equipment damage. DTA 20 E... -
Page 6: Product Description
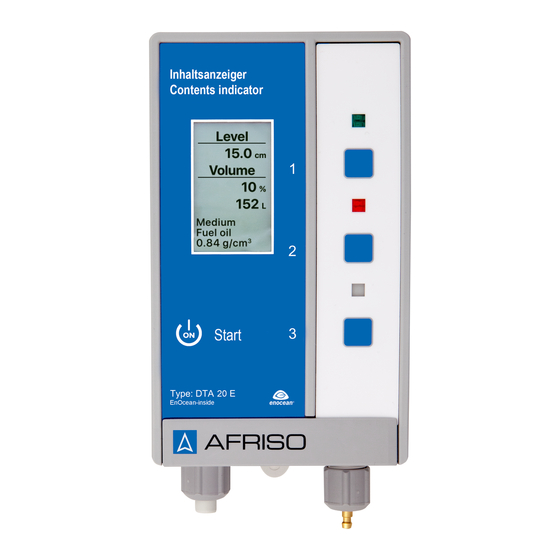
C. Upper key 1 (End/Settings) D. No function E. Centre key 2 (Info/Parameters) F. No function G. Lower key 3 (Start) H. Connection for measuring line I. Blind plug J. Battery compartment (for 9 V monobloc battery) DTA 20 E... - Page 7 Product description Dimensions 65 mm 100 mm 60 mm DTA 20 E...
- Page 8 G2 a x G1½ female Bag of accessories (not shown) with D. PVC hose (100 cm) two screws and two dowels for wall E. PVC hose (15 cm) with hose con- mounting nector (for connection to metal pipes) DTA 20 E...
- Page 9 Establish wireless connection (learn telegram to gateway) • Medium (fuel oil, water and variable) • Tank shape (linear, spherical and cylindrical horizontal) • Liquid level at 100 % (in cm) • Volume (in litres) • Alarm (percentage) DTA 20 E...
- Page 10 Push-to-Read level measurement Display Multi-coloured, backlit graphical dis- play (30 x 50 mm) - White = Operation - Red = Alarm - Green = Parameterisation Volume indication in litres (5 digits), in % and liquid level in cm DTA 20 E...
- Page 11 Fuel oil Max. 4.0 m Water Max. 3.5 m Variable Depends on density EnOcean® wireless Frequency 868.3 MHz Transmission power Max. 10 mW Range See chapter "Information on EnOcean® wireless" EnOcean® Equipment Profile (EEP) Generic Profile (GP) DTA 20 E...
- Page 12 2. Press the centre key 4 times, until the menu "Radio Learn" is dis- played. 3. Press the upper key 1 x. - The product sends a Learn tele- gram (LRNTEL). - The product is now connected to the AFRISOhome gateway. DTA 20 E...
-
Page 13: Electrostatic Discharge
The product may only be opened at the side at the battery compartment. • Only open the product to insert or replace the 9 V monobloc battery. Failure to follow these instructions can result in equipment damage. DTA 20 E... - Page 14 2. Connect the 9 V monobloc bat- tery. 3. Push the 9 V monobloc battery into the battery compartment (ver- ify correct mounting position). 4. Close the cover of the battery compartment. DTA 20 E...
- Page 15 1. Lower the bottom part (H) to the bottom of the tank. 2. Tighten the screw connection (F) so that the measuring line can no longer be moved. 3. Use the enclosed nail cable clips to fasten the measuring line (G), if necessary. DTA 20 E...
- Page 16 The measuring line (PVC) may harden over time if it is in contact with fuel oil. Hardening of the measuring line does not interfere with the operation of the product. DTA 20 E...
- Page 17 1. Check whether the plastic flange of the battery tank has a hole Ø 10 mm to Ø 10.5 mm which is closed by means of a blind plug. 2. Remove the blind plug. 3. Push the weight (C) and the hose (C) through the hole. DTA 20 E...
- Page 18 2. Press the upper or the lower key to set the required language. 3. Press the centre key 1 x. - The selected language is set and the display changes to the next menu setting. DTA 20 E...
- Page 19 Changing the language 1. Hold down the upper key until the product switches to the language selection. 2. Press the upper or the lower key to set the required language. 3. Switch to the next menu item. DTA 20 E...
- Page 20 The product is factory-set to a measuring interval of 24 hours. A higher measuring interval can decrease the service life of the battery. 6.2.5 Radio Learn You can connect the product to the AFRISOhome gateway (see "Con- necting the product to an AFRISOhome gateway"). DTA 20 E...
- Page 21 • Variable: Depends on density Adjusting a higher liquid level (for example 450 cm): 1. Press the upper or lower key (individual steps) or hold down the corre- sponding key until you have set the required liquid level. DTA 20 E...
- Page 22 1. Press the upper or lower key (individual steps) or hold down the corre- sponding key until you have set the required tank volume. 6.2.11 Adjusting the alarm You can select the following values: • OFF • 0 % - 100 % DTA 20 E...
- Page 23 - The battery status and software information are displayed. 3. Hold down the centre key. - The display changes to the first parameters menu. - The parameters entered can be changed again. Start (C) Starting a measurement. DTA 20 E...
-
Page 24: Operation
1. Press the lower key to switch on the product. - The product automatically starts a measurement. - The measured values are dis- played after a few seconds. If the measuring line is longer than 20 m perform a second measurement. DTA 20 E... - Page 25 - The display changes to normal mode. Switching off the product 1. Press the upper key 1 x to switch off the product. If no key is pressed for an extended period of time, the product switches off automatically. DTA 20 E...
-
Page 26: Maintenance
"Commissionin Incorrect tank shape g the product") entered Check the measuring Measuring line does not line in the tank reach down to the tank bottom Leak in measuring line Other malfunctions Contact the AFRISO service hotline DTA 20 E... -
Page 27: Decommissioning / Disposal
3. Dispose of the product and of the battery separately. Returning the device Get in touch with us before returning your product (service@afriso.de). Warranty See our terms and conditions at www.afriso.com or your purchase contract for information on warranty. DTA 20 E... -
Page 28: Spare Parts And Accessories
Failure to follow these instructions can result in equipment damage. Product Product designation Part no. Figure Digital tank contents indica- 52146 tor DTA 20 E with Pneumo- fix type 2 Digital tank contents indica- 52156 tor DTA 20 E Spare parts and accessories Product designation Part no. - Page 29 Wireless technology • AN001 • AN102 • AN103 14.3 Features of the EnOcean® technology Visit www.afrisohome.de for documents on EnOcean® technologies. A variety of videos on AFRISO products can also be found on the AFRISO YouTube channel. DTA 20 E...
- Page 30 Appendix Appendix 15.1 EU Declaration of Conformity DTA 20 E...
Need help?
Do you have a question about the DTA 20 E and is the answer not in the manual?
Questions and answers