Table of Contents
Advertisement
Available languages
Available languages
Quick Links
Advertisement
Table of Contents

Subscribe to Our Youtube Channel
Related Manuals for AFRISO DTA 20 E


Summary of Contents for AFRISO DTA 20 E
- Page 1 Betriebsanleitung Digitaler Tankinhaltsanzeiger DTA 20 E Copyright 2019 AFRISO-EURO-INDEX GmbH. Alle Rechte vorbehalten. Lindenstraße 20 74363 Güglingen Telefon +49 7135 102-0 Service +49 7135 102-211 Telefax +49 7135 102-147 info@afriso.com Version: 11.2019.0 www.afriso.com ID: 900.000.0900...
-
Page 2: Über Diese Betriebsanleitung
Über diese Betriebsanleitung Über diese Betriebsanleitung Diese Betriebsanleitung beschreibt den Digitalen Tankinhaltsanzeiger „DTA 20 E“ (im Folgenden auch „Produkt“). Diese Betriebsanleitung ist Teil des Produkts. • Sie dürfen das Produkt erst benutzen, wenn Sie die Betriebsanleitung vollständig gelesen und verstanden haben. -
Page 3: Bestimmungsgemäße Verwendung
Ihnen vorgesehene Verwendung geeignet ist. Berücksichtigen Sie dabei mindestens folgendes: • Alle am Einsatzort geltenden Bestimmungen, Normen und Sicherheits- vorschriften • Alle für das Produkt spezifizierten Bedingungen und Daten • Die Bedingungen der von Ihnen vorgesehenen Anwendung DTA 20 E... -
Page 4: Informationen Zur Sicherheit
Erfahrungen in der Lage sein, mögliche Gefährdungen vorherzusehen und zu erkennen, die durch den Einsatz des Produkts entstehen können. Den Fachkräften müssen alle geltenden Bestimmungen, Normen und Sicherheitsvorschriften, die bei Arbeiten an und mit dem Produkt beachtet werden müssen, bekannt sein. DTA 20 E... -
Page 5: Transport Und Lagerung
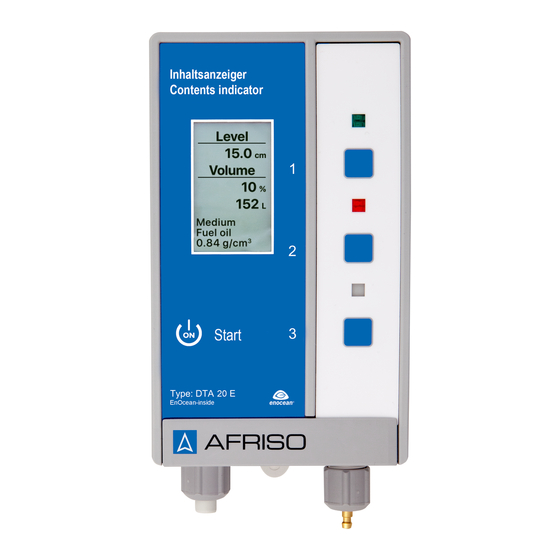
Benutzen Sie für den Transport die Originalverpackung. • Lagern Sie das Produkt nur in trockener, sauberer Umgebung. • Stellen Sie sicher, dass das Produkt bei Transport und Lagerung stoßge- schützt ist. Nichtbeachtung dieser Anweisungen kann zu Sachschäden führen. DTA 20 E... - Page 6 C. Obere Taste 1 (Ende/Einstellun- gen) D. Keine Funktion E. Mittlere Taste 2 (Info/Parameter) F. Keine Funktion G. Untere Taste 3 (Start) H. Anschluss für Messleitung I. Blindstopfen J. Anschlussfach für Netzteil / Bat- teriefach (für 9V-Blockbatterie) DTA 20 E...
- Page 7 Produktbeschreibung Abmessungen 65 mm 100 mm 60 mm DTA 20 E...
- Page 8 G1½ a x G1 i, G2 a x G1½ i I. Schlauchadapter D. PVC-Schlauch (100 cm) E. PVC-Schlauch (15 cm) mit Zubehör-Beutel (ohne Abbildung) mit Schlauchverbinder (zum zwei Schrauben und zwei Dübeln für Anschluss an Metallleitungen) Wandbefestigung DTA 20 E...
- Page 9 Tankform (Linear, Kugel und liegender Zylinder) • Füllhöhe bei 100 % (in cm) • Volumen (in Liter) • Alarm (in Prozent) Wenn die untere Taste gedrückt wird oder der Zeitpunkt des eingestellten Messintervalls erreicht ist, misst das Produkt den Füllstand im Tank. DTA 20 E...
- Page 10 Displays rot. Das Produkt sendet die Messergebnisse über das integrierte EnOcean®- Funkmodul an das AFRISOhome Gateway. Zulassungsdokumente, Bescheinigungen, Erklärungen Das Produkt entspricht: • EMV-Richtlinie (2014/30/EU) • Niederspannungsrichtlinie (2014/35/EU) • Radio Equipment Directive, RED (2014/53/EU) • RoHS-Richtlinie (2011/65/EU) DTA 20 E...
- Page 11 % und Füllhöhe in cm Temperatureinsatzbereich Umgebung 0/50 °C Lagerung -20/65 °C Medium 0/50 °C Spannungsversorgung Nennspannung 9V-Netzteil oder 9V-Blockbatterie (optional) Messbereich (Tankhöhe) Heizöl Max. 4,0 m Wasser Max. 3,5 m Variabel abhängig von der Dichte DTA 20 E...
- Page 12 +A1:2010 + A12:2011 + A2:2013 EN 62479:2010 EnOcean® -Funk Frequenz 868,3 MHz Sendeleistung Max. 10 mW Reichweite Siehe Kapitel "Informationen zu EnO- cean®-Funk" EnOcean® Equipment Profile Generic Profile (GP) (EEP) Elektrische Sicherheit Schutzart IP 20 (EN 60529) DTA 20 E...
-
Page 13: Montage
2. Drücken Sie die mittlere Taste 4 x, bis das Menü „Funk Lernen“ angezeigt wird. 3. Drücken Sie die obere Taste 1 x. - Das Produkt sendet ein Lern- Telegramm (LRNTEL). - Das Produkt ist mit dem AFRI- SOhome Gateway verbunden. DTA 20 E... - Page 14 1. Befestigen Sie die obere Schraube an der Wand. 2. Hängen Sie das Auswertegerät ein. 3. Richten Sie das Auswertegerät aus. 4. Befestigen Sie das Auswertegerät an der Wand mit einer Schraube an der unteren Lasche. DTA 20 E...
- Page 15 Öffnen Sie das Produkt nur, um das Netzteil anzuschließen oder eine 9V- Blockbatterie einzulegen. Nichtbeachtung dieser Anweisungen kann zu Sachschäden führen. 5.3.1 Netzteil anschließen Das Netzteil ist werksseitig nicht an das Auswertegerät angeschlossen. 1. Öffnen Sie mit einem Schlitz- schraubendreher den Deckel des Batteriefachs. DTA 20 E...
- Page 16 Montage 2. Schließen Sie das Netzteil mit dem Batterieclip (A) an. 3. Schieben Sie das Kabel ein- schließlich Schrumpfschlauch (B) in das Batteriefach. 4. Schließen Sie den Deckel (C) des Batteriefachs. DTA 20 E...
- Page 17 (nicht im Lieferumfang). 1. Öffnen Sie mit einem Schlitz- schraubendreher den Deckel des Batteriefachs. 2. Schließen Sie die 9V-Blockbatte- rie an. 3. Schieben Sie die 9V-Blockbatterie in das Batteriefach (Einbaulage beachten). 4. Schließen Sie den Deckel des Batteriefachs. DTA 20 E...
- Page 18 1. Lassen Sie das Fußteil (H) bis auf den Tankboden herunter. 2. Ziehen Sie die Verschraubung (F) so fest, dass sich die Messleitung nicht mehr verschieben lässt. 3. Befestigen Sie, falls nötig, die Messleitung (G) mit den beigeleg- ten Nagelschellen. DTA 20 E...
- Page 19 Wenn Sie eine vorhandene Messleitung nutzen, stellen Sie sicher, dass die Messleitung bis zum Tankboden reicht. Die Messleitung (PVC) kann bei Kontakt mit Heizöl mit der Zeit hart werden. Eine Verhärtung der Messleitung beeinträchtigt die Funktion des Produkts nicht. DTA 20 E...
- Page 20 Gewinde B. Schlauch C. Gewicht Ø 9 mm 1. Prüfen Sie, ob der Kunststoffflansch des Batterietanks über eine mit einem Blindstopfen verschlossenen Bohrung Ø 10 mm bis Ø 10,5 mm verfügt. 2. Entfernen Sie den Blindstopfen. DTA 20 E...
- Page 21 2. Drücken Sie die obere oder untere Taste, um die gewünschten Spra- che einzustellen. 3. Drücken Sie die mittlere Taste 1 x. - Die eingestellte Sprache wird übernommen und das Display wechselt in die nächste Menü- einstellung. DTA 20 E...
-
Page 22: Sprache Auswählen
Sprache wechseln 1. Halten Sie die obere Taste so lange gedrückt, bis das Produkt zur Sprachauswahl wechselt. 2. Drücken Sie die obere oder untere Taste, um die gewünschten Spra- che einzustellen. 3. Wechseln Sie in den nächsten Menüpunkt. DTA 20 E... -
Page 23: Kontrast Einstellen
1. Drücken Sie die obere oder untere Taste (Einzelschritte) oder halten Sie die jeweilige Taste so lange gedrückt, bis Sie das gewünschte Messintervall eingestellt haben. 6.2.5 Funk lernen Sie können das Produkt mit dem AFRISOhome Gateway verbinden (siehe "Einlernen des EnOcean®-Funkmoduls"). DTA 20 E... - Page 24 • Liegender Zylinder 6.2.8 Durchmesser Wenn die Tankform Kugel oder liegender Zylinder gewählt wurde, öffnet sich das Menü „Durchmesser“. Sie können folgende Werte wählen: • Kugel: 0 - 576 cm • Liegender Zylinder: 0 - 800 cm DTA 20 E...
- Page 25 1. Drücken Sie die obere oder untere Taste (Einzelschritte) oder halten Sie die jeweilige Taste so lange gedrückt, bis Sie das gewünschte Tankvolumen eingestellt haben. 6.2.11 Alarm einstellen Sie können folgende Werte wählen: • AUS • 0 % - 100 % DTA 20 E...
- Page 26 - Der Batteriestatus und die Soft- wareinformationen des Produkts werden angezeigt. 3. Halten Sie die mittlere Taste gedrückt. - Das Display wechselt in das Parametermenü. - Die eingegebenen Parameter können erneut geändert werden. Start (C) Messung starten. DTA 20 E...
-
Page 27: Betrieb
1. Drücken Sie die untere Taste um das Produkt einzuschalten. - Das Produkt startet eine Mes- sung automatisch. - Nach wenigen Sekunden wer- den die Daten der Messung angezeigt. Wenn die Messleitung länger als 20 m ist, führen Sie eine zweite Messung durch. DTA 20 E... - Page 28 1 x. - Das Display wechselt in die Hauptanzeige. Produkt ausschalten 1. Drücken Sie die obere Taste 1 x, um das Produkt auszuschalten. Wenn längere Zeit keine Taste gedrückt wird, schaltet sich das Pro- dukt automatisch aus. DTA 20 E...
-
Page 29: Wartung
Wartung Wartung Wartungsintervalle Zeitpunkt Tätigkeit Bei Bedarf Optionale Batterie ersetzen Wartungstätigkeiten 1. Gehen Sie vor wie in Kapitel "Batterie einsetzen/anschließen" beschrie- ben. - Die gespeicherten Einstellungen gehen bei einem Batteriewechsel nicht verloren. DTA 20 E... - Page 30 Tankdaten (siehe Kapi- tel "Produkt in Betrieb Tankform falsch einge- nehmen") geben Prüfen Sie die Messlei- Messleitung reicht nicht tung im Tank bis zum Tankboden Messleitung ist undicht Sonstige Störungen Bitte wenden Sie sich an die AFRISO-Service Hotline DTA 20 E...
-
Page 31: Außerbetriebnahme Und Entsorgung
3. Entsorgen Sie das Produkt. Rücksendung Vor einer Rücksendung Ihres Produkts müssen Sie sich mit uns in Verbin- dung setzen. Gewährleistung Informationen zur Gewährleistung finden Sie in unseren Allgemeinen Geschäftsbedingungen im Internet unter www.afriso.com oder in Ihrem Kauf- vertrag. DTA 20 E... -
Page 32: Ersatzteile Und Zubehör
Verwenden Sie nur Original Ersatz- und Zubehörteile des Herstellers. Nichtbeachtung dieser Anweisung kann zu Sachschäden führen. Produkt Artikelbezeichnung Art.-Nr. Abbildung Digitaler Tankinhaltsanzei- 52146 ger DTA 20 E mit Pneumo- fix Typ 2 Digitaler Tankinhaltsanzei- 52156 ger DTA 20 E Ersatzteile und Zubehör Artikelbezeichnung Art.-Nr. - Page 33 EnOcean®-Funksystemen finden Sie auf www.enocean.com. • Funkstandard • Funktechnologie • AN001 • AN102 • AN103 14.3 Möglichkeiten der EnOcean®-Technologie Unterlagen über EnOcean®-Technologien finden Sie im Internet unter www.afrisohome.de. Auf unserem YouTube-Channel finden Sie eine Reihe von Videos zu AFRISO-Produkten. DTA 20 E...
- Page 34 Anhang Anhang 15.1 EU-Konformitätserklärung DTA 20 E...
- Page 35 Operating instructions Digital tank contents indicator DTA 20 E Copyright 2019 AFRISO-EURO-INDEX GmbH. All rights reserved. Lindenstraße 20 74363 Güglingen Telephone +49 7135 102-0 Service +49 7135 102-211 Telefax +49 7135 102-147 info@afriso.com Version: 11.2019.0 www.afriso.com ID: 900.000.0900...
- Page 36 About these operating instructions About these operating instructions These operating instructions describe the digital tank contents indicator "DTA 20 E" (also referred to as "product" in these operating instructions). These operating instructions are part of the product. • You may only use the product if you have fully read and understood these operating instructions.
- Page 37 Take into account the consequences of installing or integrating the product into a system or a plant. DTA 20 E...
-
Page 38: Information On Safety
Personal protective equipment Always wear the required personal protective equipment. When performing work on and with the product, take into account that hazards may be present at the installation site which do not directly result from the product itself. DTA 20 E... -
Page 39: Transport And Storage
Use the original packaging when transporting the product. • Store the product in a clean and dry environment. • Verify that the product is protected against shocks and impact during trans- port and storage. Failure to follow these instructions can result in equipment damage. DTA 20 E... - Page 40 E. Centre key 2 (Info/Parameters) F. No function G. Lower key 3 (Start) H. Connection for measuring line I. Blind plug J. Connection compartment for power supply unit / Battery com- partment (for 9 V monobloc bat- tery) DTA 20 E...
-
Page 41: Product Description
Product description Dimensions 65 mm 100 mm 60 mm DTA 20 E... -
Page 42: Scope Of Delivery
G2 a x G1½ female D. PVC hose (100 cm) Bag of accessories (not shown) with E. PVC hose (15 cm) with hose con- two screws and two dowels for wall nector (for connection to metal mounting pipes) DTA 20 E... -
Page 43: Application Example
• Liquid level at 100 % (in cm) • Volume (in litres) • Alarm (percentage) When the lower key is pressed or the adjusted measuring interval has been reached, the product measures the level in the tank. DTA 20 E... - Page 44 The product sends the measurement results to the AFRISOhome Gateway via the integrated EnOcean® wireless module. Approvals, conformities, certifications The product complies with: • EMC Directive (2014/30/EU) • Low Voltage Directive (2014/35/EU) • Radio Equipment Directive, RED (2014/53/EU) • RoHS Directive (2011/65/EU) DTA 20 E...
- Page 45 Storage -20/65 °C Medium 0/50 °C Supply voltage Nominal voltage 9 V power supply unit 9 V monobloc battery (optional) Measuring range (tank height) Fuel oil Max. 4.0 m Water Max. 3.5 m Variable Depends on density DTA 20 E...
- Page 46 + A2:2013 EN 62479:2010 EnOcean® wireless Frequency 868.3 MHz Transmission power Max. 10 mW Range See chapter "Information on EnOcean® wireless" EnOcean® Equipment Profile Generic Profile (GP) (EEP) Electrical safety Degree of protection IP 20 (EN 60529) DTA 20 E...
- Page 47 2. Press the centre key 4 x, until the menu "Radio Learn" is displayed. 3. Press the upper key 1 x. - The product sends a Learn tele- gram (LRNTEL). - The product is now connected to the AFRISOhome gateway. DTA 20 E...
- Page 48 The product may only be opened at the side at the battery compartment. • Only open the product to connect the power supply unit or to insert a 9 V monobloc battery. Failure to follow these instructions can result in equipment damage. DTA 20 E...
- Page 49 2. Connect the power supply unit with the battery clip (A). 3. Then push the cable including the shrink tube (B) into the battery compartment. 4. Close the cover (C) of the battery compartment. DTA 20 E...
- Page 50 2. Connect the 9 V monobloc bat- tery. 3. Push the 9 V monobloc battery into the battery compartment (verify correct mounting position). 4. Close the cover of the battery compartment. DTA 20 E...
- Page 51 1. Lower the bottom part (H) to the bottom of the tank. 2. Tighten the screw connection (F) so that the measuring line can no longer be moved. 3. Use the enclosed nail cable clips to fasten the measuring line (G), if necessary. DTA 20 E...
- Page 52 The measuring line (PVC) may harden over time if it is in contact with fuel oil. Hardening of the measuring line does not interfere with the operation of the product. DTA 20 E...
- Page 53 1. Check whether the plastic flange of the battery tank has a hole Ø 10 mm to Ø 10.5 mm which is closed by means of a blind plug. 2. Remove the blind plug. 3. Push the weight (C) and the hose (C) through the hole. DTA 20 E...
-
Page 54: Commissioning The Product
2. Press the upper or the lower key to set the required language. 3. Press the centre key 1 x. - The selected language is set and the display changes to the next menu setting. DTA 20 E... -
Page 55: Selecting The Language
Changing the language 1. Hold down the upper key until the product switches to the language selection. 2. Press the upper or the lower key to set the required language. 3. Switch to the next menu item. DTA 20 E... -
Page 56: Adjusting The Contrast
1. Press the upper or lower key (individual steps) or hold down the corre- sponding key until you have set the required measuring interval. 6.2.5 Radio Learn You can connect the product to the AFRISOhome gateway (see "Teach- ing in the EnOcean® wireless module"). DTA 20 E... - Page 57 • Horizontal cylinder 6.2.8 Diameter If you have selected the tank shapes ball or horizontal cylinder, the menu "Diameter" opens. You can select the following values: • Ball: 0 - 576 cm • Horizontal cylinder: 0 - 800 cm DTA 20 E...
- Page 58 1. Press the upper or lower key (individual steps) or hold down the corre- sponding key until you have set the required tank volume. 6.2.11 Adjusting the alarm You can select the following values: • OFF • 0 % - 100 % DTA 20 E...
- Page 59 - The battery status and software information are displayed. 3. Hold down the centre key. - The display changes to the first parameters menu. - The parameters entered can be changed again. Start (C) Starting a measurement. DTA 20 E...
-
Page 60: Operation
1. Press the lower key to switch on the product. - The product automatically starts a measurement. - The measured values are dis- played after a few seconds. If the measuring line is longer than 20 m perform a second measurement. DTA 20 E... -
Page 61: Battery Status
- The display changes to normal mode. Switching off the product 1. Press the upper key 1 x to switch off the product. If no key is pressed for an extended period of time, the product switches off automatically. DTA 20 E... -
Page 62: Maintenance Activities
Maintenance Maintenance Maintenance intervals When Activity If required Replacing the optional battery Maintenance activities 1. Proceed as described in chapter "Inserting/connecting the battery". - Stored settings are not lost when the battery is replaced. DTA 20 E... -
Page 63: Troubleshooting
(see chapter "Commis- sioning the product") Incorrect tank shape entered Check the measuring line in the tank Measuring line does not reach down to the tank bottom Leak in measuring line Other malfunctions Contact the AFRISO service hotline DTA 20 E... -
Page 64: Decommissioning / Disposal
2. Dismount the product (see chapter "Mounting", reverse sequence of steps). 3. Dispose of the product. Returning the device Get in touch with us before returning your product. Warranty See our terms and conditions at www.afriso.com or your purchase contract for information on warranty. DTA 20 E... -
Page 65: Spare Parts And Accessories
Failure to follow these instructions can result in equipment damage. Product Product designation Part no. Figure Digital tank contents indica- 52146 tor DTA 20 E with Pneumo- fix type 2 Digital tank contents indica- 52156 tor DTA 20 E Spare parts and accessories Product designation Part no. - Page 66 Wireless technology • AN001 • AN102 • AN103 14.3 Features of the EnOcean® technology Visit www.afrisohome.de for documents on EnOcean® technologies. A variety of videos on AFRISO products can also be found on the AFRISO YouTube channel. DTA 20 E...
- Page 67 Appendix Appendix 15.1 EU Declaration of Conformity DTA 20 E...
- Page 68 Notice technique Indicateur numérique de niveau de réservoir DTA 20 E Copyright 2019 AFRISO-EURO-INDEX GmbH. Tous droits réservés. Lindenstraße 20 74363 Güglingen Téléphone +49 7135 102-0 Service clientèle +49 7135 102-211 Téléfax +49 7135 102-147 info@afriso.com Version: 11.2019.0 www.afriso.com ID: 900.000.0900...
- Page 69 La présente notice technique La présente notice technique Cette notice technique contient la description de l'indicateur numérique de niveau de réservoir DTA 20 E (dénommé ci-après "produit"). Cette notice technique fait partie du produit. • Utilisez le produit seulement après que vous aurez lu et compris intégra- lement la notice technique.
- Page 70 à l'aide d'un procédé reconnu et prenez toutes les mesures de sécurité nécessaires correspondant au résultat. Prenez aussi en compte les conséquences possibles du montage ou de l'intégration du produit dans un système ou une installation. DTA 20 E...
-
Page 71: Informations Sur La Sécurité
Équipement de protection individuelle Utilisez toujours l'équipement de protection individuel requis. En travaillant sur le produit et avec celui-ci, tenez compte des dangers susceptibles de se présenter sur le lieu d'installation lesquels n'émanent pas directement du produit. DTA 20 E... -
Page 72: Transport Et Stockage
• Stockez le produit dans un lieu sec et propre. • Assurez-vous que le produit est à l'abri des chocs pendant le transport et le stockage. La non-observation de ces instructions peut causer des dommages matériels. DTA 20 E... - Page 73 E. Touche de milieu 2 (info/para- mètres) F. Sans fonction G. Touche inférieure 3 (Start) H. Raccord pour conduite de mesure I. Bouchon d'obturation J. Compartiment de branchement pour bloc d'alimentation/loge- ment de pile (pour pile monobloc 9 V) DTA 20 E...
-
Page 74: Description Du Produit
Description du produit Dimensions 65 mm 100 mm 60 mm DTA 20 E... -
Page 75: Composants Fournis
G2 male x G1½ femelle D. Tuyau PVC (100 cm) Sachet d'accessoires (non représen- E. Tuyau PVC (15 cm) avec raccord tés) avec deux vis et deux chevilles tuyau (pour branchement aux pour fixation au mur tubes en métal) DTA 20 E... -
Page 76: Exemple D'application
Niveau de remplissage à 100 % (en cm) • Volume (en litres) • Alarme (en pourcentage) Lorsque la touche inférieure est enfoncée ou si l'intervalle de mesure réglé est atteint, le produit mesure le niveau dans le réservoir. DTA 20 E... - Page 77 Le produit transmet les résultats de mesure à la passerelle AFRISOhome via le module sans fil intégré EnOcean®. Agréments, certificats, déclarations Le produit est conforme à : • Directive CEM (2014/30/UE) • Directive basse tension (2014/35/UE) • Radio Equipment Directive, RED (2014/53/UE) • Directive RoHS (2011/65/UE) DTA 20 E...
-
Page 78: Caractéristiques Techniques
-20/65 °C Fluide 0/50 °C Alimentation Tension nominale Bloc d'alimentation 9 V ou Pile monobloc 9 V (en option) Plage de mesure (hauteur du réservoir) Fuel Max. 4,0 m Max. 3,5 m Autre En fonction de la densité DTA 20 E... - Page 79 EnOcean® sans fil Fréquence 868,3 MHz Puissance de transmission Max. 10 mW Portée Voir chapitre "Informations sur EnO- cean® sans fil" EnOcean® Equipment Profile Generic Profile (GP) (EEP) Sécurité électrique Degré de protection IP 20 (EN 60529) DTA 20 E...
-
Page 80: Préparation Du Montage
2. Appuyez 4 fois sur la touche du milieu jusqu'à le menu "Radio appr." s'affiche. 3. Appuyez 1 fois sur la touche supérieure. - Le produit transmet un télé- gramme de connexion (LRN- TEL). - Le produit est connecté à la pas- serelle AFRISOhome. DTA 20 E... - Page 81 Assurez-vous que la température ambiante autorisée n'est pas dépas- sée. 1. Introduisez la vis supérieure dans le mur. 2. Accrochez l'unité de commande. 3. Alignez l'unité de commande. 4. Fixez l'unité de commande sur la paroi en vissant la vis dans la patte inférieure. DTA 20 E...
- Page 82 N'ouvrez que le logement de pile sur le côté du produit. • Ouvrez le produit uniquement pour connecter le bloc d'alimentation ou pour insérer une pile 9 V monobloc. La non-observation de ces instructions peut causer des dommages maté- riels. DTA 20 E...
- Page 83 2. Connectez le bloc d'alimentation avec le connecteur à clip pour piles (A). 3. Poussez le câble, y compris la gaine thermorétractable (B), dans le compartiment à piles. 4. Fermez le couvercle (C) du loge- ment de pile. DTA 20 E...
- Page 84 à l'aide d'un tournevis plat. 2. Branchez la pile monobloc 9 V. 3. Insérez la pile monobloc 9 V dans le logement de pile (respectez la position de montage). 4. Fermez le couvercle du logement de pile. DTA 20 E...
- Page 85 2. Serrez le raccord à vis (F) de sorte que la conduite de mesure ne se déplace plus. 3. Si nécessaire, fixez la conduite de mesure (G) à l'aide des serre- câbles à clou fourni. DTA 20 E...
- Page 86 La conduite de mesure (PVC) peut durcir si elle est en contact avec du fuel. Le durcissement de la conduite de mesure n'altère pas le fonctionnement du produit. DTA 20 E...
- Page 87 1. Vérifiez si la bride en plastique du réservoir de batterie présente un trou de Ø 10 mm à Ø 10,5 mm fermé par un bouchon d'obturation. 2. Retirez le bouchon d'obturation. 3. Faites glisser le poids (C) et le tuyau (B) au travers le trou. DTA 20 E...
-
Page 88: Mise En Service
(voir "Sélectionner la langue"). 2. Appuyez sur la touche supérieure ou inférieure pour régler la langue souhaitée. 3. Appuyez 1 fois sur la touche du milieu. - La langue est réglée et le produit affiche le menu suivant. DTA 20 E... -
Page 89: Sélectionner La Langue
Changer la langue 1. Maintenez enfoncée la touche supérieure jusqu'à ce que le produit passe à la sélection de la langue. 2. Appuyez sur la touche supérieure ou inférieure pour régler la langue souhaitée. 3. Passez au menu suivant. DTA 20 E... - Page 90 Régler un intervalle de mesure plus long (par exemple, 48 heures) : 1. Appuyez sur la touche supérieure ou inférieure (pas à pas) ou mainte- nez enfoncée la touche correspondante jusqu'à ce que vous ayez réglé l'intervalle de mesure souhaité. DTA 20 E...
- Page 91 Si la forme du réservoir sphère cylindre horizontal ont été sélectionnés, le menu "Diamètre" s'ouvre. Vous pouvez sélectionner une valeur de : • Sphère : 0 - 576 cm • Cylindre horizontal : 0 - 800 cm DTA 20 E...
-
Page 92: Régler L'alarme
1. Appuyez sur la touche supérieure ou inférieure (pas à pas) ou mainte- nez enfoncée la touche correspondante jusqu'à ce que vous ayez réglé le volume du réservoir souhaité. 6.2.11 Régler l'alarme Vous pouvez sélectionner une valeur de : • OFF • 0 % - 100 % DTA 20 E... - Page 93 - Le produit affiche l'état de la pile et les informations sur le logiciel. 3. Maintenez enfoncé la touche du milieu. - L'affichage passe au premier menu de paramètres. - Les paramètres entrés peuvent être modifiés à nouveau. Start (C) Démarrer la mesure. DTA 20 E...
- Page 94 1. Appuyez sur la touche inférieure afin d'allumer le produit. - Le produit effectue une mesure automatiquement. - Au bout de quelques secondes, les données de mesure s'affichent. Effectuez une deuxième mesure si la conduite de mesure dépasse 20 m. DTA 20 E...
- Page 95 - L'affichage principal s'affiche. Éteindre le produit 1. Pour éteindre le produit, appuyez 1 fois sur la touche supérieure. Au bout de quelques secondes le produit s'éteint automatiquement si aucune autre action n'est effectuée. DTA 20 E...
- Page 96 Intervalles de maintenance Quand Opération Si nécessaire Remplacer la pile en option Opérations de maintenance 1. Procédez comme décrit dans le chapitre "Installer et raccorder la pile". - Au changement de pile, les réglages enregistrés ne sont pas perdus. DTA 20 E...
-
Page 97: Suppression Des Dérangements
Vérifiez la conduite de Conduite de mesure mesure dans le réser- n'atteint pas le fond du voir réservoir Conduite de mesure non étanche Autre dérangement Veuillez contacter l'AFRISO Service Hot- line DTA 20 E... -
Page 98: Mise Hors Service Et Élimination
3. Éliminez le produit. Retour Avant de retourner le produit, il faut que vous preniez contact avec nous. Garantie Les informations sur la garantie figurent dans nos "Conditions générales de vente" sur le site www.afriso.com ou dans votre contrat d'achat. DTA 20 E... -
Page 99: Pièces Détachées Et Accessoires
La non-observation de ces instructions peut causer des dommages maté- riels. Produit Désignation de l'article Référence Figure Indicateur numérique de 52146 niveau de réservoir DTA 20 E avec Pneumofix type 2 Indicateur numérique de 52156 niveau de réservoir DTA 20 E Pièces détachées et accessoires Désignation de l'article Référence... - Page 100 • AN001 • AN102 • AN103 14.3 Possibilités de la technologie EnOcean® Vous trouverez des documents supplémentaires sur les technologies EnO- cean® sur www.afrisohome.de. Visitez le canal YouTube d'AFRISO et découvrez des vidéos sur les produits AFRISO. DTA 20 E...
- Page 101 Annexe Annexe 15.1 Déclaration de conformité UE DTA 20 E...
Need help?
Do you have a question about the DTA 20 E and is the answer not in the manual?
Questions and answers