urmet domus VOG 5 User Handbook Manual
Ipercom video door phone 5” hands-free ipercom
Hide thumbs
Also See for VOG 5:
- Booklet (52 pages) ,
- User handbook manual (32 pages) ,
- Installation handbook (29 pages)

Related Manuals for urmet domus VOG 5


Summary of Contents for urmet domus VOG 5
- Page 1 Mod. 1761 DS1761-005 LBT20944 VIDEOCITOFONO 5” VIVAVOCE IPERCOM VIDEO DOOR PHONE 5” HANDS-FREE IPERCOM Sch./Ref.1761/6 Interactive Links AAAAAAAAAAA LIBRETTO UTENTE USER HANDBOOK...
-
Page 2: Table Of Contents
Interactive Links Nel documento sono presenti LINK INTERATTIVI per rendere la consultazione più rapida ed efficiente. ITALIANO INDICE 1. DESCRIZIONE GENERALE ........................2 2. DESCRIZIONE DEI COMPONENTI E CARATTERISTICHE ..............3 3. FUNZIONE PULSANTI ..........................4 3.1 SEGNALAZIONI STATO LED ...................... -
Page 3: Descrizione Dei Componenti E Caratteristiche
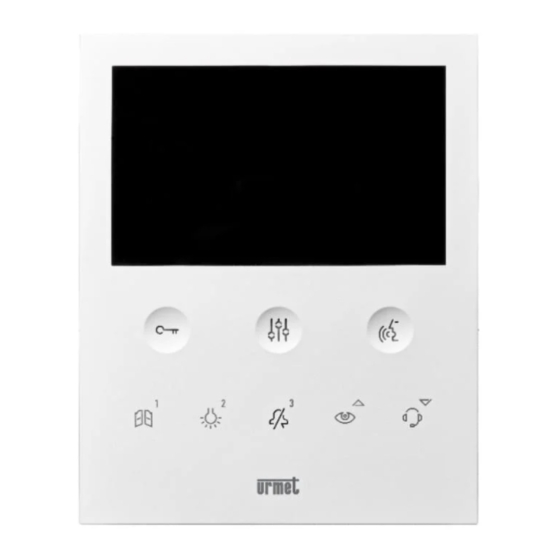
DESCRIZIONE GENERALE Il videocitofono Sch. 1761/6 è dedicato all’utilizzo in impianti videocitofonici del sistema Ipercom. Le caratteristiche principali sono: • schermo a colori TFT-LCD da 5’’ (wide angle); • pulsanti soft-touch; • possibilità di attivazioni delle funzioni del videocitofono tramite comandi gestuali (Gesture) sul sensore IR; •... -
Page 4: Funzione Pulsanti
FUNZIONE PULSANTI MENU DI Stato ATTESA RIPOSO E TASTO CONFIGURAZIONE RISPOSTA (SOLO CON RIPOSO IN FONIA (ricezione VIDEOCITOFONO A PREMUTO chiamata) Pulsante RIPOSO) - Apriporta pedonale Visualizzazione della - Abilita/disabilita Apriporta Apriporta Apriporta pedonale schermata precedente del apriporta pedonale pedonale menu di configurazione automatico (tenere premuto il tasto per... - Page 5 Stato MENU DI RIPOSO E CONFIGURAZIONE ATTESA RISPOSTA TASTO (SOLO CON RIPOSO IN FONIA (ricezione chiamata) VIDEOCITOFONO A PREMUTO Pulsante RIPOSO) - SCHERMATA 1 - Selezione dello stato del videocitofono: IN - Rifiuto chiamata - All’interno CASA / REMOTO del menu OSD Chiamata - All’interno del menu Funzione...
-
Page 6: Segnalazioni Stato Led
3.1. SEGNALAZIONI STATO LED DEI PULSANTI Stato MENU DI ATTESA RIPOSO E CONFIGURAZIONE RISPOSTA TASTO (SOLO CON RIPOSO IN FONIA (ricezione VIDEOCITOFONO A PREMUTO chiamata) Pulsante RIPOSO) Spento: nessuna funzione Verde lampeggiante: solo quando la funzione apriporta Verde fisso Verde fisso Spento Spento automatica è... -
Page 7: Prestazioni
Icona che indica che è stata effettuata una segnalazione di allarme panico. Icona che indica che la funzione di apriporta automatico è abilitata. Icona che indica se una o più porte sono rimaste aperte. Icona che indica i seguenti stati del videocitofono: In casa / Remoto / Segreteria / Deviazione (alternativi fra loro). Lo stato di “Segreteria”... -
Page 8: Ricezione E Risposta A Una Chiamata Con La Modalità "Remoto" Attiva
5.1.1 RICEZIONE E RISPOSTA A UNA CHIAMATA CON LA MODALITÀ “REMOTO” ATTIVA Se è stata attivata la modalità “Remoto” quando si riceve una chiamata, il display del videocitofono non mostra l’immagine del chiamante ma viene visualizzata la seguente schermata: Sul videocitofono che si desidera usare per rispondere, premere il tasto per visualizzare l’immagine del chiamante. -
Page 9: Ricezione E Risposta A Una Chiamata Proveniente Da Centralino
5.3. RICEZIONE E RISPOSTA A UNA CHIAMATA PROVENIENTE DA CENTRALINO Quando il videocitofono riceve una chiamata da centralino squilla e accende il display, che è normalmente spento. Il videocitofono visualizza sul display l’immagine dell’addetto al centralino (se il centralino è provvisto di telecamera). -
Page 10: Funzione Di Apriporta
Accettando la chiamata si entrerà in comunicazione con lo smartphone e il display visualizza la seguente schermata: Premendo il tasto la comunicazione viene chiusa e il display si spegne. 5.5. FUNZIONE DI APRIPORTA Il videocitofono consente l’apertura della porta pedonale o passo carraio, associati alla postazione di chiamata. Con il videocitofono a riposo o in ricezione chiamata (ricevuta dalla postazione di chiamata) o in fonia... - Page 11 • Premere il tasto per effettuare la chiamata al centralino. • Premere il tasto per effettuare una chiamata intercomunicante con un altro citofono o videocitofono. Il display visualizza la seguente schermata: Se la risposta da parte del centralino o dell’utente, in caso di chiamata intercomunicante, avviene entro il tempo di attesa sgancio, si entra direttamente in comunicazione e sul videocitofono il led del tasto inizia a lampeggiare.
-
Page 12: Autoinserzione
5.7. AUTOINSERZIONE La funzione di autoinserzione permette di visualizzare sul display del videocitofono l’immagine ripresa da tutte le postazioni di chiamata presenti nel percorso topologico. Quando il videocitofono è a riposo. premere il tasto , sul display viene visualizzata l’immagine ripresa dalla postazione di chiamata, premere nuovamente il tasto per passare ad eventuali postazioni di chiamata successive presenti nell’impianto. -
Page 13: Indicazione Porta Aperta
• MUTE (senza limiti di tempo): premendo il tasto per un tempo breve il videocitofono sarà silenziato sino ad una successiva pressione sullo stesso tasto. In seguito ad eventuale black out la funzione manterrà lo stato che aveva prima dell’evento. Il display del videocitofono visualizza la seguente schermata: Dopo aver attivato la funzione “MUTE”... -
Page 14: Pulizia Schermo
Quando viene premuto il tasto il videocitofono invia il messaggio di allarme panico. Inviato l’allarme panico nella barra superiore del display viene visualizzata la seguente icona Quando riceve il messaggio di allarme Panico, l’addetto al centralino può ascoltare cosa sta avvenendo nell’appartamento, nelle vicinanze del videocitofono. -
Page 15: Comandi Gestuali
COMANDI GESTUALI (GESTURE) ATTENZIONE! Per utilizzare i comandi gestuali è necessario abilitare il sensore IR sul videocitofono tramite il menu di configurazione (vedere paragrafo “Abilitazione /disabilitazione sensore IR per comandi gestuali”). Il videocitofono permette l’attivazione di alcune funzioni attraverso comandi gestuali. Passando la mano davanti al sensore IR è... -
Page 16: Accesso Al Menu Di Configurazione
In fonia • Effettuare 1 passaggio quando il videocitofono è in comunicazione con una postazione di chiamata. APERTURA PASSO CARRAIO A riposo • Effettuare 1 passaggio quando il display è spento. • Infine effettuare 3 passaggi quando il display è acceso. In fonia • Effettuare 3 passaggi quando il videocitofono è in comunicazione con una postazione di chiamata. CHIAMATA AL CENTRALINO • Effettuare 1 passaggio quando il display è spento. • Infine effettuare o 4 passaggi o 1 passaggio con fermo maggiore di 1 secondo sul sensore, quando il display è acceso. AUTOINSERZIONE • Effettuare 1 passaggio quando il display è spento. • Ripetere l’operazione con il display acceso. PALLEGGIAMENTO VIDEO In attesa risposta (durante la ricezione di una chiamata) •... - Page 17 Premendo il tasto è possibile visualizzare la seconda schermata di configurazione dei parametri. SCHERMATA 2 Premendo il tasto è possibile ritornare alla schermata precedente. Premendo il tasto è possibile visualizzare la terza schermata di configurazione dei parametri. SCHERMATA 3 Premendo il tasto è possibile ritornare alla schermata precedente. Per configurare un parametro è necessario premere sul videocitofono, il tasto associato al parametro che si desidera configurare. ATTENZIONE! Alcuni parametri sono configurabili solamente dal videocitofono Master. L’uscita dal menu di configurazione è possibile premendo il tasto . Il dispositivo emetterà un beep, il led del tasto smetterà...
-
Page 18: Apriporta Automatico
7.1. APRIPORTA AUTOMATICO (SOLO MASTER) La funzione di apriporta automatico permette di aprire automaticamente la porta quando si riceve una chiamata, senza necessità di rispondere. Per attivare il servizio di apriporta automatico accedere al menu di configurazione. Premere il tasto nella schermata 1 del menu di configurazione. Il display visualizza la seguente schermata: Con la funzione di apriporta automatico attiva, nella barra superiore del display viene visualizzata la seguente icona... -
Page 19: Regolazione Volume Chiamate
7.2. REGOLAZIONE VOLUME CHIAMATE Per regolare il volume delle chiamate (da postazione di chiamata, al piano, da chiamata intercomunicante e da centralino) accedere al menu di configurazione. Premere il tasto nella schermata 1 del menu di configurazione. A ogni pressione del tasto il videocitofono visualizza e configura il volume di chiamata selezionato (il volume cambia secondo la sequenza: BASSO, MEDIO, ALTO). DS1761-005... -
Page 20: Modalità "In Casa" O "Remoto" (Solo Master)
7.3. MODALITÀ “IN CASA” O “REMOTO” (SOLO MASTER) Il videocitofono dispone di due modalità di utilizzo: “In casa” normale modalità di utilizzo del videocitofono (modalità di default). • • “Remoto” modalità di utilizzo che permette l’inoltro di una chiamata audio-video oppure solo audio verso uno smartphone con sistema operativo Android oppure IOS. -
Page 21: Formato Ora
7.4. FORMATO ORA É possibile selezionare il formato ora visualizzato nella barra superiore del display: • 24 ore • 12 ore Per cambiare il formato ora visualizzato sul videocitofono accedere al menu di configurazione. Premere il tasto nella schermata 1 del menù di configurazione. Il display visualizza la seguente schermata: DS1761-005... -
Page 22: Selezione Melodie Di Chiamata
7.5. SELEZIONE MELODIE DI CHIAMATA Nei posti interni del sistema Ipercom si può scegliere, per ogni sorgente di chiamata, una fra le 5 melodie disponibili. Per selezionare le melodie di chiamata accedere al menu di configurazione. Premere il tasto per passare alla schermata 2 del menu di configurazione. Premere il tasto nella schermata 2 del menu di configurazione. Il display visualizza la seguente schermata: DS1761-005... -
Page 23: Disabilitazione / Abilitazione Tono Tasti
• Premere il tasto per scorrere le 5 suonerie disponibili per la chiamata da postazione di chiamata principale. • Premere il tasto per scorrere le 5 suonerie disponibili per la chiamata da postazione di chiamata secondaria. • Premere il pulsante per scorrere le 5 suonerie disponibili per la chiamata al piano. -
Page 24: Selezione Della Lingua
Premere il tasto nella schermata 2 del menu di configurazione per disabilitare o abilitare il volume dei tasti. Per abilitare nuovamente il volume dei tasti è sufficiente ripetere la procedura. 7.7. SELEZIONE DELLA LINGUA Per cambiare la lingua del videocitofono accedere al menu di configurazione. Premere il tasto per passare alla schermata 2 del menu di configurazione. DS1761-005... -
Page 25: Attivazione Della Funzione Di Inoltro Di Chiamata (Solo Master)
Premere il tasto nella schermata 2 del menu di configurazione. Il display visualizza la seguente schermata: Per selezionare la lingua del videocitofono occorre premere il relativo tasto associato alla lingua che si vuole impostare. La voce “Lingua di sistema” permette di configurare in automatico la lingua impostata durante la configurazione del sistema Ipercom. Premendo i tasti è... - Page 26 Accedere al menu di configurazione del videocitofono. Premere il tasto per passare alla schermata 2 del menu di configurazione. Premere il tasto nella schermata 2 del menu di configurazione. Il display visualizza la seguente schermata: DS1761-005...
- Page 27 Sul videocitofono premere il tasto per effettuare la verifica e l’attivazione della funzione di inoltro di chiamata. Premere il tasto per annullare l’attivazione delle funzione e tornare al menu di configurazione . In caso di esito positivo viene visualizzata una schermata di conferma dell’attivazione della funzione. In caso di esito negativo viene visualizzata una schermata di indicazione di fallimento dell’attivazione della funzione.
- Page 28 Accedere al menu di configurazione del videocitofono. Premere il tasto per passare alla schermata 2 del menu di configurazione. Premere il tasto nella schermata 2 del menu di configurazione. Il display visualizza la seguente schermata: DS1761-005...
- Page 29 Sullo smartphone in cui è presente l’App CallMe, avviare l’applicazione. Premere il pulsante: “Impostazioni” → “Gestione servizio” → “I miei dispositivi” → “Aggiungi”. Viene avviata l’applicazione QR Code reader presente sul proprio smartphone. Scansionare con lo smartphone il QR Code visualizzato sul display del videocitofono. Sul videocitofono premere il tasto per effettuare la verifica e l’attivazione della funzione di inoltro di chiamata.
-
Page 30: Abilitazione / Disabilitazione Sensore Ir Per Comandi Gestuali
7.9. ABILITAZIONE / DISABILITAZIONE SENSORE IR PER COMANDI GESTUALI Per abilitare il sensore IR, che permette di utilizzare i comandi gestuali (Gesture) sul videocitofono, accedere al menu di configurazione. Premere il tasto per passare alla schermata 2 del menu di configurazione. Premere nuovamente il tasto per passare alla schermata 3 del menu di configurazione. DS1761-005... -
Page 31: Reset Ai Parametri Di Fabbrica
Premere il tasto nella schermata 3 del menu di configurazione. Il display visualizza la seguente schermata: Per disabilitare nuovamente il sensore IR è sufficiente ripetere la procedura. 7.10. RESET AI PARAMETRI DI FABBRICA Per ripristinare i parametri di default del dispositivo accedere al menu di configurazione. Premere il tasto per passare alla schermata 2 del menu di configurazione. DS1761-005... - Page 32 Premere nuovamente il tasto per passare alla schermata 3 del menu di configurazione. Premere il tasto nella schermata 3 del menu di configurazione. Il display visualizza la seguente schermata: Premere il tasto per confermare il reset del dispositivo ai parametri di fabbrica. Premere il tasto per annullare l’operazione e tornare al menu di configurazione . ATTENZIONE! Il reset ai parametri di fabbrica non ripristina l’attivazione della funzione di inoltro di chiamata.
-
Page 33: Informazioni Videocitofono
7.11. INFORMAZIONI VIDEOCITOFONO Per visualizzare l’indirizzo IP, l’indirizzo MAC e la versione firmware del dispositivo, accedere al menu di configurazione. Premere il tasto per passare alla schermata 2 del menu di configurazione. Premere nuovamente il tasto per passare alla schermata 3 del menu di configurazione. DS1761-005... -
Page 34: Valori Di Default
Premere il tasto nella schermata 3 del menu di configurazione. Il display visualizza la seguente schermata: VALORI DI DEFAULT Il videocitofono Sch. 1761/6 è configurato di fabbrica con le seguenti impostazioni: Apriporta automatico: Disabilitato Volume chiamate: Alto Call forwarding: In casa Formato ora: 24 ore da postazione di chiamata principale: Suoneria 1 da postazione di chiamata secondaria: Suoneria 2 chiamata al piano... -
Page 35: English
ENGLISH INDEX 1. DESCRIPTION ............................36 2. DESCRIPTION OF COMPONENTS AND FEATURES ................36 3. BUTTON FUNCTIONS ..........................37 3.1 BUTTON LED STATUS INDICATION .................... 39 4. HOMEPAGE ............................39 5. FEATURES ............................. 40 RECEIVING AND ANSWERING A CALL FROM A CALLING STATION .......... - Page 36 DESCRIPTION Ref. 1761/6 video door phone is dedicated to the Ipercom system video door phones. The main features are: • 5’’ (Wide Angle) TFT-LCD colour screen; • soft-touch buttons • possibility of activating video door phone functions using gesture commands on the IR sensor •...
- Page 37 BUTTON FUNCTIONS State STAND-BY AND WAITING FOR CONFIGURATION MENU DURING AUDIO BUTTON STAND-BY AN ANSWER (WITH VIDEO DOOR OPERATION (receiving call) PHONE ON STAND-BY) PRESSED Button - Open pedestrian door View previous - Connect / disconnect Open pedestrian Open pedestrian Open pedestrian configuration the automatic door...
- Page 38 State CONFIGURATION STAND-BY AND WAITING FOR AN DURING AUDIO MENU BUTTON STAND-BY ANSWER OPERATION (WITH VIDEO DOOR (receiving call) PRESSED PHONE ON STAND-BY) Button PAGE 1 - Select video door phone status: AT HOME / - Reject call REMOTE - In the OSD - In the OSD menu, “MUTE”...
- Page 39 3.1. BUTTON LED STATUS INDICATION State STAND-BY AND WAITING FOR CONFIGURATION MENU DURING AUDIO BUTTON STAND-BY AN ANSWER (WITH VIDEO DOOR OPERATION (receiving call) PHONE ON STAND-BY) PRESSED Button Off = no function Green blinking: (only when the automatic door opening Green fixed Green fixed function is on)
- Page 40 Icon indicating that a panic alarm is in progress. Icon indicating that the automatic door opener function is enabled. Icon indicating whether one or more doors is open. Icon indicating the following video door phone statuses: At home / Remote / Recording / Divert (mutually alternative). The “Recording”...
- Page 41 5.1.1 RECEIVING AND ANSWERING A CALL WHILE “REMOTE” MODE IS ON If the “Remote” mode is on when receiving a call, the video door phone display does not show the caller’s image but the following screen page: Press key to display the caller’s image on the video door phone you want to use to answer. Press key to reject the incoming call.
- Page 42 5.3. RECEIVING AND ANSWERING A SWITCHBOARD CALL When the video door phone receives a switchboard call, it rings and turns on the display, which is normally off. The video door phone displays the image of the switchboard operator (if the switchboard is equipped with a camera). Press key to reject the incoming call. Press key to pick up the call (the key LED starts flashing). Press the key again to end the call and the display turns off.
- Page 43 Press the key again to end the call and the display turns off. Accept the call to start the communication with the smartphone with the display showing the following page: Press key to end the call and the display turns off. 5.5. DOOR OPENING FUNCTIONS The video door phone allows the opening of any pedestrian door or garage door associated with the calling station.
- Page 44 • Press key to call the switchboard. • Press key to make an intercom call with another door phone or video door phone. The following screen page will be displayed: If, in the event of an intercom call, the switchboard or the user picks the call up within the pick-up time, communication is started straight away and the LED of key starts flashing on the video door phone.
- Page 45 5.7. AUTO-ON FUNCTION The auto-on function allows viewing the image taken from all the calling stations installed in the topological path on the video door phone display. When the video door phone is in stand-by, press key , to display the image taken from the calling station. Press the key again to move to any subsequent calling stations installed in the system.
- Page 46 After a possible blackout, the function will maintain the status it had before the event. The following page will be displayed on the video door phone: After activating the “MUTE” function, the following icon is shown in the top bar of the display to indicate that the function is active.
- Page 47 installer during configuration (for more information see the Ipercom system technical manual available at the website www.urmet.com). 5.13. CLEAN SCREEN The “Clean Screen” function temporarily makes the video door phone keys insensitive to any action. This feature proves useful to avoid unintentionally activating the functions of the video door phone when cleaning the screen. When the video door phone is in stand-by, press buttons for more than 5 seconds;...
- Page 48 GESTURES ATTENTION! To use the gestures, it is necessary to enable the IR sensor on the video door phone via the configuration menu (see section “Enabling/ disabling IR sensor for gestures”). The video door phone allows the activation of some functions through gestures. For instance, by passing your hand in front of the IR sensor it is possible to: turn on the display, answer a call or open the pedestrian door without having to press any button on the video door phone.
- Page 49 OPENING THE DRIVEWAY GATE In stand-by • Perform 1 movement when the display is off. • Finally, perform 3 movements with the display on. During audio operation • Perform 3 movements during a video door phone conversation with a calling station. SWITCHBOARD CALL • Perform 1 movement when the display is off. • Finally, make either 4 movements or 1 movement pausing longer than 1 second on the sensor, with the display on.
- Page 50 SCREEN PAGE 2 Press key to go back to the previous screen page. The third parameter configuration screen page can be displayed by pressing key SCREEN PAGE 3 Press key to go back to the previous screen page. To configure a parameter, press the key associated with the parameter you want to configure on the video door phone. ATTENTION! Some parameters can only be configured via the Master video door phone. To exit the configuration menu, press key . The device will beep, the key LED will stop flashing and the display will display the Homepage.
- Page 51 7.1. AUTOMATIC DOOR OPENING (MASTER ONLY) The automatic door opening function allows you to automatically open the door when you receive a call, without the need to answer. To activate the automatic door opening service, go to the configuration menu. Press key on screen page 1 of the configuration menu. The display shows the following screen page: With the automatic door opening function active, the following icon is shown in the top bar of the display.
- Page 52 7.2. ADJUSTING THE RINGTONE VOLUME To adjust the ringtone volume (from the calling station, to floor, from intercom call and from the switchboard) access the configuration menu. Press the key on screen page 1 of the configuration menu. Each time the key is pressed, the video door phone displays and configures the selected call volume (the volume changes according to the sequence: LOW, MEDIUM, HIGH). DS1761-005...
- Page 53 7.3. “AT HOME” OR “REMOTE” MODE (MASTER ONLY) The video door phone has two modes of use: “At home”: standard mode of use of the video door phone (default mode). • • “Remote”: mode of use that allows forwarding an audio-video call or audio only call to a smartphone with Android or IOS operating system.
- Page 54 7.4. TIME FORMAT Select the time format to be displayed in the top bar of the display: • 24 hours • 12 hours To change the time format displayed on the video door phone, go to the configuration menu. Press key on screen page 1 of the configuration menu. The display shows the following screen page: DS1761-005...
- Page 55 7.5. SELECTING THE CALL RINGTONES In the indoor stations of the Ipercom system you can choose, for each call source, one of the 5 ringtones available. To select call ringtones, go to the configuration menu. Press key to move to screen page 2 of the configuration menu. Press key on screen page 2 of the configuration menu. The display shows the following screen page: • Press key to scroll through the 5 ringtones available for the call from the main calling station. DS1761-005...
- Page 56 • Press key to scroll through the 5 ringtones available for the call from the secondary calling station • Press button to scroll through the 5 ringtones available for the floor call. • Press button to scroll through the 5 ringtones available for the intercom call. Press button to display the next screen page. •...
- Page 57 Press key on screen page 2 of the configuration menu to disable or enable the button feedback tone. To enable the button feedback tone again, simply repeat the procedure. 7.7. LANGUAGE SELECTION To change the language of the video door phone, go to the configuration menu. Press key to move to screen page 2 of the configuration menu. DS1761-005...
- Page 58 Press key on screen page 2 of the configuration menu. The following screen page will be displayed: To select the language of the video door phone, press the relevant button associated with the language The “System Language” item allows you to automatically configure the language set when configuring the Ipercom system. Press keys to scroll through the list of available languages. 7.8.
- Page 59 Enter the configuration menu of the video door phone. Press key to move to screen page 2 of the configuration menu. Press key on screen page 2 of the configuration menu. The display shows the following screen page: Press key on the video door phone to verify and activate the call forwarding function. Press key to cancel the activation of the function and return to the configuration menu. DS1761-005...
- Page 60 If successful, a screen page confirming the activation of the function will be displayed. If the operation failed, a screen page indicating that the activation of the function was not successful will be displayed. In this case, perform the procedure again, making sure that you perform the described steps correctly. CallMe Manager support disabled on the Ipercom system Download the Urmet CallMe App from the Apple Store (IOS) or the Play Store (Android) Create an account on the Urmet Cloud through the CallMe App For the procedure required to create an account through the CallMe App, refer to the...
- Page 61 Enter the configuration menu of the video door phone. Press key to move to screen page 2 of the configuration menu. Press key on screen page 2 of the configuration menu. The display shows the following screen page: Launch the application on the smartphone where the CallMe App is installed. Press button: “Settings” → “Service Manager” → “My Devices” → “Add”. DS1761-005...
- Page 62 The QR Code Reader application on your smartphone is launched. Scan the QR Code shown on the video door phone display with your smartphone. Press key on the video door phone to verify and activate the forwarding call function. Press key to cancel the activation of the function and return to the configuration menu.
- Page 63 7.9. ENABLING / DISABLING THE IR SENSOR FOR GESTURES To enable the IR sensor, which allows you to use gestures on the video door phone, access the configuration menu. Press key to move to screen page 2 of the configuration menu. Press key again to move to screen page 3 of the configuration menu. DS1761-005...
- Page 64 Press key on screen page 3 of the configuration menu. The display shows the following screen page: To disable the IR Sensor again, simply repeat the procedure. 7.10. RESET TO FACTORY SETTINGS To restore device default parameters, go to the configuration menu. Press key to move to screen page 2 of the configuration menu. Press key again to move to screen page 3 of the configuration menu. DS1761-005...
- Page 65 Press key on screen page 3 of the configuration menu. The display shows the following screen page: Press key to confirm the reset of the device to factory settings. Press key to cancel the operation and return to the configuration menu. ATTENTION! Resetting the device to factory settings does not reactivate the call forwarding function. 7.11. VIDEO DOOR PHONE INFORMATION To view the IP address, MAC address and firmware version of the device, go to the configuration menu. DS1761-005...
- Page 66 Press key to move to screen page 2 of the configuration menu. Press key again to move to screen page 3 of the configuration menu. Press key on screen page 3 of the configuration menu. The display shows the following screen page: DS1761-005...
- Page 67 DEFAULT VALUES The video door phone ref. 1761/6 is set with the following default settings: Automatic door opening: Disabled Ringtone volume: High Call forwarding: At home Time format: 24 hours from the main calling station: Ringtone 1 from a secondary calling station: Ringtone 2 floor call Ringtone 3...
- Page 68 DS1761-005 LBT20944 URMET S.p.A. Area tecnica 10154 TORINO (ITALY) servizio clienti +39 011.23.39.810 VIA BOLOGNA 188/C http://www.urmet.com Telef. +39 011.24.00.000 (RIC. AUT.) e-mail: info@urmet.com +39 011.24.00.300 - 323...
Need help?
Do you have a question about the VOG 5 and is the answer not in the manual?
Questions and answers