Advertisement
Table of Contents
- 1 Table of Contents
- 2 Panel Descriptions
- 3 Top Panel
- 4 Rear Panel
- 5 Selecting Patterns and Setting the Tempo
- 6 Using the Rhythm Sequencer
- 7 Using the Bass Sequencer
- 8 Using Delay and Reverb
- 9 Functions, Menus and Shortcuts
- 10 Connecting to a Computer or Mobile Device
- 11 Backup and Factory Reset
- 12 Main Specifications
- 13 Signal Flow
- 14 MIDI Implementation Chart
- Download this manual
Advertisement
Table of Contents

Related Manuals for Roland T-8


Summary of Contents for Roland T-8
- Page 1 T-8 (Version 1.02) Owner’s Manual...
-
Page 2: Table Of Contents
Table of contents Table of contents Connecting to a Computer or Mobile Device ....27 Panel Descriptions ..............3 Top Panel.................. 3 Backup and Factory Reset ........... 28 Rear Panel ................6 Main Specifications ..............29 Selecting Patterns and Setting the Tempo ..... 7 Signal Flow ................ -
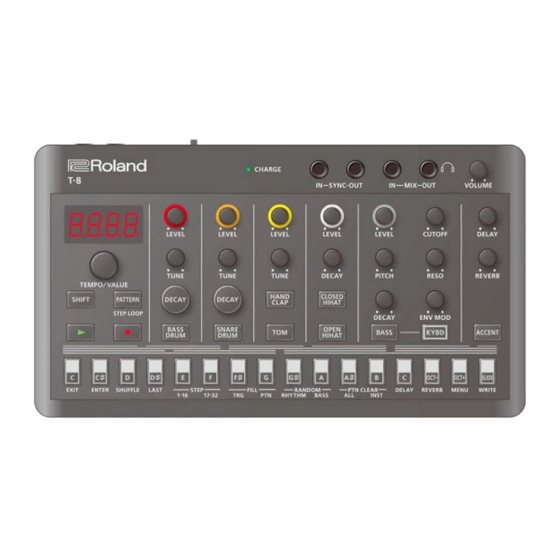
Page 3: Panel Descriptions
Orange (lit): Charging. Green (lit): Charging is completed. Green orange (blinking): A charging error occurred. Please contact your dealer or a Roland customer service center. CHARGE https://roland.cm/service indicator When not charging via USB port: (lit): The remaining battery power is low. Charge the battery. - Page 4 Panel Descriptions 2. Common Controller Explanation Display This is a four-digit, seven-segment LED display. [TEMPO/VALUE] Changes the values shown in the display. knob [SHIFT] button Use this in combination with other controllers. [PATTERN] button Switches the unit to pattern selection mode. Plays the pattern.
- Page 5 Panel Descriptions 7. BASS Controller Explanation [LEVEL] knob Adjusts the bass volume. [PITCH] knob Adjusts the pitch. [DECAY] knob Adjusts the decay length. [CUTOFF] knob Adjusts the cutoff frequency, which determines the brightness of the sound. [RESO] knob Adjusts the harmonics around the cutoff frequency. [ENV MOD] knob Adjusts the intensity of time-based change to the cutoff frequency.
-
Page 6: Rear Panel
Panel Descriptions Rear Panel A. [POWER] switch Turns the power on/off. B. USB port (USB Type-C ® Use a commercially available USB 2.0 cable (Type-A to C, or Type-C to C) to connect this port to your computer. This is used to transfer USB MIDI and USB audio data. * Do not use a USB cable that is designed only for charging. -
Page 7: Selecting Patterns And Setting The Tempo
Selecting Patterns and Setting the Tempo Selecting Patterns and Setting the Tempo Switching between patterns Press the [PATTERN] button. The [PATTERN] button lights up, and the buttons are in pattern select mode. The step buttons function as pattern numbers 1–16. Pattern Explanation Playing... - Page 8 Selecting Patterns and Setting the Tempo Saving a pattern Hold down the [SHIFT] button and press the [SLIDE (WRITE)] button. Use the [TEMPO/VALUE] knob to select what to save. Saves the currently selected pattern. Saves all patterns. Press the [C# (ENTER)] button. This saves the pattern(s).
-
Page 9: Using The Rhythm Sequencer
Using the Rhythm Sequencer Using the Rhythm Sequencer Basic operations (basic steps for inputting notes) Press the button of the instrument you want to input. The button lights up and the instrument is selected. Press the step buttons of the steps you want to input. The steps you select light up, and the notes are inputted. - Page 10 Using the Rhythm Sequencer Inputting an accent With the rhythm instrument selected, press the [ACCENT] button. The [ACCENT] button lights up. Press the step buttons of the steps you want to accent. The steps you select light up, and the accents are inputted. * Accents are applied to all rhythm instruments.
- Page 11 Using the Rhythm Sequencer Setting the probability This shows how to set the probability for notes to play back. You can use the probability feature to make a pattern play in different variations, while that same pattern keeps playing back. Press one of the step 1–16 buttons (and keep holding the step buttons until the operation is finished).
- Page 12 Using the Rhythm Sequencer Setting the sub step probability Here’s how to set the probability for sub steps to play back. Hold down an instrument button and press the step 1–16 buttons. (Keep holding down the instrument button until the operation is finished.) The setting for the current sub step (OFF–FLAN) is shown.
- Page 13 Using the Rhythm Sequencer Master probability You can add a value that affects the probability of the entire sequence. Ø For more details on probability, refer to “Setting the probability”. * This has no effect if the individual probabilities are not set. Hold down the [PATTERN] button and turn the [TEMPO/VALUE] knob.
- Page 14 Using the Rhythm Sequencer Real-time input (tap input) Press the [ó] (REC) button. The [ó] (REC) button lights up. Press the [ø] (PLAY) button. The [ø] (PLAY) button lights, and recording begins. Press an instrument button. This inputs a note into the step during playback.
-
Page 15: Using The Bass Sequencer
Using the Bass Sequencer Using the Bass Sequencer Basic operations (basic steps for inputting notes) Press the [BASS] button to select the bass. The step buttons to which notes have been input light up. Step buttons for which a tie has been input light up dimly. Press a step button. - Page 16 Using the Bass Sequencer Checking and editing what’s in a step (step mode) Press one of the step buttons (and keep holding the step button until you’re finished editing). The step’s note is displayed. Use the [TEMPO/VALUE] knob while holding down the step button to edit the note’s value (n.oFF, n.C0–n.C7, n.tie).
- Page 17 Using the Bass Sequencer Editing the steps (keyboard mode) Press the [KYBD] button while the sequencer is stopped. Press the [ó] (REC) button. If the [ó] (REC) is unlit, press a step button while holding down the [KYBD] button to start editing from the step you want. In this case, you can only edit the step you want, even during playback.
- Page 18 Using the Bass Sequencer Setting the accent strength Press the [BASS] button to select the bass. Hold down the [ACCENT] button and turn the [TEMPO/VALUE] knob. Inputting accents and slides using step input Besides inputting accents and slides in step mode or in keyboard mode, you can also input them all at once. Press the [BASS] button to select the bass.
-
Page 19: Using Delay And Reverb
Using Delay and Reverb Using Delay and Reverb Configuring the delay Adjusting the delay volume and feedback Turn the [DELAY] knob. Setting the delay time Hold down the [SHIFT] button and turn the [DELAY] knob. When Delay Sync is ON, the following text is displayed when you turn the [DELAY] knob. 1_32: Thirty-second note 16t: Sixteenth-note triplet 32d: Dotted thirty-second note... - Page 20 Using Delay and Reverb Setting how much signal is sent to the delay Hold down the [SHIFT] button and press the [C (DELAY)] button. “d.Snd” is displayed. Press the button of the instrument you want to set. The current value (0–127) is shown on the display. * Press the [ACCENT] button to set the send amount for the signal received via USB.
- Page 21 Using Delay and Reverb Setting the reverb time Hold down the [SHIFT] button and turn the [REVERB] knob. Setting how much signal is sent to the reverb Hold down the [SHIFT] button and press the [OCT- (REVERB)] button. “r.Snd” is displayed. Press the button of the instrument you want to set.
-
Page 22: Functions, Menus And Shortcuts
Functions, Menus and Shortcuts Functions, Menus and Shortcuts Using the functions Hold down the [SHIFT] button and press the step button corresponding to the function you want to execute. When switching between STEP 1–16/17–32 or using FILL TRG, RANDOM or PTN CLEAR, the display returns to the previous screen after the function is executed. - Page 23 Functions, Menus and Shortcuts Operation Explanation Sets the length (the last step) of the selected pattern. * This can be set separately for rhythm and for bass. [SHIFT] + [D# (LAST)] * The rhythm and bass may be out of sync if their last steps are different. By setting Pattern Sync to “OnCE”, reselecting the current pattern lines up the instruments the next time they start.
- Page 24 Functions, Menus and Shortcuts Menu list This is a list of menus that you can execute using the [SHIFT] + [OCT+ (MENU)] button combination. Use the [TEMPO/VALUE] knob to select the item, and then press the [C# (ENTER)] button to display the values for each item. Item Value Explanation...
- Page 25 Functions, Menus and Shortcuts Item Value Explanation Synchronizes the delay time to the tempo. ƞSyn (Delay Sync) OFF, On Adjusts the amount of delay to send to the reverb. ƞƐSE (Delay to 0–127 Reverb Send) Sets the depth of the side chain effect that uses a rhythm instrument as a trigger, as well OFF, 1–100 as the effect’s sustain time.
- Page 26 Functions, Menus and Shortcuts Item Value Explanation Copies the rhythm pattern to a specified pattern. The save destination number is shown in the display. Use the [TEMPO/VALUE] knob to select the save destination. CPƮr Press the [C# (ENTER)] button to copy. If you want to cancel, press the [C (EXIT)] button.
-
Page 27: Connecting To A Computer Or Mobile Device
Connecting to a Computer or Mobile Device Connecting to a Computer or Mobile Device You can transmit and receive audio and MIDI data by connecting a USB cable from your computer or mobile device (smartphone or tablet) to this unit. You don’t need to install a device driver on your computer or other device to do this (the unit supports USB Audio Device Class 2.0 specs). -
Page 28: Backup And Factory Reset
The drive on this unit takes about a minute to get ready. The step buttons light up to show the progress. Open the “T-8” drive on your computer. The “BACKUP” folder on the “T-8” drive contains a “BASS” and “RHYTHM” subfolder, which contain the backup files for the bass and rhythm. -
Page 29: Main Specifications
Main Specifications Main Specifications User Patterns Rhythm instrument parts x 6 Step Sequencer Bass part x 1 32 steps BASS DRUM SNARE DRUM HAND CLAP INST tone CLOSED HIHAT OPEN HIHAT BASS Effects DELAY, REVERB, OVERDRIVE, SIDE CHAIN Display 7 segments, 4 characters (LED) SYNC (IN, OUT) jacks: Mini phone type Connectors MIX (IN, OUT) / PHONES jacks: Stereo mini phone type... -
Page 30: Signal Flow
Signal Flow Signal Flow... -
Page 31: Midi Implementation Chart
MIDI Implementation Chart MIDI Implementation Chart AIRA Compact Model:T-8 Date: Feb. 7, 2022 Version 1.02 Function Transmitted Recognized Remarks Basic Default 2 (Bass), 10 (Rhythm), 16 (PC) 2 (Bass), 10 (Rhythm), 16 (PC) Memorized Channel Changed 1–16, OFF 1–16, OFF... - Page 32 MIDI Implementation Chart Owner’s Manual ©2022 Roland Corporation...
Need help?
Do you have a question about the T-8 and is the answer not in the manual?
Questions and answers