Roland V-Drums TD-50 Quick Start Manual
Drum sound module
Hide thumbs
Also See for V-Drums TD-50:
- Reference manual (49 pages) ,
- Data list (48 pages) ,
- Manual (30 pages)
Table of Contents
Advertisement
Quick Links
Contents
Quick Start (this document)
Read this first. It explains basic operation.
PDF Manual (download from the web)
5 Reference Manual
This explains all the functions of the TD-50.
5 Data List
This explains the parameters and sound of the TD-50.
5 MIDI Implementation
This is detailed reference material regarding MIDI messages.
Before using this unit, carefully read "IMPORTANT SAFETY INSTRUCTIONS" (inside front cover), "USING THE UNIT SAFELY" (p. 2), and "IMPORTANT NOTES" (p. 4). After reading,
keep the document(s) where it will be available for immediate reference.
Copyright © 2016 ROLAND CORPORATION
2
4
5
6
6
9
9
10
11
12
13
13
13
13
13
14
14
14
14
15
15
16
16
16
16
16
To obtain the PDF manual
1
Enter the following URL in your computer.
http://www roland com/manuals/
2
Choose "TD-50" as the product name.
Quick Start
I
17
17
17
18
18
19
19
20
20
20
20
21
21
22
22
22
22
23
23
23
24
24
24
25
26
26
Advertisement
Table of Contents

Related Manuals for Roland V-Drums TD-50


Summary of Contents for Roland V-Drums TD-50
-
Page 1: Table Of Contents
Before using this unit, carefully read “IMPORTANT SAFETY INSTRUCTIONS” (inside front cover), “USING THE UNIT SAFELY” (p. 2), and “IMPORTANT NOTES” (p. 4). After reading, keep the document(s) where it will be available for immediate reference. Copyright © 2016 ROLAND CORPORATION... -
Page 2: Using The Unit Safely
Do not repair or replace parts by yourself instructions, or as marked on the Refer all servicing to your retailer, bottom of unit. the nearest Roland Service Center, Certification symbols, including regulatory or an authorized Roland distributor, compliance, electrical ratings, country of as listed on the “Information.”... - Page 3 Roland this unit or from a power outlet. Service Center, or an authorized Roland Periodically clean the power plug distributor, as listed on the “Information” An accumulation of dust or foreign...
-
Page 4: Important Notes
Intellectual Property Right in which the electrical appliance is used, • Roland assumes no liability concerning the power supply noise may cause this unit restoration of any stored content that has • It is forbidden by law to make an audio to malfunction or may produce audible been lost. -
Page 5: Look What You Can Do With The
Look What You Can Do with the TD-50 Customize Sounds for More Expressive Potential A rich variety of sounds, and a plenty of freedom to customize them page 5 Drum kits appropriate for a wide range of musical genres are provided. 5 You can customize the drum itself by varying the shell depth and tuning, and adjust the ambience and effects to obtain a variety of sounds. -
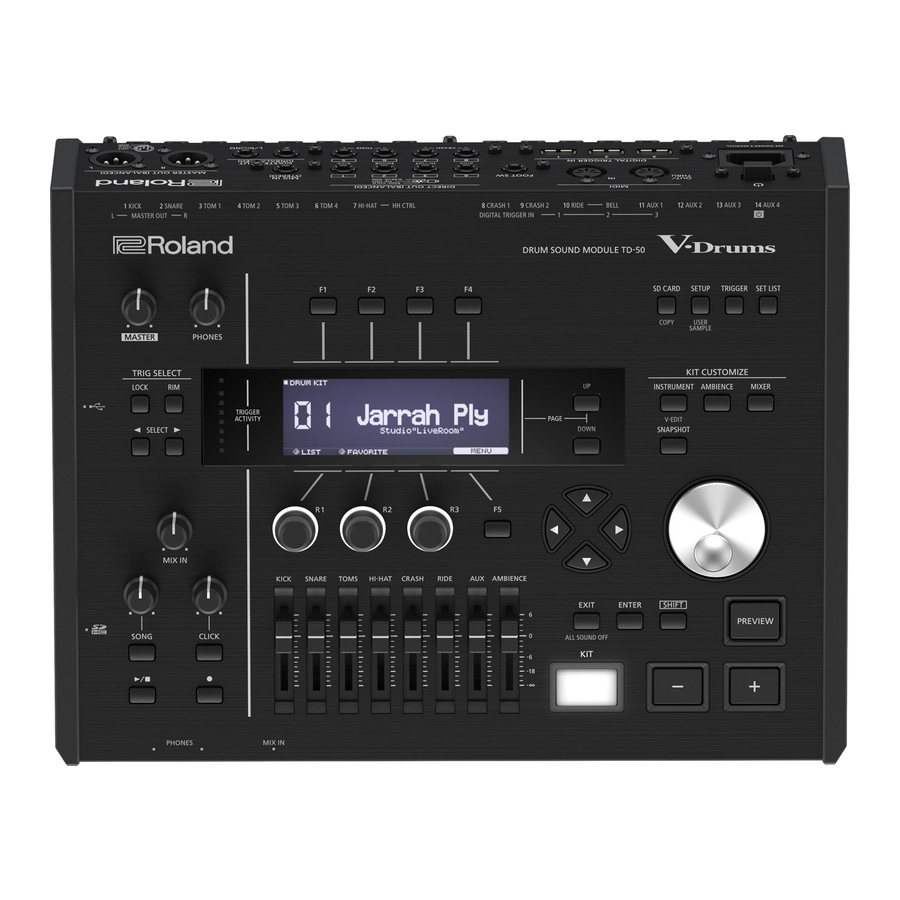
Page 6: Getting Ready
Getting Ready Panel Descriptions Top Panel Controller Explanation Page [MASTER] knob Adjusts the volume of the MASTER OUT jacks. p. 11 [PHONES] knob Adjusts the volume of the headphones connected to the PHONES jack. p. 11 TRIG SELECT If you press the [LOCK] button so its indicator is lit, the pad for which settings are being made will remain selected even if you [LOCK] button strike a pad. - Page 7 Getting Ready Controller Explanation Page KIT CUSTOMIZE Allows you to specify an instrument (sound). [INSTRUMENT] button p. 17 By holding down the [SHIFT] button and pressing the [INSTRUMENT] button, you can move directly to the instrument edit (V-EDIT) page. [AMBIENCE] button Allows you to specify the size and resonance of the room in which the drums are being played.
- Page 8 Getting Ready Rear Panel (Connect Your Equipment) External sound module Footswitch Mixer Sampling pad or Mixer or amplified or other MIDI device other electronic speakers musical instrument Pads Pads (digital connection) Jack Explanation [ L ] switch Press this switch to turn it on/off. AC IN jack Connect the included AC power code to this inlet.
-
Page 9: Turning The Power On/Off
Getting Ready Turning the Power On/Off Making the Power Automatically Turn off After a Time (AUTO OFF) * Once everything is properly connected (p. 8), be sure to follow the procedure below to turn on their power. If you turn on The power to this unit will be turned off automatically after equipment in the wrong order, you risk causing malfunction or a predetermined amount of time has passed since it was... -
Page 10: Making Hi-Hat Settings
Getting Ready Settings for the VH-11 Making Hi-hat Settings After making the hi-hat settings, release your foot from If you’re using the VH-13 or VH-11 V-hi-hat, adjust the offset on the the pedal, and while keeping your foot off the pedal, turn TD-50. -
Page 11: Basic Operation
Getting Ready Basic Operation Switching tabs and specifying functions ([F1]– Switching pages (PAGE [UP] [DOWN] buttons) [F5] buttons, [R1]–[R3] knobs) Use the PAGE [UP] [DOWN] buttons to switch pages in the screen. You can use the [F1]–[F5] buttons to switch the tabs that are In screens where you can switch pages, the PAGE [UP] [DOWN] shown at the top of the display, or specify the functions that buttons are lit, and in the right side of the display there is an... -
Page 12: About Performance Techniques
Getting Ready About Performance Techniques Hi-Hat The TD-50 responds to a variety of performance techniques just like Playing method Explanation an acoustic drum set. The hi-hat tone changes smoothly and continuously Open/closed from open to closed in response to how far the pedal NOTE is pressed. -
Page 13: Performing
Performing Drum Kits and Instruments Selecting a Drum Kit On the TD-50, the sound you hear when you strike each pad is Press the [KIT] button. called an “instrument. ” A “drum kit” is a set of sounds (instruments) assigned to the pads. The DRUM KIT screen appears. -
Page 14: Playing With The Click
Performing Playing with the Click Performing Along with a TD-50 Song The TD-50 contains songs of a wide range of genres. Some internal songs consist only of audio data, and others record a Turning the click on/off drum performance (MIDI data). An audio file (WAV or MP3) on an SD card can also be played back Press the [CLICK] button. -
Page 15: Rhythm Training (Quiet Count)
Performing Rhythm Training (QUIET COUNT) Registering/Recalling Favorite Drum Kits (FAVORITE) The TD-50 provides a “Quiet Count” function that’s an ideal way to develop your sense of tempo. You can register frequently-used drum kits as “favorites” for instant Quiet count is a training function that helps you keep the tempo on your own. -
Page 16: Recording
SMF to an SD card; in the SONG screen (REC DATA tab), press the [F4] (EXPORT) button. For details, refer to “Reference For details on downloading and installing the USB driver, refer to Manual” (PDF). the Roland website. http://www roland com/support/... -
Page 17: Customizing A Kit
Customizing a Kit Selecting an Instrument Saving the settings On the TD-50, your edits are saved automatically, so you Press the [INSTRUMENT] button. don’t have to perform any operation to save the settings. Settings are also saved when you turn off the power. Press the PAGE [UP] button several times to access the INSTRUMENT screen. -
Page 18: Simulating The Ambience Of A Performance Space (Ambience)
Customizing a Kit Simulating the Ambience of a Editing the Mixer (MIXER) Performance Space (AMBIENCE) Here you can adjust the volume of each pad and apply various effects to the sound. This simulates the reverberation or acoustics of a location in which Reference you’re playing the drums (ambience). -
Page 19: Applying Effects
Customizing a Kit Applying Effects Comparing with or Reverting to the Unedited Drum Kit (SNAPSHOT) For each pad, you can adjust the way in which its volume changes (pad compressor) and adjust its tone (pad equalizer), or apply up to three effects to the entire drum kit (multi-effect). -
Page 20: Editing A Drum Kit (Menu)
Customizing a Kit Renaming the Drum Kit Editing a Drum Kit (MENU) Here’s how to rename the currently selected drum kit. Here’s how to make settings such as the volume of the drum kit and the illumination color of the controls. In the KIT SETTINGS screen (p. -
Page 21: Importing And Playing Audio Files (User Sample)
Customizing a Kit Press the [F5] (IMPORT) button. Importing and Playing Audio Files A confirmation message appears. (USER SAMPLE) Audio files that you created on your computer can be imported from an SD card into the TD-50, and played as instruments (user sample function). -
Page 22: Settings
Settings Trigger Settings Adjusting the Sensitivity of a Pad By adjusting the sensitivity of a pad you can adjust the balance Here’s how to make trigger settings so that the signals from the between the force of the strike and the loudness of the sound. pads can be accurately processed by the TD-50. -
Page 23: Backing Up Data
Settings Backing Up Data Loading Backup Data from an SD Card Here’s how backup data that was saved on an SD card can be All settings stored in the TD-50 can be saved (backed up) to an SD loaded into the TD-50. card, or restored (loaded) into the TD-50. -
Page 24: Formatting An Sd Card
Settings Formatting an SD Card Settings for the Entire TD-50 (SETUP) Here’s how to format an SD card. Settings that are common to the entire TD-50, such as the output destination settings and the footswitch settings, are called “setup” * Before using an SD card for the first time with the TD-50, you data. -
Page 25: Troubleshooting
Troubleshooting Problem Items to check Action Page Problems with sound Are the cables correctly connected to each pad and pedal? Check the connections. p. 8 Could the instrument be “OFF”? Assign an instrument. p. 17 &PDF Could the instrument’s “Volume” be lowered? Adjust the instrument’s “Volume. -
Page 26: Quick Reference Of Operations
Personal Drum Monitor: PM-10 Options (sold separately) Kick: KD series, KT series Acoustic Drum Trigger: RT series * This document explains the specifications of the product at the time that the document was issued. For the latest information, refer to the Roland website.
Need help?
Do you have a question about the V-Drums TD-50 and is the answer not in the manual?
Questions and answers