Advertisement
Quick Links
Compatibility
864TRV (31K) – Standard or CleanFace
864TV (40K) – Standard or CleanFace
864TRV Fireplace (replacement set)
Installation Warnings
NOTE: Consult the installation manual for order of installation. If using propane (LP), convert the appliance
before installing the log set. If using firebacks, install them prior to installing the log set.
The logs are fragile, especially after being exposed to heat.
Make sure the gas control valve is OFF and the heater is cool prior to conducting service.
Failure to position the parts in accordance with these diagrams or failure to use only parts specifically
approved with this appliance may result in property damage or personal injury.
The burner must be correctly positioned before installing the log set. Make sure the burner is fully seated
and the pilot is properly aligned. See owner's manual for details on burner removal.
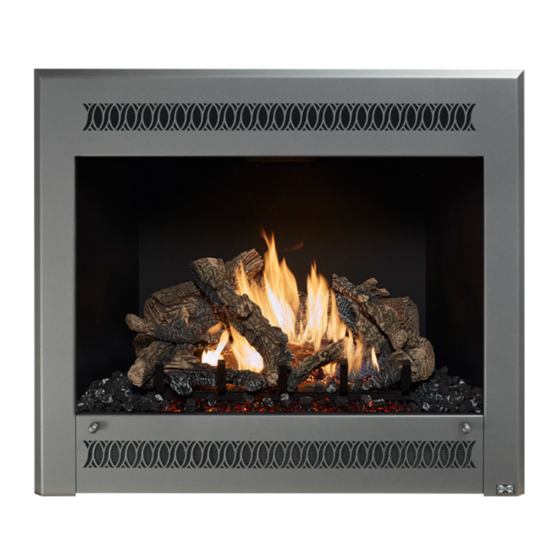
Log Set Overview – Birch
When installed, the ten (10) logs should appear as shown below.
Left Log
250-04853
Center Left Twig
250-04856
Left Twig
250-04857
Front Left Log
250-04851
Page 1 of 7
864 Deluxe Birch Log Set
sku# 94500720
Center Log
250-04859
Center Twig
250-04858
17602062 — 4/2/19
Packing List
10 Piece Log Set
Back Log
250-04850
Front Ember Chunk
Right Twig
250-04855
Right Log
250-04854
250-04852
© Travis Industries, Inc.
Advertisement

Related Manuals for Travis Industries Fireplace Xtrordinair 864 Deluxe


Summary of Contents for Travis Industries Fireplace Xtrordinair 864 Deluxe
- Page 1 Back Log Left Log 250-04850 250-04853 Right Twig 250-04855 Center Left Twig Right Log 250-04854 250-04856 Left Twig 250-04857 Front Left Log 250-04851 Center Twig Front Ember Chunk 250-04858 250-04852 Page 1 of 7 17602062 — 4/2/19 © Travis Industries, Inc.
- Page 2 Right Log The right log has a channel on the bottom that fits over the grate. Place the log in place and slide it to the rear. Page 2 of 7 17602062 — 4/2/19 © Travis Industries, Inc.
- Page 3 The left log has a channel on the bottom. Place this channel over the grate. When in place, make sure the log is positioned so it does not block any burner holes. Page 3 of 7 17602062 — 4/2/19 © Travis Industries, Inc.
- Page 4 Pin rests on burner Notch straddles grate Front Ember Chunk The front ember chunk has a groove on the bottom that fits over the grate. Place it as shown below. Page 4 of 7 17602062 — 4/2/19 © Travis Industries, Inc.
- Page 5 The left center twig is flat on the bottom and has a fork at one end. Place the twig as shown below. Note how the twig rests in the groove in the front left log and the right end hangs over the burner but does not rest on it. Page 5 of 7 17602062 — 4/2/19 © Travis Industries, Inc.
- Page 6 The right twig has a hole on the bottom that fits over the pin on the right log. Position the twig so it rests on the back log as shown below. Page 6 of 7 17602062 — 4/2/19 © Travis Industries, Inc.
- Page 7 Do not use the entire bag of rock wool. Use only a small amount and save the remainder. Over-use of rock wool will diminish the glow and may cause sooting or other adverse conditions. Page 7 of 7 17602062 — 4/2/19 © Travis Industries, Inc.