Table of Contents
Advertisement
Advertisement
Table of Contents

Related Manuals for Sunwave Tech. SRC-3310/9320


Summary of Contents for Sunwave Tech. SRC-3310/9320
- Page 1 SRC-9310/9320 Touch Screen Remote Control User Manual 031021...
-
Page 2: About This Manual
SRC-93 SERIES User’s Manual About this manual This manual is designed to make using the SRC-93 SERIES Touch Screen Remote Control as easy as possible. document has been carefully checked for accuracy; however, no guarantee is given to the correctness of the contents. The information in this document is subject to change without notice. -
Page 3: Table Of Contents
Table of Contents Chapter 1 - Introducing the SRC-93 SERIES...1 SRC-93 SERIES Features ... 2 Unpacking the SRC-93 SERIES ... 2 Identifying Components ... 3 Chapter 2 - Getting Started ...4 Features Overview ... 4 Installing Batteries ... 6 Battery Low Indicator... 7 Battery Tips and Precautions ... - Page 4 SRC-93 SERIES User’s Manual Chapter 4 - Controlling Devices ... 27 Selecting Device to Control ... 27 Changing Touch Screen Page... 27 Controlling the Device... 28 Using the AUX Key ... 28 Chapter 5 - Creating and Using Macros ... 29 Introduction to Macros ...
-
Page 5: Chapter 1 - Introducing The Src-93 Series
Chapter 1 - Introducing the SRC-93 SERIES Congratulations on your purchase of the SRC-93 SERIES Touch-Screen Remote Control. The SRC-93 SERIES is a digital universal remote control that is easy to use, enabling you to control all of your electronic devices equipped with an infrared (IR) remote. -
Page 6: Src-93 Series Features
SRC-93 SERIES User’s Manual SRC-93 SERIES Features The following list identifies the SRC-93’s key features. • Large touch screen display. • Macro sequence function—each macro can store 60 commands. • Controls up to sixteen devices including DVDs, TVs, Satellite Receivers, VCRs and CDs. •... -
Page 7: Identifying Components
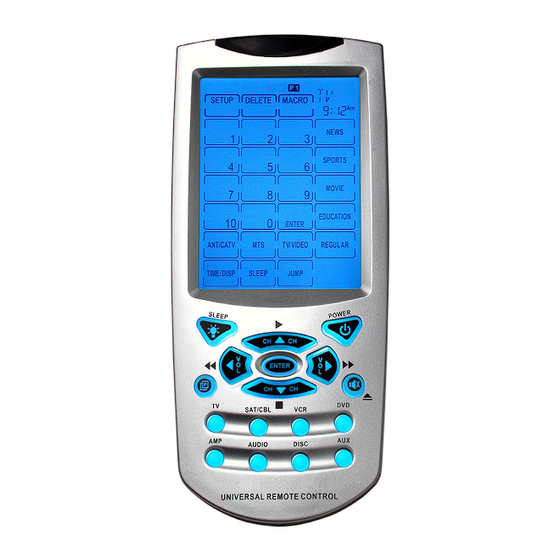
Identifying Components Please refer to the following illustrations to identify the components of the SRC-93 SERIES. Infrared Eye Point the infrared eye at the device you want to operate. Touch Screen The Touch Screen panel enables you to configure and operate your devices by touching the... -
Page 8: Chapter 2 - Getting Started
SRC-93 SERIES User’s Manual Chapter 2 - Getting Started This chapter will give you the information you need to know to quickly get using the SRC-93 SERIES as your single remote control. Features Overview The following illustration highlights the different sections of the SRC-93 SERIES. - Page 9 • LCD Indicators: LCD stands for Liquid Crystal Display and these indicators at the top of the display give you feedback and information. You can look here to see if the beep is turned on, if the battery has low power, if the infrared signal was sent OK or if there was an ERROR, and also to see which page of Touch Screen buttons you are looking at.
-
Page 10: Installing Batteries
SRC-93 SERIES User’s Manual Installing Batteries The SRC-9310 operates on four AA Alkaline batteries, SRC-9320 operates on four AAA Alkaline batteries (batteries are not included). Batteries must be inserted before you can operate the SRC-93 SERIES. To insert the batteries, refer to the following illustration: Figure 3: Installing Batteries 1. -
Page 11: Battery Low Indicator
Battery Low Indicator When the batteries are low, the battery low icon will be displayed in the upper left hand corner just above the SETUP button: When the battery Low Icon appears, you will not allowed to enter Functions Keys (SETUP Menu, DELETE Menu & MACRO Menu). -
Page 12: Touch Screen
SRC-93 SERIES User’s Manual Touch Screen The touch screen reduces the number of buttons by changing its configuration for each device selected. In this way, the touch screen can provide a total of 768 buttons (16 devices x 2 pages x 24 buttons per page). -
Page 13: Touch Screen Buttons
immerse it in liquid. • Don't expose the SRC-93 SERIES to extreme temperatures. Keep it away from heat sources. • Avoid dropping the SRC-93 SERIES. • Don't drop anything on the touch screen. • Clean the LCD touch screen with a soft cloth. If needed, dampen the cloth slightly before cleaning. -
Page 14: Menus
SRC-93 SERIES User’s Manual • Page / Date Button: Toggles from Page 1 to Page 2 of the Touch Screen buttons. If held down for more than two seconds, the date and year then week will be shown. • Power Button: Can turn off and on your devices but also during Touch Screen Layout (see page 15) will display all possible LCD choices. -
Page 15: Setup Menu
Setup Menu Menu Item DATE Set the system clock and date. Create a new device from scratch. CODE Assign a preprogrammed manufactures infrared code to a device. LABL Rename a Device. Change the Touch Screen layout to you want to have based on all possible LCD choices. Learn infrared codes from an existing remote control. -
Page 16: Delete Menu
SRC-93 SERIES User’s Manual Delete Menu Menu Item Allow you to delete the infrared codes for a specific Touch Screen or Rubber button. BANK CODE: Allows you to delete all infrared codes for a specific device while leaving the Touch Screen layout the same. ALL: Deletes both infrared codes and the touch screen layout for a specific device. -
Page 17: Chapter 3-Setting Up The Src-93 Series To Control A Device
Chapter 3-Setting Up the SRC-93 SERIES to Control a Device Before the SRC-93 SERIES can be used to control a device, it needs to be configured to display your existing remote control buttons and also programmed to send the correct infrared signals. This chapter guides you through the Touch Screen layout and SRC-93 SERIES setup procedure. -
Page 18: Modifying An Existing Device
SRC-93 SERIES User’s Manual Press the device key you wish to use for this device. For example, if this is a new TV you should press the TV button. For a new DVD player, press the DVD button. Give your new Device a label. Use the UP and DOWN arrows to change the letter. -
Page 19: Changing Touch Screen Layout
1. Use the device keys to select the device you want to label. 2. Use the arrow keys to give the device a new label. 3. Press OK when finished. Then press EXIT to leave the SETUP menu. Changing Touch Screen Layout The layout edit mode enables you to customize the SRC-93 SERIES's Touch Screen display to match your existing remote controls. -
Page 20: Programming Infrared Codes
SRC-93 SERIES User’s Manual Press the device keys to select the device you want to modify. (ex. Press TV button) Press the button (Page Button) to change to the Touch Screen page you want to modify. Press the available LCD choices for all buttons. Touch the button that you wish to change. -
Page 21: Using Manufacturer Codes
configure all buttons on the SRC-93 SERIES for use with a specific manufacture model number. This feature is the fastest way to program the SRC-93 SERIES but requires that your device be located in Preprogrammed Code Table as the separate page with this manual. (Some newer or less-common devices may not be pre-programmed and must be learned using the Learning Function.) •... - Page 22 SRC-93 SERIES User’s Manual Press and hold the SETUP button on the Touch Screen. Press each number button (2, 4, 6, 8) until it disappears. Use the arrow buttons on the Touch Screen to select CODE and then press the OK button. 1.
- Page 23 You may also use the TUNING buttons to increase or decrease the code. When finished, press the OK button to return to the Setup Menu. When you enter the Manufacture Code , but shows ‘ERROR’ message, two possibilities maybe caused : 1.
-
Page 24: Using The Learning Function
SRC-93 SERIES User’s Manual The AUTO mode‘s preprogrammed code circle depends on the range of Manufacture Code table reserved for that default device screen. Ex. TV’s preprogrammed code circle will be from 0 ~255. Using the Learning Function If you have the original remote, the SRC-93 SERIES has the ability to directly learn infrared codes. - Page 25 Learning from Another Remote Control To teach the codes from your remote, set both remotes on a flat surface facing each other. Be sure to point your device’s remote control at the SRC-93 SERIES’s learning eye, which is located at the bottom of the unit. Do not use the other eye located at the top of the SRC-93 SERIES.
- Page 26 SRC-93 SERIES User’s Manual To learn infrared codes directly from a device’s remote control, follow these steps: Press and hold the SETUP button on the Touch Screen. Press each number button (2, 4, 6, 8) until it disappears. Use the arrow buttons on the Touch Screen to select LRN and then press the OK button.
- Page 27 Press and hold the button on the other remote control for 2 seconds. Check to see whether ERROR or OK on the top of the SRC-93 SERIES Touch Screen is displayed. If ERROR is displayed, try again. (You have to hold the other remote control’s button for about 2 seconds before letting go.) The SRC-93 SERIES will automatically guide you to the next button to program by flashing it on the Touch Screen.
-
Page 28: Collecting Unrecognized Infrared Codes
SRC-93 SERIES User’s Manual Collecting Unrecognized Infrared Codes Use this procedure if the SRC-93 SERIES is unable to recognize the infrared signals from another remote control. (You only see the ERROR indicator when Using the Learning Function on page 20.) Once collected you can use the Remote Connector (see Appendix B - Accessories on page 44 for more info) to upload the unrecognized codes to your personal... -
Page 29: Deleting A Specific Key
Deleting a Specific Key To erase the infrared codes for a specific Touch Screen or Rubber key, follow these steps: Press and hold the DELETE button on the Touch Screen. Press each number button (2, 4, 6, 8) until it disappears. Use the arrow buttons on the Touch Screen to select KEY and then press the OK button. - Page 30 SRC-93 SERIES User’s Manual To delete a device from the SRC-93 SERIES follow these steps: Press and hold the DELETE button on the Touch Screen. Press each number button (2, 4, 6, 8) until it disappears. Use the arrow buttons on the Touch Screen to select BANK and then press the OK button.
-
Page 31: Chapter 4 - Controlling Devices
Chapter 4 - Controlling Devices The SRC-93 SERIES is designed to be simple and straight forward to operate. This chapter explains how to use the SRC-93 SERIES to control all your devices. This Chapter assumes you have already setup the SRC- 93 SERIES and assigned Infrared codes to different buttons. -
Page 32: Controlling The Device
SRC-93 SERIES User’s Manual Controlling the Device Make sure the SRC-93 SERIES is pointing at the device you are trying to control and simply press the button you want to send: • Press the Touch Screen buttons. • Press one of the rubber buttons on the bottom half of the SRC-93 SERIES’s. -
Page 33: Chapter 5 - Creating And Using Macros
Chapter 5 - Creating and Using Macros Introduction to Macros A macro is simply a series of commands. The MACRO feature enables you to initiate a sequence of up to 60 commands with a single button. You can create a macro on any control button and also insert time delays into the sequence. - Page 34 SRC-93 SERIES User’s Manual Set up the macro using the following steps: Press and hold for two seconds the MACRO button on the Touch Screen. Press each number button (2, 4, 6, 8) until it disappears. Use the arrow buttons on the Touch Screen to select KEY and then press the OK button.
- Page 35 Press the DVD device button. Press the POWER button. Press the TIME DELAY button. Use the UP and DOWN arrows to select a time delay (in seconds). Press OK to confirm time delay. 10. Press the PLAY button. 11. Press OK to save the Macro. Then press EXIT to leave the MACRO Menu.
-
Page 36: Using Macros
SRC-93 SERIES User’s Manual Using Macros To start a Macro for a specific device, first select the device and then simply press the key assigned to the Macro. If you forget which keys have Macros assigned to them, press the MACRO button and all keys with valid Macros will be shown. -
Page 37: Chapter 6 - Other Features
Chapter 6 - Other Features The SRC-93 SERIES has the following additional features: • Timers: Can be used to start a macro or send a command at a later time. Many timers are available including: daily, weekly, weekends only, weekdays only, or specific days and times. -
Page 38: Setting Up A New Timer
SRC-93 SERIES User’s Manual Setting Up a New Timer Press and hold the MACRO button on the Touch Screen. Press each number button (2, 4, 6, 8) until it disappears. Use the arrow buttons on the Touch Screen to select TIMR and then press the OK button. -
Page 39: Using Quick Channel Lists
Use the arrow keys to select the time. Press OK Note: If you used SPEC (Specific Day/Time) you will also set the date. Select the key that the timer will press. If you want you can switch devices (use device keys) or Touch Screen pages. -
Page 40: Setting Up Quick Channel Lists
SRC-93 SERIES User’s Manual Setting up Quick Channel Lists Press and hold the MACRO button on the Touch Screen. Press each number button (2, 4, 6, 8) until it disappears. Use the arrow buttons on the Touch Screen to select Q CH and then press the OK button. -
Page 41: Deleting Channels From A Quick Channel List
Deleting Channels from a Quick Channel List Press and hold the DELETE button on the Touch Screen. Press each number button (2, 4, 6, 8) until it disappears. Use the arrow buttons on the Touch Screen to select Q CH and then press the OK button. -
Page 42: Using Quick Channel Lists
SRC-93 SERIES User’s Manual Using Quick Channel Lists Press the Quick Channel button you wish to use. (It will begin to flash.) Now use the Channel Up and Channel Down buttons to scroll through all channels in this classification. When finished, press the Exit button again to return to normal operation. -
Page 43: Using Sleep Mode
Using Sleep Mode Sleep mode allows the SRC-93 SERIES to send a command or start a Macro after a specified time delay. One example is you could use sleep mode to shut off a TV after you have already fallen asleep. To use sleep mode: Press and hold the BACKLIGHT (SLEEP) key for two seconds. -
Page 44: Displaying Version Number
SRC-93 SERIES User’s Manual Displaying Version Number For technical support reasons, the version number might be needed by SUNWAVE. To display the two version number of PROG and DATA, use the VER selection in the SETUP Menu. Chapter 7 - Changing SRC-93 SERIES Parameters Many of the SRC-93 SERIES parameters can be changed. -
Page 45: Power Down Time Period
Power Down Time Period This setting specifies the time delay the SRC-93 SERIES will wait until it automatically shuts down. (The touch screen will go blank to conserve battery usage.) This setting can be changed from 1 minute to 90 minutes by using the PWDN selection of the SETUP menu: 1. -
Page 46: Beep Toggling
SRC-93 SERIES User’s Manual Beep Toggling This setting specifies whether you want the SRC-93 SERIES to beep each time a button is pressed. Use the BEEP selection in the SETUP Menu to change this setting: 1. Use the OK button to toggle the beep from ON to OFF. -
Page 47: Appendix A - Specifications
Appendix A - Specifications Model Dimensions (WxHxD): Weight (Without Batteries): Number of Device: LCD Screen (WxH) : Soft Button : Hard Buttons: Backlighting: Learning Frequency: Memory: Batteries: Power consumption: Battery Life: Operating Distance: PC Interface: SRC-9310 3.2" x 7.3" x 1.2" (8.2cm x18.5cm x 3.2cm) 7.8oz (220g) 16 devices... -
Page 48: Appendix B - Accessories
SRC-93 SERIES User’s Manual Appendix B - Accessories SLC–2080 USB cable The SLC–2080 is an optional link cable that enables transmission of system setup to a personal computer or another SRC-9310/9320. With th RemoteComm software enables user to customize the remote control, create macros and timers. With the Upgrade Tools enables user to upgrade program and Preprogrammed code. -
Page 49: Appendix C - Troubleshooting
Appendix C - Troubleshooting Problem LCD does not show anything when you touch it or press the rubber buttons. The SRC-93 SERIES doesn’t operate a device. Solution Batteries may be dead. Replace the batteries with 4 new AA Alkaline Batteries. (page 6) Check that the batteries are properly installed. - Page 50 SRC-93 SERIES User’s Manual Problem You cannot operate a device even after teaching the device using the learning function. You see “ERROR” display on the LCD during the learning procedure. You see “ERROR” display during operation. Your VCR will not record.
- Page 51 Problem A button of your existing remote performs two or more functions The LCD screen turns off. IR LEARNING cannot be made successfully. Solution Some remotes issue multiple commands when a button is held down. Please be sure to teach different buttons of SRC-93 SERIES for these different commands.
Need help?
Do you have a question about the SRC-3310/9320 and is the answer not in the manual?
Questions and answers