
Subscribe to Our Youtube Channel
Related Manuals for Comcast CGA4332COM


Summary of Contents for Comcast CGA4332COM
-
Page 1: Setup And User Guide
Comcast Business Router v2 (CBR2) Model- CGA4332COM The Comcast Business Router v2 (CBR2) DOCSIS® 3.1 Cable Modem, with built-in 802.11ax Wi-Fi Router and voice eMTA SETUP AND USER GUIDE CBR2 CGA4332COM... - Page 2 CBR2 CGA4332COM - User Guide SAFETY INSTRUCTIONS AND REGULATORY NOTICES Before you start installation or use of this product, carefully read these instructions! 2 of 51...
- Page 3 CBR2 CGA4332COM - User Guide To reduce the risk of electric shock, do not disassemble this product. None of its internal parts are user-replaceable; therefore, there is no reason to When using this product, always follow the basic safety precautions to access the interior.
- Page 4 CBR2 CGA4332COM - User Guide 2 This device must accept any interference received, including interference P(ermissible) E(xposure) limits are well above the potential this module is capable to produce. For operation within 5.15 ~ 5.25GHz frequency range, it that may cause undesired operation.
- Page 5 Other brands and product names may be trademarks or registered trademarks of their respective holders. All other logos, trademarks and service marks are the property of their respective owners, where marked or not. Document Information Status: v1.0 (June 2021) Reference: CBR2 Data Sheet 06012021 COMCAST Title: Setup and User Guide CBR2 CGA4332COM 5 of 51...
-
Page 6: Table Of Contents
Preparing for installation ............................... 16 Local connection requirements ............................16 Setup .................................... 16 Setup procedure .................................. 16 Connect the Gateway to the Comcast network ....................16 Connecting the cables ..............................16 Power on the Gateway ............................17 Connect your wired devices ..........................18 How to connect your phone .......................... - Page 7 CBR2 CGA4332COM - User Guide 7.1.1. UPnP ..................................40 7.1.2. Port forwarding ..............................41 7.1.3. Port triggering ..............................42 7.1.4. Port Management ..............................43 7.1.5. Remote Management ............................45 7.1.6. Configure a DMZ Host ............................46 7.1.7. NAT ..................................46 7.1.8.
-
Page 8: About This Setup And User Guide
The note symbol indicates that the text provides additional information about a topic. Terminology Generally, the CBR2 CGA4332COM will be referred to as the Gateway in this Setup and User Guide. Typographical conventions The following typographical conventions are used throughout this manual: This sample text indicates a hyperlink to a website. -
Page 9: Getting Started
CBR2 CGA4332COM - User Guide 1 Getting Started Introduction This chapter provides a brief overview of the main features and components of the Gateway. After this chapter, we will start with the installation. Do not connect any cables to the Gateway until instructed to do so. -
Page 10: Getting To Know The Gateway
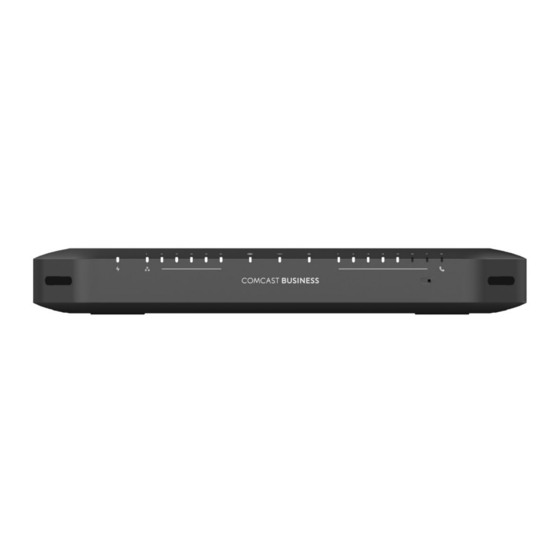
CBR2 CGA4332COM- User Guide 1.2 Getting to know the Gateway This section introduces you to the different components of the Gateway: Section Page 1.2.1 Front Panel 1.2.2 Top Panel 1.2.3 Back Panel 1.2.4 Bottom Panel 1.2.1 Front panel Introduction On the front panel of your Gateway is a series of LEDs that allow you to check the state of the services offered by the Gateway. - Page 11 CBR2 CGA4332COM- User Guide 1.2.2 Top Panel LED Legend: State Description Solid on Signifies steady state, or no action required Blink (1X/second) Signifies activity in progress or action required Fast Blink (5X/second) Fatal error, unrecoverable No activity, off 11 of 51...
- Page 12 CBR2 CGA4332COM- User Guide A: Power/Battery Status LED LED Status Description White Solid on On AC Power Amber Solid on On Battery Power Amber Blinking (1X/second) Battery at <=20% (Overrides AC / Battery Power States) White and Blinking (5X/second) Battery needs Replacement (Overrides AC/ Battery Power &...
-
Page 13: Back Panel
CBR2 CGA4332COM- User Guide E: WiFi LED - White State Description Solid on On and OK Blink (1X/second) In Use (2.4 or 5G active) F: US/DS LED - White State Description Solid on Registration State Confirmed Blink (1X/second) Up/Down Stream registration or Non-deferred SW Download (when Online) G: TEL 1 –... - Page 14 CBR2 CGA4332COM- User Guide Four Ethernet ports on the Gateway (item B) support Gigabit Ethernet and have a maximum speed of 1 Gbps (Gigabit per second). Two Ethernet ports on the Gateway (item C) support 2.5 Gigabit Ethernet and have a maximum speed of 2.5 Gbps (Gigabits per second).
-
Page 15: Bottom Panel
CBR2 CGA4332COM- User Guide 1.2.3 Bottom panel A: Battery compartment (optional) During a power failure, the Gateway can automatically switch to the auxiliary emergency power via the rechargeable battery (if installed). The following capabilities are supported during a loss of power: The connected phones support dial tones for a connected alarm system. -
Page 16: Preparing For Installation
To connect the Gateway to the RF network, proceed as follows: 1. Take one end of the coaxial cable and connect it to Comcast’s cable network. 2. Connect the other end of the coaxial cable to the Cable port of the Gateway. -
Page 17: Power On The Gateway
CBR2 CGA4332COM- User Guide To connect Gateway to an EPON device proceed as follows: 1. Take one end of the Ethernet cable and connect it to your EPON device. 2. Connect the other end of the Ethernet cable to Port 6 of the Gateway. -
Page 18: Connect Your Wired Devices
CBR2 CGA4332COM- User Guide 3.3 Connect your wired devices Requirements Both your network device (for example, a computer, a point-of-sale terminal, etc.) and Gateway • must have an available Ethernet port. Your network device must be configured to obtain an IP address automatically. This is the default setting. -
Page 19: How To Install The Battery
CBR2 CGA4332COM- User Guide 3.5 How to Install the Battery This section describes how to install the battery in the gateway. By default, CBR2 CGA4332COM does not come with the battery installed. To install or replace the battery, follow the below procedure. -
Page 20: Admin Tool
CBR2 CGA4332COM- User Guide Angle the new battery/compartment door such that the guides in the bay and aligns with the slots on the battery and insert the battery into the compartment. Insert and tighten the screw above the battery compartment door. - Page 21 CBR2 CGA4332COM- User Guide Note: It is recommended that you change the default password. The admin tool will automatically require changing the default password after 10 logins. 3. The appears: Admin Tool 21 of 51...
-
Page 22: Components
CBR2 CGA4332COM- User Guide 4.1 Components The following diagram identifies the sections of the Admin Tool: A: Menu The menu consists of the following items: Gateway: • Provides basic information about the Gateway and allows you to configure basic settings. -
Page 23: How To Change The Default Admin Tool Password
CBR2 CGA4332COM- User Guide • The status of the Internet interface The status of the wireless interface • • The selected firewall level Move your mouse over the items to view additional information. D: Tips section The tips section provides helpful information about the settings displayed on the current page. -
Page 24: How To Back Up Or Restore A Configuration
CBR2 CGA4332COM- User Guide Your new password must be at least 8 characters long. It may include letters, numbers, or a combination of both (no symbols). For better security, try using at least one number and a mix of upper and lowercase letters. -
Page 25: Battery Status
Power Status When running on AC power with no battery installed Battery Installed Yes or No Good (Awaiting Comcast Product Team’s Reply) Low Battery Condition (Awaiting Comcast Product Team’s Reply) Charging (When Device is on AC power and battery charge is <... -
Page 26: The Gateway Wireless Access Point
CBR2 CGA4332COM- User Guide 5 The Gateway Wireless Access Point This section describes how to set up your wireless network. What you need to set up a wireless network: A wireless access point (already integrated into your Gateway) A wireless client: the device that you want to connect (for example, a computer, smartphone, network printer) ... - Page 27 CBR2 CGA4332COM- User Guide Network Name 1 (SSID): CBCI-XXXX Network Name 2 (SSID): CBCI-XXXX Password: *************** The Gateway’s back panel contains two items needed to establish a Wi-Fi connection: Network Name (SSID) is the default network name. This network name is used by both the •...
- Page 28 CBR2 CGA4332COM- User Guide How to connect your computer on Windows 10 1. Click the wireless network icon ( ) in the notification area. 2. A list of available wireless networks appears. Double-click the Gateway’s Network Name (SSID). Use the Gateway’s Network Name (SSID) as printed on the bottom panel label.
- Page 29 CBR2 CGA4332COM- User Guide 4. Windows prompts you to enter the security key. 5. Type the Password (Key) from the Gateway's bottom panel label in the Enter the network security key box and click Next. 6. A Windows prompt asks you if it should turn on sharing. Click Yes.
-
Page 30: How To Configure The Wireless Settings
CBR2 CGA4332COM- User Guide 5.2 How to Configure the Wireless Settings 1. Go to the Admin Tool (http://10.1.10.1), using a computer or other device that is currently connected to your Gateway (either wired or wirelessly). For more information, see “Accessing the Admin Tool”. - Page 31 CBR2 CGA4332COM- User Guide The following fields are available for configuration: Wireless Network: Allows you to enable or disable this access point. Network Name (SSID): To distinguish one wireless network from another, each wireless network has its own network name, often referred to as Service Set Identifier (SSID). All your wireless clients on your network must use this network name.
-
Page 32: Prevent Devices From Accessing Your Wireless Network
CBR2 CGA4332COM- User Guide Broadcast Network Name (SSID): By default, the Gateway broadcasts its network name. Wireless clients can then detect the presence of your network and inform the users that this network is available. Enabling SSID broadcast does not mean that everyone can connect to your network. Users still need the correct wireless network key (password) to connect to the Gateway network. -
Page 33: Internet Security
CBR2 CGA4332COM- User Guide Repeat this step for each exception that you want to add. 6. Click SAVE FILTER SETTING. 6 Internet Security The Gateway offers various options to secure your Internet connection: Topic Page 6.1 Content Filtering 6.1.1 Managed Sites 6.1.2 Managed Services... -
Page 34: How To Access The Managed Sites Page
CBR2 CGA4332COM- User Guide How to access the Managed Sites page 1. Go to Admin Tool (http://10.1.10.1), using a computer or other device that is currently connected to your Gateway (either wired or wirelessly). For more information, see “Accessing the Admin Tool”. -
Page 35: How To Block Websites Based On Keywords
CBR2 CGA4332COM- User Guide How to block websites based on keywords Proceed as follows, from the Managed Sites page: 1. Under Blocked Sites, click + ADD. The Add Keyword to be Blocked page appears. 2. In the Keyword box type the keyword that you want to block (for example, the webmail keyword will block all URLs that contain the word webmail in the URL). -
Page 36: Mark Computers As Trusted For All Services
CBR2 CGA4332COM- User Guide How to create a service rule 1. Go to the Admin Tool (http://10.1.10.1), using a computer or other device that is currently connected to your Gateway (either wired or wirelessly). For more information, see “Accessing the Admin Tool”. -
Page 37: Adding Allowed Devices
CBR2 CGA4332COM- User Guide 4. In the Access Type list, select: Allow All to allow all devices by default. In this case you must create a rule for each device that you want to block on your network. Block All to block all devices by default. In this case you must create a rule for each device that you ... -
Page 38: Firewall
CBR2 CGA4332COM- User Guide 3. Under Report Filters, select a report type and time frame and click GENERATE REPORT. 4. The Generated report table now lists all log entries. 5. Optionally, you can: Click PRINT to print the log entries. -
Page 39: Advanced Configuration
CBR2 CGA4332COM- User Guide 7 Advanced configuration This chapter covers the more advanced features. The following topics are available: Topic Page 7.1 Port configuration for applications and services 7.1.1 UPnP 7.1.2 Port Forwarding 7.1.3 Port Triggering 7.1.4 Port Management 7.1.5 Remote Management 7.1.6 Configure a DMZ Host... -
Page 40: Upnp
CBR2 CGA4332COM- User Guide Solutions To avoid this problem, the Gateway offers the following solutions: The Gateway supports automatic device discovery and port configuration for UPnP-enabled devices. For more information, see “7.1.1 UPnP”. The Gateway allows you to assign a port to a device. For more information, see “7.1.2 Port... -
Page 41: Port Forwarding
CBR2 CGA4332COM- User Guide 4. In the Enable UPnP list, select Enabled. 5. Click SAVE. 7.1.2. Port forwarding Port forwarding allows you to forward incoming Internet traffic arriving on a specific port to an internal IP address. For example, if you are running a web server and the Gateway receives a request on port 80, this request should be forwarded to your web server. -
Page 42: Port Triggering
CBR2 CGA4332COM- User Guide In the Service Type list, select the protocol that is used by the service. In the Starting Port box, type the start port number of the port range. In the End port box, type the last port number of the port range. If you only want to specify one ... -
Page 43: Port Management
CBR2 CGA4332COM- User Guide 4. In the Enable Port Triggering list, select Enabled. In the Port Triggering table, click +ADD PORT TRIGGER. The Add Port Trigger page appears: 5. Complete the following fields: In the Service Name box, type a name for the rule (for example, FTP). - Page 44 CBR2 CGA4332COM- User Guide The Port Management page appears. 3. In the Enable Port Management, uncheck the Disable all rules and allow all Inbound traffic through; click OK on the pop-up window. 4. Select the port management from the list Block all ports but allow exceptions below or Open all ports but block exceptions below;...
-
Page 45: Remote Management
CBR2 CGA4332COM- User Guide 7. Click SAVE. Your service is now listed in the Port Management table. 7.1.5. Remote Management Remote management allows the gateway to be accessed remotely by a customer account representative to perform troubleshooting or maintenance. This can be used via HTTPS. -
Page 46: Configure A Dmz Host
CBR2 CGA4332COM- User Guide 7.1.6. Configure a DMZ Host The Gateway allows you to configure one local device as a Demilitarized Zone (DMZ) host. This means that: None of the Gateway firewall rules will be applied to this device. •... -
Page 47: Static Routing
CBR2 CGA4332COM- User Guide 6. The Add NAT page appears: 7. In the Public IP Address box, type the IP address of the computer for which you want to add the rule for 1-to-1 NAT. 8. In the Private IP Address box, type the IP address of the computer for which you want to add the rule for 1-to-1 NAT. - Page 48 CBR2 CGA4332COM- User Guide How to assign a reserved IP Address 1. Go to the Admin Tool (http://10.1.10.1), using a computer or other device that is currently connected to your Gateway (either wired or wirelessly). For more information, see “Accessing the Admin Tool”.
-
Page 49: Support
CBR2 CGA4332COM- User Guide 8 Support This chapter suggests solutions for issues that you may encounter while installing, configuring, or using your Gateway. If the suggestions provided here do not resolve the problem, look at the support pages on www.technicolor.com or contact your service provider. -
Page 50: Network Diagnostic Tools
5. In the Wireless Network list, click Enabled. 6. Click SAVE SETTINGS. For further assistance please contact Comcast Business support at 800-391-3000 or at https://business.comcast.com/. 8.2 Network diagnostic tools The Admin Tool offers a number of diagnostic tools to test your network connectivity. - Page 51 CBR2 CGA4332COM- User Guide reconfiguration of your Gateway or a restore of a previously saved configuration (see “Restoring a configuration”) will be needed. Also, your wireless clients will have to be re-associated, previously saved as described in “5.1 Connect your wireless devices”.
Need help?
Do you have a question about the CGA4332COM and is the answer not in the manual?
Questions and answers