Table of Contents
Advertisement
Quick Links
INSTRUCTION MANUAL
No.2205
MODEL
Read and fully understand all the instructions before use.
Keep this manual in designated place for easy and quick reference.
The models mentioned in this manual are designed for use outside Japan.
Warranty shall be void if above mentioned models are used in Japan.
GPTN241E-UC/GPTN301E-UC
GPTN331E-UC/GPTN391E-UC
GPTN451E-UC
24 0
2 10
1 80
90
15 0
1 0 0
12 0
CAUTION
Double Insulation
Advertisement
Table of Contents

Related Manuals for Tone GPTN241E-UC


Summary of Contents for Tone GPTN241E-UC
- Page 1 INSTRUCTION MANUAL No.2205 GPTN241E-UC/GPTN301E-UC GPTN331E-UC/GPTN391E-UC MODEL GPTN451E-UC 24 0 2 10 1 80 90 15 0 1 0 0 12 0 Double Insulation CAUTION Read and fully understand all the instructions before use. Keep this manual in designated place for easy and quick reference.
- Page 2 PREFACE Thank you for purchasing the- TURN OF THE NUT TIGHTENIG WRENCH ■ Upon receipt, check and confirm the following: ● Check for any damage. ● Check for any loose or missing screws and bolts. ● Check the model as per order. ●...
- Page 3 SAFETY INSTRUCTION This manual specifies three (3) basic safety instructions: Instructions are classified by degree of risk and described as follows: Danger is used to indicate threatening dangerous or unsafe practices which could immediately result in severe personal injury or death in the worst case. Warning is used to indicate hazardous or unsafe practices which could result in severe personal injury or death in the worst case.
-
Page 4: Table Of Contents
TABLE OF CONTENTS 1. GENERAL SAFETY INSTRUCTIONS ···································· 4 2. APPLICATION ················································································ 7 PRECAUTIONS FOR USE ················································ 7 4. PART NAME & ACCESSORIES ············································ 17 5. BEFORE USE ··············································································· 19 6. CHANGING ACCESSORIES ··················································· 20 7. OPERATING PROCEDURE ····················································· 22 8. -
Page 5: General Safety Instructions
1. GENERAL SAFETY INSTRUCTIONS WARNING When using electric tools, basic safety precautions, including the following, should always be followed to reduce the risk of fire, electric shock and personal injury. Read all instructions before operating this product and keep the instructions for future reference. - Page 6 e) When operating a power tool outdoors, use an extension cord suitable for outdoor use. Use of a cord suitable for outdoor use reduces the risk of electric shock. 3) Personal safety a) Stay alert, watch what you are doing and use common sense when operating a power tool.
- Page 7 4) Power tool use and care a) Do not force the power tool. Use the correct power tool for your application. The correct power tool will do the job better and safer at the rate for which it was designed. b) Do not use the power tool if the switch does not turn it on and off.
-
Page 8: Application
2. APPLICATION ■TURN OF THE NUT TIGHTENIG WRENCH is an electric tool for tightening High Strength Hexagonal Bolts/Nuts according to Turn-of-Nut Method. PRECAUTIONS FOR USE ■ To prevent accidents or personal injury read and follow all instructions listed below. DANGER ●... - Page 9 DANGER ●Never put hand in the turning circle of reaction bar during operation. The reaction bar rotates in the reverse direction. ○If the wrench is started, the reaction bar will turn in the direction opposite to the rotation of nut. There is a risk that finger might be pinched by reaction bar and reaction-member.
- Page 10 WARNING ● Beware of electric shock. ○ Never use the wrench when moisture is present such as rain or snow. ○ Never touch the plug with wet hands. Failure to follow these instructions may result in electric shock, fire or electric leakage.
- Page 11 WARNING ● Avoid overloading. ○ Use the wrench and its accessories within the rated specifications. An overloaded wrench and its accessories may result in the malfunction of the wrench which may cause accidents or personal injury. ● Properly install the sockets as described in this manual. Incomplete installation may result in accident and personal injury.
- Page 12 WARNING ● Store the wrench in the metal case and place it in protected storage when not in use. ○ Store the wrench in a secure, dry location to keep any unauthorized personnel away. Failure to follow these instructions may result in malfunction or accidents. ●...
- Page 13 WARNING ● Immediately check the wrench if it is dropped or impacted. ○ Check for deformation, crack, damage and other abnormality. Stop using the wrench if any abnormality is found. ○ Do not use the wrench if any problems are found. Failure to follow these instructions may result in electric shock, fire or burn accidents.
- Page 14 CAUTION ● Use Commercial power supply to operate the wrench. ● Follow the instructions below when using generator. ■ Use 50-60Hz (AC) sinusoidal power supply without high harmonic wave. Power supply including high harmonic wave may cause malfunction or breakage of the wrench. ■...
- Page 15 ■ Always wear safety helmet. ● Use genuine accessories and attachments manufactured by TONE CO., Ltd. ■ Use the genuine accessories mentioned in this instruction manual or TONE’s general catalog. Failure to follow these instructions may result in malfunction or accidents. - 14 -...
- Page 16 CAUTION ● Do not connect multiple plugs to a single outlet by using a multiple outlet adaptors. Over current may cause fire, accidents or malfunction. ● Do not abuse the electric cord. ■ Never use the electric cord for carrying, pulling or unplugging the power. ■...
- Page 17 MEMO - 16 -...
-
Page 18: Part Name & Accessories
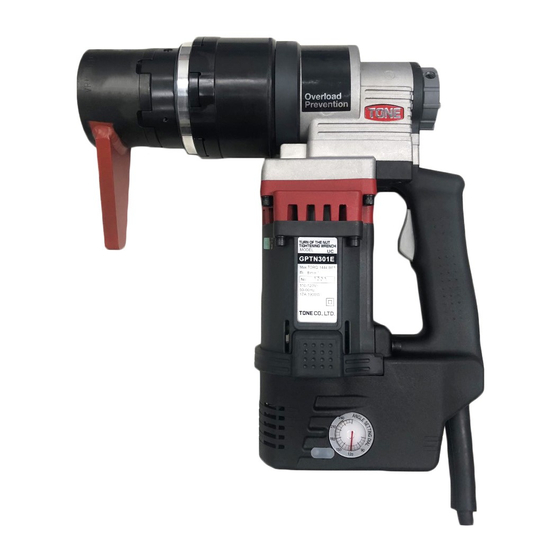
4. PART NAME & ACCESSORIES Part Name Internal Gear Bar Socket Set Screw Main Body Change Lever Trigger Switch Rating Plate Motor Carbon Brushes Angle Setting Dial Red LED Green LED Graduation Accessory Plug Electric Cord Instruction Metal Case (-)Driver for Manual (-)Driver for Bar Socket... - Page 19 Accessories Model Bar Socket Accessories ・(-)Driver GPTN241E-UC HRU41T For Bar Socket GPTN301E-UC VRU46T For Angle Setting Dial GPTN331E-UC VRU50T ・Instruction Manual ・Metal Case GPTN391E-UC XRU60T GPTN451E-UC XXRU60T ● Contact your distributor for the accessories above and other optional accessories. - 18 -...
-
Page 20: Before Use
5. BEFORE USE WARNING ● Check the following contents before connecting the plug into a power source. Failure to follow these instructions may result in serious injury due to accidental starting, ○ Inspection of the wrench Check for any deformation, crack or damage on the wrench body, sockets and accessories before use. -
Page 21: Changing Accessories
6. CHANGING ACCESSORIES ○ Remove bar socket form the wrench by unscrewing set screws with (-) driver. Do not remove the set screws completely from outer socket holder. Outer Socket Holder Bar Socket Wrench Body Set Screw ○ Select adequate bar socket for the bolts being tightened. ○... - Page 22 WARNING ● There should be no gap between the bar socket and the wrench. A gap invites accidents or breakage of the sockets or the wrench body. - 21 -...
-
Page 23: Operating Procedure
7. OPERATING PROCEDURE BEFORE OPERATION 【Snug Tightening】 Tighten the bolts /nuts to remove the gap between the nut and the grip. 【Marking】 Put the straight line mark on the bolt, nut, washer and grip as the drawing below after finishing the “Snug Tightening”. - 22 -... - Page 24 1.Tightening Operation ①Set the change lever or switch to “R” (clockwise) position. ※When tightening left handed screw, set the lever or switch to ”L”(counterclockwise) position. ① ②Adjust the angle setting dial to target angle with (-) a screw driver. 2 4 0 2...
- Page 25 2.Loosening Operation ①Set the change lever or switch to “L” (counterclockwise) position. ※When tightening left handed screw, set the lever or switch to ”R”(clockwise) position. ① ②Adjust the angle setting dial to the 2 4 0 maximum angle with (-) a screw driver. 2...
- Page 26 DANGER ●Never put hand in the turning circle of reaction bar during operation. The reaction bar rotates in the reverse direction. Negligence might cause accidents or injury. WARNING ●Set target angle as well as the change lever or switch while electric motor is stopping.
-
Page 27: Tightening Angle
8. TIGHTENING ANGLE 1. Adjustment of Tightening Angle Setting ■ Adjust tightening angle setting before tightening when high accuracy tightening angle control is required. Warming up for 5 minutes with no load. Mandatory for precise tightening angle Adjust angle setting dial to desired angle. Wrench must be shut off when adjusting angle setting dial. - Page 28 WARNING ● Adjustment of the tightening angle setting has to be done daily before operation and when tightening conditions change. ● Periodically overhaul of the wrench is recommended to implement steady and proper turn of the nut tightening. ● Never tighten the same bolt/nut twice. (Never apply too much torque to the same bolt/nut.) Failure to follow this instruction may result in breakage of the bolt/but, malfunction and personal injury.
-
Page 29: Explanation Led Indication
9. EXPLANATION ON LED INDICATION The TURN OF THE NUT TIGHTENIG WRENCH is provided with GREEN and RED LED lights that indicate whether the tightening operation has been successfully completed or any trouble has occurred. : Lights Out : Light On : Quick On &... -
Page 30: Inspection & Maintenance
○ Store the wrench in the metal case after operation and keep it dry. ○Carbon brushes must be regularly inspected and replaced with the new genuine TONE carbon brushes when the brush length becomes less than 5mm (3/16”) or 6mm (1/4”). - Page 31 ○ Replace carbon brush as the drawing below. Motor Let two “A” portion coincide Carbon Brush Brush Cap ○ Overhaul must be carried out every 6 months or 10,000 tightening, whichever comes first. Contact your distributor for overhaul. - 30 -...
-
Page 32: Feature
11. FEATURE Feature ○ Prevent the over limit function. ○ The wrench stops automatically when the preset angle is reached. ○ Double Insulated Electric Wrench. 12. SPECIFICATIONS Specifications GPTN GPTN GPTN GPTN GPTN Model 241E-UC 301E-UC 331E-UC 391E-UC 451E-UC Frequency 50-60Hz Voltage 110-120V... -
Page 33: After Sales Service
13. AFTER SALES SERVICE ● Use the wrench properly in accordance with the cautions and warnings mentioned in this instruction manual. ● If there is a tool failure, provide the model number, serial number and date of purchase along with the details of the failure when contacting your distributor. - Page 34 MEMO - 33 -...
- Page 35 MEMO - 34 -...
- Page 36 IMKA081...
Need help?
Do you have a question about the GPTN241E-UC and is the answer not in the manual?
Questions and answers