Table of Contents
Advertisement
Quick Links
MicroLinx Series L
Electronic Metering Pump
Product Manual
Important Safety Instructions
Read all warnings and instructions in this manual.
Save all instructions.
C
US
Advantage Controls
4700 Harold-Abitz Dr.
Muskogee, OK 74403
Phone: 800-743-7431
Fax: 888-686-6212
www.advantagecontrols.com
support@advantagecontrols.com
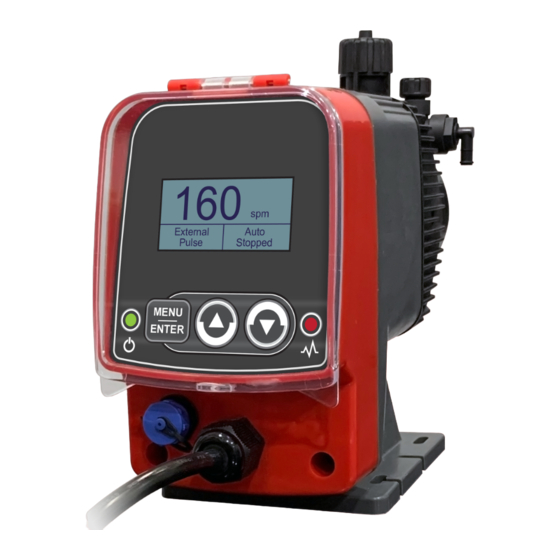
160
spm
External
Auto
Pulse
Stopped
MENU
ENTER
1
7/2022
Advertisement
Table of Contents

Related Manuals for Advantage Controls MicroLinx L Series


Summary of Contents for Advantage Controls MicroLinx L Series
- Page 1 Electronic Metering Pump Product Manual Important Safety Instructions Read all warnings and instructions in this manual. Save all instructions. External Auto Pulse Stopped MENU ENTER Advantage Controls 4700 Harold-Abitz Dr. Muskogee, OK 74403 Phone: 800-743-7431 Fax: 888-686-6212 www.advantagecontrols.com support@advantagecontrols.com 7/2022...
-
Page 2: Table Of Contents
Trouble Shooting ................22 Manufacturer’s Product Warranty Advantage Controls warrants units of its manufacture to be free of defects in material or workmanship. Liability under this policy extends for 24 months from date of installation. Liability is limited to repair or replacement of any failed equipment or part proven defective in material or workmanship upon manufacturer’s examination. -
Page 3: Introduction
Introduction This manual covers all facets of operation of the Advantage MicroLinx pump, including unpacking, mounting, electrical and plumbing connection, and start-up. Safety, maintenance and repair, warranty, and factory information is also provided. Please read this manual completely before proceeding. Observe safety protocols and heed all warnings and precautions. -
Page 4: Unpacking
Unpacking The MicroLinx pump has been shipped as a complete package, ready for installation.If the shipping carton shows any signs of damage, notify the shipping company immediately upon receipt. Advantage Controls cannot be held responsible for damage from shipping. Unpack the carton and insure the following items are present: 1. -
Page 5: Installation
Always adhere to your local plumbing codes and requirements. Check local plumbing codes for guidelines. Advantage Controls is not responsible for improper installations. If you are pumping downhill or into low or no system pressure, a back pressure/anti-syphon device such as Advantage’s Three Function Valve should be installed to prevent over pumping or syphoning. - Page 6 Wall Mounting The fluid end portion (head assembly) of the pump is set up to accommodate mounting of the pump to the solution container, either as a flooded suction, or a suction lift. The pump head must be kept in a vertical po- sition for proper operation.
-
Page 7: Start-Up
Start-Up Priming the Pump Plug in pump. Set the strokes per minute to maximum speed (see 2.2 Manual section on pg 9). While pump is operating, if fluid begins moving, no further priming is required. If fluid is not moving, open bleed valve approximately one turn until fluid begins to move. -
Page 8: Menu Navigation
30.0% 30.0% PULSE 60 STROKES/MIN 60 STROKES/MIN 30.0% PULSE PULSE Menu Navigation 60 STROKES/MIN MENU PULSE ENTER MENU MENU MENU / ENTER - Used to MENU ENTER ENTER confirm choices as well as ENTER enter the config screen from MENU the run status screen. - Page 9 Config Menu TIMERS This is the main configuration menu. Use the Up/Down arrows (while selection choice is flashing) to change to a different menu. Press Menu/ MANUAL CLOCK SET Enter to confirm selection. MULT/DIV PASSWORD mA IN WIFI-ON OFF - Select to stop pump from operating.
- Page 10 Multiply/Divide This is where you select the MULT/DIV menu. TIMERS MANUAL CLOCK SET Use the Up/Down arrows (while selection choice is flashing). MULT/DIV PASSWORD Press Menu/Enter to confirm selection. mA IN WIFI-ON This will display the MULT/DIV submenu. Use the Up/Down arrows (while selection choice is flashing). PULSES IN will toggle Multiply / Divide with each press of the Menu/ Enter button.
- Page 11 Timers TIMERS This is where you select the TIMERS menu. MANUAL CLOCK SET Use the Up/Down arrows (while selection choice is flashing). MULT/DIV PASSWORD Press Menu/Enter to confirm selection. mA IN WIFI-ON Timers: WM Timer, Recycle, Stop Close [Open], 28-Day, 1.0% Batch.
- Page 12 2.5.2 Recycle Timer This is where you select the RECYCLE submenu. WM TIMER 28 DAY RECYCLE BATCH Use the Up/Down arrows (while selection choice is flashing). STOP CLOSE Press Menu/Enter to confirm selection. CONFIG Use the Up/Down arrows to select the ON CYCLE minutes. Press Menu/Enter to confirm selection.
- Page 13 2.5.5 Batch Timer This is where you select the BATCH submenu. WM TIMER 28 DAY RECYCLE BATCH Use the Up/Down arrows (while selection choice is flashing). STOP CLOSE Press Menu/Enter to confirm selection. CONFIG Use the Up/Down arrows to select the RUN TIME hour. Press Menu/Enter to confirm selection.
- Page 14 Password This is where you select the PASSWORD menu. TIMERS MANUAL CLOCK SET Use the Up/Down arrows (while selection choice is flashing). MULT/DIV PASSWORD Press Menu/Enter to confirm selection. mA IN WIFI-ON This will display the PASSWORD screen. Use the Up/Down arrows (while selection choice is flashing) to change the value from 0-9.
-
Page 15: Wifi Connection
AirAdvantage App WiFi Connection Step 1: Step 2: Open the AirAdvantage Press "Add Device" or app. the "+" button. Press the "Linx" button. Step 3: Step 4: Enter a custom Name. The pump will be added to the list. Enter the pump's Wifi SSID in the Serial Press the pump name or Number field. - Page 16 Step 7: Step 8: Connected successfully. Pump run screen. Press "OK" to continue. Press the "Configure" button to continue. Step 9: Configure screen. Press a button to make changes as previously described in this manual.
- Page 17 Browser Manual WiFi Connection Step 1: Step 2: Open Wifi connections on Enter the password. your device. Note: This is located on Press the connection the pump's Wifi SSID listed as the pump's Wifi label on top of the pump. SSID.
-
Page 18: External Signal Cable Wiring
External Signal Cable Wiring ML-CABLE-7P-6 1 - Red 2 - Black 3 - Blue 4 - White 5 - Orange 6 - Green MicroLinx Pump Connections 1 - Red = External auto-stop 2 - Black = External auto-stop 3 - Blue = Pulse in 4 - White = (+) 4-20mA input 5 - Orange = Pulse in 6 - Green = (-) 4-20mA input... -
Page 19: Liquid End Diagram
PVDF Liquid End Diagram Item Description Complete Head Kit* Injection Valve Foot Valve Suction Valve Discharge Valve Priming Valve Assembly Degassing Valve Assembly Pump Head Priming Tube Assembly Priming Tubing Head Bolts Diaphragm Support Ring Shaft Seal Discharge Tubing Suction Tubing Weight *Complete Head Kit includes items:... -
Page 20: Replacement Parts
Replacement Parts Getting the right materials of construction for your spare parts is easy. Using positions 6-9 of the pump model number, example: L30X1-KFCV. Find the assembly needed and add the codes of your pump’s liquid end after the standard prefix part number for the assembly. NOTES: 1. -
Page 21: Maintenance
Maintenance The Advantage pump is designed for long service life with minimum maintenance. If for any reason, maintenance is necessary or desirable, the pump is easily maintained. Before any maintenance or service is performed, observe the following precautions: 1. Disconnect the pump from power source. 2. -
Page 22: Trouble Shooting
Trouble Shooting PROBLEM CAUSE REMEDY Pump does Air trapped in suction line Straighten suction line so as to eliminate high spots. not achieve or maintain Foot valve contaminated Inspect foot valve screen and assure that foot valve is in a vertical position prime or improperly installed below fluid level. - Page 24 Get the Advantage in Water Treatment Equipment Advantage Controls can give you the Advantage in products, knowledge and support on all of your water treatment equipment needs. Cooling Tower Controllers Boiler Blow Down Controllers Blow Down Valve Packages Bleed Valves...
Need help?
Do you have a question about the MicroLinx L Series and is the answer not in the manual?
Questions and answers