Advertisement
Quick Links
Getting Started Guide
IAR KickStart Kit™ for Renesas R-IN32M4-CL3
This guide briefly describes how to get started using IAR Embedded
Workbench® with the I-jet Lite debug interface, to run an example
application on the target system R-IN32M4-CL3 Board (Board name is
SBEV-RIN32M4CL3).
For more detailed information, see the IAR Embedded Workbench® user
guides, which can be reached from the Help menu or the IAR
Information Center in the IAR Embedded Workbench IDE.
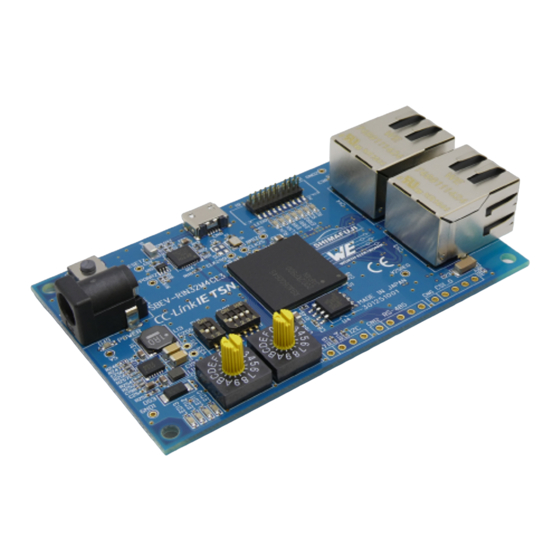
R-IN32M4-CL Board (The board name is SBEV-RIN32M4CL3)
R-IN32M4-CL Cortex-M4 device
User LEDs
User SWs
Reset button
JTAG/SWD/ETM Trace connector 20 pin 0.05"
2xEthernet (RJ45) connectors
Power up through USB-micro B connector or with external power supply
RoHS/CE compliant
I-jet Lite debug probe*
MCU support: ARM7/9/11, Cortex-M/A/R devices
JTAG/SWD debugging support
Flash download into supported evaluation boards
Up to 5V target interface voltage
GS-RIN32M4-CL3
Hardware Features
1
Advertisement

Related Manuals for Renesas IAR KickStart Kit R-IN32M4-CL3


Summary of Contents for Renesas IAR KickStart Kit R-IN32M4-CL3
- Page 1 Getting Started Guide IAR KickStart Kit™ for Renesas R-IN32M4-CL3 This guide briefly describes how to get started using IAR Embedded Workbench® with the I-jet Lite debug interface, to run an example application on the target system R-IN32M4-CL3 Board (Board name is SBEV-RIN32M4CL3).
- Page 2 MIPI-20 cable and USB-micro cable Fully integrated with IAR Embedded Workbench for Arm (v8.50 or later) CE compliant * Used with starter kit only. For more advanced debugging features, please choose IAR I-jet debug probe. GS-RIN32M4-CL3...
- Page 3 Install IAR Embedded Workbench for ARM 1 Download the software and documentation for the R-IN32M4-CL3 Starter Kit board from http://www.iar.com/kit_updates. 2 Run the software installation .exe file, it may take a while for the installation files to unpack. 3 Click Install IAR Embedded Workbench® for ARM and follow the prompt instructions to install the product.
- Page 4 You can download the example projects from the web site of Renesas Electronics: https://www.renesas.com/eu/en/products/factory-automation/r-in32m4-cl3.html#sampleCodes Note: To use the example projects, you need to register “My Renesas”. and you need to prepare CC-Link IE TSN (Master) MELSEC iQ-R. Please refer to the user manual comes with the Renesas Electronics example project.z...
- Page 5 Notes: How to use sample program is described in the user manual. “rin32m4-ccietsn.pdf” in sample program you downloaded from My Renesas *The board name of this starter kit is written “SBEV-RIN32M4CL3” in this manual. To explore the C-SPY debugging features or change the I-jet Lite settings, choose the View and I-jet/JTAGjet menu.
-
Page 6: Board Overview
Board overview JTAG/SWD/Trace LEDs Reset SW Power Ethernet Rotary-SW DIP-SW Mode setting SW1-1 SW1-2 Rotary-SW CC-Link IE TSN CC-Link IE Field DIP-SW Boot Mode 内蔵発振器 1 (Defalt) SerialFlash(Defalt) External 2 (Defalt) IRAM Internal(Defalt) Figure 1 – R-IN32M4-CL3 Board layout Target power supply for the evaluation board We recommend supplying power via the USB connector for further use of the evaluation board. - Page 7 Troubleshooting If you are unable to find the cause of a problem, try resetting the evaluation board by using the reset button on the board. Then restart the C-SPY Debugger in the IAR Embedded Workbench IDE. You can also try disconnecting and reconnecting the power to the evaluation board, pressing the reset button and then restarting C-SPY.
Need help?
Do you have a question about the IAR KickStart Kit R-IN32M4-CL3 and is the answer not in the manual?
Questions and answers